Flash layers tutorial: Difference between revisions
mNo edit summary |
m (Text replacement - "<pageby nominor="false" comments="false"/>" to "<!-- <pageby nominor="false" comments="false"/> -->") |
||
| Line 1: | Line 1: | ||
{{Incomplete}}{{Flash tutorial|CS3, CS4, (CS5, CS6)|beginner|}} | {{Incomplete}}{{Flash tutorial|CS3, CS4, (CS5, CS6)|beginner|}} | ||
<pageby nominor="false" comments="false"/> | <!-- <pageby nominor="false" comments="false"/> --> | ||
This entry is part of the [[Flash tutorials]]. | This entry is part of the [[Flash tutorials]]. | ||
Latest revision as of 18:17, 22 August 2016
This entry is part of the Flash tutorials.
Introduction
- Learning goals
- Learn how to use layers
- Flash/CS level
- Flash CS3 - CS6
- Prerequisites
- Flash CS3 desktop tutorial or Flash CS4 desktop tutorial or Flash CS6 desktop tutorial. It's probably a good idea to use a layout similar to the ones I suggest there.
- You also may first look at the first part of the Flash drawing tutorial.
- Next steps
- One of the basic animation tutorials
- Quality and level
- Screen captures were made with CS3, but the overall logic is the same for CS4 to CS6.
- This text should technical people get going. It's probably not good enough for beginners, but may be used as handout in "hands-on" class. That is what Daniel K. Schneider made it for...
- It aims at beginners. More advanced features and tricks are not explained here.
Introduction
Layers help you deal with more complex Flash projects. Working with layers has several advantages:
- You can draw and edit objects in one layer without affecting objects in another layer.
- You can lock layers (to protect their embedded objects from unwanted editing)
- You can hide layers, make them visible (i.e. you can see their objects in the workspace), or you can display just the outlines of their objects.
The layers tool is part of the Timeline panel.
Overview picture
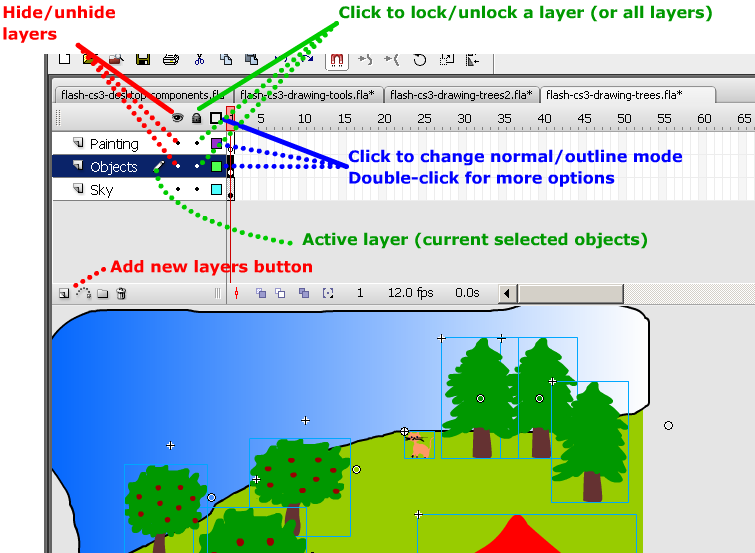
The layers tool is in the left part of the timeline. Annotations in the following screen capture highlight a few functionality we will further explain below.
Drawing in a layer
To draw, paint, or otherwise modify a layer simple click on the the layer name in the Timeline to make it active. A pencil icon next to it indicates that the layer is active.
Creating new layers and deleting layers
When you create a Flash document, it only contains a single layer, i.e. less than you need.
To create a new layer, either:
- Insert->Timeline->Layer
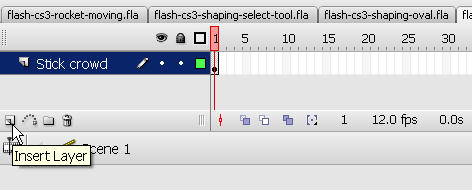
- Click on layer icon (left most item in the Edit bar just below the timeline)
- Right-click on an existing layer, then Insert Layer
As soon as you create a new layer, you should give it meaningful name. Right-click on its name (something like Layer 2) select Properties and change the name. Alternatively, to display this properties panel, just double-click on the layer name.
To delete a layer and its contents: Right-click->Delete Layer. You also can lock/hide other layers with this menu. Before you delete a layer make sure that you save its objects if you plan to keep them. You can insert them in the library as symbols or copy them to another layer.
Show only outlines of a layer
- Click on the rectangle next to the layer name. If this rectangle turns empty then you only should see outlines of its objects.
- You also can change the outline color by double-clicking on the rectangle. E.g. if your background is green (like the grassy hills in our example), the outline should be of a different color.
Lock and hide layers
Click on the dots below the appropriate hide/lock/display icons in the panel to apply locking/hiding/displaying to a single layer, or on the icons themselves to apply an operation to all layers (e.g. lock them all).
TIP: Always lock all layers and then just unlock the layer on which you are working. This way you can prevent yourself from making mistakes.
Moving layers
To move a layer in the stack simply grab it with the mouse and drag it up or down. Position of the layer has an influence on the order objects are drawn. E.g. if a moving object should pass in from of a tree and it doesn't, then drag the animation layer up or down.
Drawing order depends on the load order defined in the Publish Settings (File menu)
Example
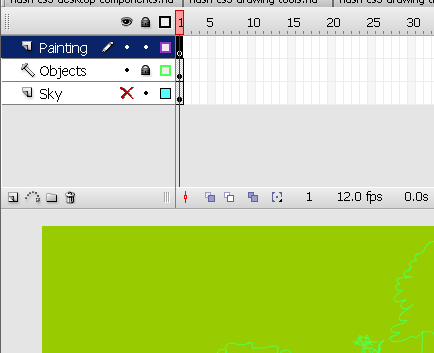
The following screen capture shows hidden and locked layers:
- The painting layer is active (the pencil is shown)
- The objects layer only shows outlines and in addition it is locked (the lock sign is on and the rectangle is empty. Its objects are drawn in light green, i.e. the color of the rectangle)
- The Sky layer is hidden (The red "X" sign is on).
Layer folders
Once your documents get really complex, you can organize layers into folders, e.g. one folder per task: Static objects, animations, background etc.
To create layer folders, either:
- click on the folder icon in the Edit bar (third item)
- or use Insert->Timeline->Layer Folder
You then can drag around layers. Hiding, locking etc. works more or less like with folders (try it out ...)
However, at some point you also will have to decide whether you really want to work with an "everything is in the main time line model". Consider organizing and planning your project with embedded movie clip objects (see the Flash embedded movie clip tutorial). Putting everything in the main time line is like programming with "goto's"...
Scenes
Once your animation gets bigger, you most certainly should break it down to several scenes. There is no urgency to work with scenes if you are new to Flash, but you should know about this now. Scenes are played in the order you defined them.
- To insert a new scene
- Menu Insert->Scene
- To rename/reorder the scenes
- Menu Window->Other Panels->Scene (SHIFT-F2)
- Then drag up or down the scenes
- To rename, double-click on a scene name in this panel.
- To navigate between scenes
- Either via the scenes panel, or the Edit Bar (displayed below the timeline). If you can't see it: Window->Toolbars->Edit Bar.
One advantage of using scenes is that you can just test a single scene (menu Control->Test->Scene).


