Flash CS3 frame-by-frame animation tutorial: Difference between revisions
m (using an external editor) |
m (using an external editor) |
||
| Line 10: | Line 10: | ||
;Prerequisites: | ;Prerequisites: | ||
:[[Flash CS3 desktop tutorial]] | :[[Flash CS3 desktop tutorial]] | ||
:[[Flash layers tutorial]] | :[[Flash layers tutorial]] | ||
:[[Flash drawing tutorial]] (at | :[[Flash drawing tutorial]] (for starters some of it, at some point you'll have to dig into it a bit) | ||
;Moving on | ;Moving on | ||
:The [[Flash]] article has a list of other tutorials. | :The [[Flash]] article has a list of other tutorials. | ||
| Line 22: | Line 22: | ||
; The executive summary | ; The executive summary | ||
Purpose: Frame-by-frame animation gives you very detailed control over the movie (since it's the technology animation pictures | Purpose: Frame-by-frame animation gives you very detailed control over the movie (since it's the technology used make animation pictures until recently when 2D and 3D computer animation techniques came into the existence). Disadvantage is that this is very time consuming work. Therefore, most often, designers use a combination between frame-by-frame animation and interpolation techniques (called tweening in Flash lingo). But often frame-by-frame animation is use to animate single objects that in turn can be used as part of larger Flash animations. | ||
Executive summary: | |||
* Insert drawings in various keyframes | * Insert drawings in various keyframes | ||
* Modify these drawings a little bit | |||
== The | == The timeline and keyframes == | ||
The principle of | The principle of most sorts of animations made with drawings - you also can script animations - is that you draw various versions of the same object in different frames. | ||
A frame is a drawing that is displayed at a given time. In the timeline, each little box is a frame and they are numbered from 1 to | A frame is a drawing that is displayed at a given time. In the timeline, each little box is a frame and they are numbered from 1 to whatever length your animation has. | ||
When you start drawing with Flash, everything is drawn by default into a first frame in [[Flash layers tutorial|layer]] 1. | When you start drawing with Flash, everything is drawn by default into a first frame in [[Flash layers tutorial|layer]] 1. | ||
[[image:flash-cs3-frames1.png|thumb|none|400px|The default keyframe is frame # 1]] | [[image:flash-cs3-frames1.png|thumb|none|400px|The default keyframe is frame # 1]] | ||
E.g. if you insert a letter, for example, you will see something like | E.g. if you insert a letter, for example, you will see something like in the screen capture just above. | ||
* The first frame in the timeline will have a dot inside | * The first frame in the timeline will have a dot inside. | ||
* The '''playhead''' showing the current frame (the red rectangle) sits on top of frame one. | * The '''playhead''' showing the current frame (the red rectangle) sits on top of frame one. | ||
Btw. if you feel display of timeline elements is too small, you can fix this with the time line options (little pull-down menu in the upper right). This menu also allows to display a preview of the animation (but takes up space of course). | Btw. if you feel that display of timeline elements is too small, you can fix this with the time line options (little pull-down menu in the upper right). This menu also allows to display a preview of the animation (but that takes up space of course). | ||
[[image:flash-cs3-timeline-options.png|thumb|500px|none|Time line options pulldown menu]] | [[image:flash-cs3-timeline-options.png|thumb|500px|none|Time line options pulldown menu]] | ||
== | == A simple letter after letter animation == | ||
The *.fla, *.swf and *.html files ''flash-cs3-frame-by-frame-hello.*'' can be found at | The *.fla, *.swf and *.html files ''flash-cs3-frame-by-frame-hello.*'' can be found at http://tecfa.unige.ch/guides/flash/ex/frame-by-frame-intro/ | ||
Now let's do a most simple frame-by-frame animation. | Now let's do a most simple frame-by-frame animation. | ||
| Line 53: | Line 54: | ||
; Step 1 | ; Step 1 | ||
We | We insert the letter "H" in frame 1 (alternatively you may start in frame 5, i.e. the user won't see the "H" when the frame loads. | ||
Anyhow, later on you always can add extra empty frames. | Anyhow, later-on you always can add extra empty frames. | ||
; Steps 2 to 5 | ; Steps 2 to 5 | ||
Now we repeat this procedure by adding new letters in new frames. So first we will transform frame 5 into a new keyframe. The '''important''' thing is to understand that there are two kinds of new keyframes: | Now we repeat this procedure by adding new letters in new frames. So first we will transform frame 5 into a new keyframe. The '''important''' thing is to understand that there are two kinds of new keyframes: | ||
# Blank ones that will clear the stage, i.e. | # Blank ones that will clear the stage, i.e. the objects will be gone. That's not what we want here. | ||
# Keyframes that carry "forward" contents of the keyframe before. We will use this one. | # Keyframes that carry "forward" contents of the keyframe before. We will use this one. | ||
The procedure is the following (see the picture) | The procedure is the following (see the picture below) | ||
* ''Right-click'' in a frame, then select ''Insert Keyframe'' ('''not''' insert blank keyframe). | * ''Right-click'' in a frame, then select ''Insert Keyframe'' ('''not''' insert blank keyframe). | ||
[[image:flash-cs3-frames2.png|thumb|none|500px|Editing keyframe #5]] | [[image:flash-cs3-frames2.png|thumb|none|500px|Editing keyframe #5]] | ||
Repeat this, until you incrementally spelled | Repeat this, until you incrementally spelled out "HELLO". | ||
; Step 6 | ; Step 6 | ||
| Line 73: | Line 74: | ||
Test if it works: | Test if it works: | ||
* Firstly you simply can move back an forth the '''playhead''' (red rectangle that sits on the top of the timeline) | * Firstly you simply can move back an forth the '''playhead''' (red rectangle that sits on the top of the timeline) | ||
* Then you can test the movie (menu ''Control->Test Movie''). | * Then you can test the movie (menu ''Control->Test Movie''). This will open a up a new window where you can see more or less what an end-user would see. | ||
; Step 7 | ; Step 7 | ||
Now we want to tune a few things: | Now we want to tune a few things: | ||
(1) You may not be happy that the movie starts with letter "H" | (1) You may not be happy that the movie starts with letter "H" already displayed. ''Right-Click'' on Frame 1 and ''Insert Frame'' (not a keyframe!). Then drag the black dot in the new frame 1 to frame 2. Finally insert a few new frames by click-right on frame 1 again. | ||
(2) Your Movie may be too slow or too fast. Flash animation is not time-based (as in SVG for instance) so you have to fix a frame rate. You can change the frame rate (number of pictures shown/second) in two ways: | (2) Your Movie may be too slow or too fast. Flash animation is not time-based (as in SVG for instance) so you have to fix a frame rate. You can change the frame rate (number of pictures shown/second) in two ways: | ||
* Click on an | * Click on an empty spot on the stage and change the rate in the properties panel that you should see below | ||
* Menu ''Modify->Document'' (CTRL-J) | * Menu ''Modify->Document'' (CTRL-J) | ||
For this animation about 15 frames are about right I think. | For this animation about 15 frames are about right I think. | ||
| Line 90: | Line 91: | ||
; Step 8 | ; Step 8 | ||
Now you can publish this as a web page. | Now you can publish this as a web page. | ||
* Make sure to | * Make sure to save the animation find in some place you can remember because Flash will put the exported Flash, HTML and JavaScript there. | ||
* Then, click on an empty spot in the stage and click the "Publish Settings" button or menu ''File->Publish Settings''. | * Then, click on an empty spot in the stage and click the "Publish Settings" button or menu ''File->Publish Settings''. | ||
* Click the ''publish'' button when you are happy with the settings. It will put all the necessary files in the same directory where your *.fla file sits. | * Click the ''publish'' button when you are happy with the settings. It will put all the necessary files in the same directory where your *.fla file sits. | ||
* Then click on either the Flash *.swf file or the *.html file and see if it works. | |||
As an exercise, you now can add extra keyframes after frame 1,5,10, etc. and move up or down letters. Alternatively, read on ... | |||
== Frame-by-frame shaky animation == | == Frame-by-frame shaky animation == | ||
Sometimes, e.g. in trailers | Sometimes, e.g. in trailers or in little advertisement boxes you can see some sort of shaky or jittery icons. Let's do one. | ||
The *.fla, *.swf and *.html files ''flash-cs3-shaking-hello.*'' can be found here: http://tecfa.unige.ch/guides/flash/ex/frame-by-frame-intro/ | The *.fla, *.swf and *.html files ''flash-cs3-shaking-hello.*'' can be found here: http://tecfa.unige.ch/guides/flash/ex/frame-by-frame-intro/ | ||
| Line 110: | Line 114: | ||
* In the "hello" layer, draw the word "Hello" with the pencil for a change | * In the "hello" layer, draw the word "Hello" with the pencil for a change | ||
* Select the pencil | * Select the pencil | ||
** put it into "Smooth mode" | ** put it into "Smooth mode" | ||
** Put Flash into object mode (circle in the options area of the tools panel) | ** Put Flash into object mode (circle in the options area of the tools panel) | ||
** Select a wide stroke (15px or more) | ** Select a wide stroke (15px or more) | ||
Go back to [[Flash_drawing_tutorial#Pencil_tool|drawing tutorial]] if you don't how to use object mode and set the smooth control for the pencil. | Go back to [[Flash_drawing_tutorial#Pencil_tool|drawing tutorial]] if you don't how to use object mode and how to set the smooth control for the pencil. | ||
; Step 3 - fix the hello word | ; Step 3 - fix the hello word | ||
* You may have to fix the Word "Hello", since despite smooth mode your drawing may not be so hot. | * You may have to fix the Word "Hello", since despite smooth mode your drawing may not be so hot. | ||
* Firstly use the Free Transform tool to adjust size, rotation, etc. | * Firstly use the Free Transform tool to adjust size, rotation, etc. of each letter. | ||
* | * Then use the Subselection tool to fix certain letters, probably your "o" will be ugly. | ||
* Finally select | ** To do good work, you need to set magnification to something like 400 (Menu ''View->Magnification''). | ||
** Then you can drag around the '''distortion points''' (squares) and kill some of these and/or move the '''curve control handles'' (dots attached to a line). | |||
** Sorry, no further explanation about [[Flash object transform tutorial|envelope transforms]] here. | |||
* Finally select all letters with the selection tool and center them. You may also may make the whole drawing bigger or smaller (just change the "W" property in the properties panel while everything is selected, i.e. see the screen capture below). | |||
So you should have (very) roughly something like this: | So now you should have (very) roughly something like this: | ||
[[image:flash-cs3-shaking-hello1.png|thumb|500px|none|Hello with the pencil]] | [[image:flash-cs3-shaking-hello1.png|thumb|500px|none|Hello with the pencil]] | ||
; Step 4 - Draw an oval | ; Step 4 - Draw an oval | ||
* Draw an oval or something around the "Hello" word if | * Draw an oval or something around the "Hello" word if you want. Use another layer for this and lock the "Hello" layer while you do this. See the [[Flash layers tutorial]] if you don't know how to use layers. | ||
* Again, use the subselection tool to fine tune, if you feel like. | * Again, use the subselection tool to fine tune, if you feel like. | ||
; Step 5 - Make a new keyframe | ; Step 5 - Make a new keyframe for both layers | ||
Create a new keyframe in frame 2 | Create a new keyframe in frame 2 (as explained above). | ||
* '' | * ''Right-click; Insert Key Frame'' for the "hello" layer | ||
* | * ''Right-click; Insert Key Frame'' for the "oval" layer | ||
* Now you should have a copy of both the "hello" word and the Oval in the new frame. | * Now you should have a copy of both the "hello" word and the Oval in the new frame. | ||
; Step 6 - Make changes | ; Step 6 - Make changes | ||
* Now you can make '''slight''' changes to to your drawings | * Now you can make '''slight''' changes to to your drawings in frame 2 (so make sure that frame 2 is selected !) | ||
* I changed color a bit for everything | * I changed color a bit for everything | ||
** Unlock the "hello" layer if you have to | ** Unlock the "hello" layer if you have to | ||
| Line 143: | Line 150: | ||
** You can do this for instance with the subselection tool or the Freetransform tool. (I only used the subselection tool and basically turned a few Curve control handles). | ** You can do this for instance with the subselection tool or the Freetransform tool. (I only used the subselection tool and basically turned a few Curve control handles). | ||
Below is a picture of the | Below is a picture of the slightly altered graphics: | ||
[[image:flash-cs3-shaking-hello2.png|thumb|400px|none|Hello with the pencil - second frame]] | [[image:flash-cs3-shaking-hello2.png|thumb|400px|none|Hello with the pencil - second frame]] | ||
| Line 165: | Line 172: | ||
; Step 1 - Break the rocket into components | ; Step 1 - Break the rocket into components | ||
* Break the rocket | * Break the rocket apart (''right-click->Break Apart''). You now should see various rectangles drawn around its various shapes. | ||
* Flames are made with 2 shapes (the two rectangles in the lower right) | * Flames are made with 2 shapes (the two rectangles in the lower right) | ||
[[image:flash-cs3-rocket-components.png|thumb|450px|none|A broken apart imported SVG rocket]] | [[image:flash-cs3-rocket-components.png|thumb|450px|none|A broken apart imported SVG rocket]] | ||
| Line 183: | Line 190: | ||
; Step 4 - Change the flames for each frame | ; Step 4 - Change the flames for each frame | ||
* I simply used the Free Transform tool and dragged the rectangle towards the lower right. | * I simply used the Free Transform tool and dragged the rectangle towards the lower right. | ||
* By doing this you | * By doing this you also might move the rectangle itself, just push it back underneath the rocket... (either with the arrows, or with the selection tool). | ||
* In order to do this right, you should each time put all the other layers (rocket plus one of the flames) in outline mode with the layers tool. | * In order to do this right, you should each time put all the other layers (rocket plus one of the flames) in outline mode with the layers tool. | ||
[[image:flash-cs3-rocket-yellow-flame.png|thumb|450px|none|Rocket with flames in layers]] | [[image:flash-cs3-rocket-yellow-flame.png|thumb|450px|none|Rocket with flames in layers]] | ||
; Step 4 | |||
* Test and enjoy :) | |||
* Publish, or alternatively just ''File->Export Movie''. This will just save a *.swf Flash animation file (no HTML). | |||
== Reuse frame-by-frame animations as movies == | == Reuse frame-by-frame animations as movies == | ||
| Line 195: | Line 206: | ||
; Step 1 - Import *.swf files into the library of a new Flash file | ; Step 1 - Import *.swf files into the library of a new Flash file | ||
* Create a new flash file (''File->New'') | * Create a new flash file (''File->New'') | ||
* | * Then import stuff you made: ''File->Import->Import to library'' | ||
** Select the flash-cs3-rocket.swf file | ** Select the flash-cs3-rocket.swf file | ||
** Do the same with the flash-cs3-shaking-hello.swf file | ** Do the same with the flash-cs3-shaking-hello.swf file | ||
Revision as of 20:22, 29 August 2007
<pageby nominor="false" comments="false"/>
Definition
Frame-by-frame animation means that to display one image after each other.
- Learning goals
- Learn about basic frame by frame animation
- Prerequisites
- Flash CS3 desktop tutorial
- Flash layers tutorial
- Flash drawing tutorial (for starters some of it, at some point you'll have to dig into it a bit)
- Moving on
- The Flash article has a list of other tutorials.
- Quality and level
- This text should technical people get going. It's probably not good enough for beginners, but may be used as handout in "hands-on" class. That is what Daniel K. Schneider made it for...
- It aims at beginners. More advanced features and tricks are not explained here.
- Materials (*.fla file you can play with)
- http://tecfa.unige.ch/guides/flash/ex/frame-by-frame-intro/
- The executive summary
Purpose: Frame-by-frame animation gives you very detailed control over the movie (since it's the technology used make animation pictures until recently when 2D and 3D computer animation techniques came into the existence). Disadvantage is that this is very time consuming work. Therefore, most often, designers use a combination between frame-by-frame animation and interpolation techniques (called tweening in Flash lingo). But often frame-by-frame animation is use to animate single objects that in turn can be used as part of larger Flash animations.
Executive summary:
- Insert drawings in various keyframes
- Modify these drawings a little bit
The timeline and keyframes
The principle of most sorts of animations made with drawings - you also can script animations - is that you draw various versions of the same object in different frames.
A frame is a drawing that is displayed at a given time. In the timeline, each little box is a frame and they are numbered from 1 to whatever length your animation has.
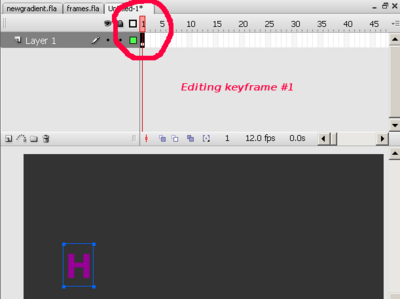
When you start drawing with Flash, everything is drawn by default into a first frame in layer 1.
E.g. if you insert a letter, for example, you will see something like in the screen capture just above.
- The first frame in the timeline will have a dot inside.
- The playhead showing the current frame (the red rectangle) sits on top of frame one.
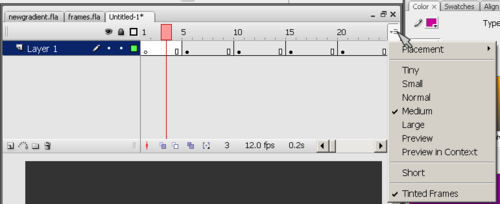
Btw. if you feel that display of timeline elements is too small, you can fix this with the time line options (little pull-down menu in the upper right). This menu also allows to display a preview of the animation (but that takes up space of course).
A simple letter after letter animation
The *.fla, *.swf and *.html files flash-cs3-frame-by-frame-hello.* can be found at http://tecfa.unige.ch/guides/flash/ex/frame-by-frame-intro/
Now let's do a most simple frame-by-frame animation.
We will produce an animation that will display the word "HELLO", one letter after each other. The principle is quite simple: We will insert new letters in new keyframes. One could do this by inserting "H" into keyframe 1, then add "E" to keyframe 2 etc. We will do something slightly different here, i.e. we insert a keyframe every 5 frames.
- Step 1
We insert the letter "H" in frame 1 (alternatively you may start in frame 5, i.e. the user won't see the "H" when the frame loads. Anyhow, later-on you always can add extra empty frames.
- Steps 2 to 5
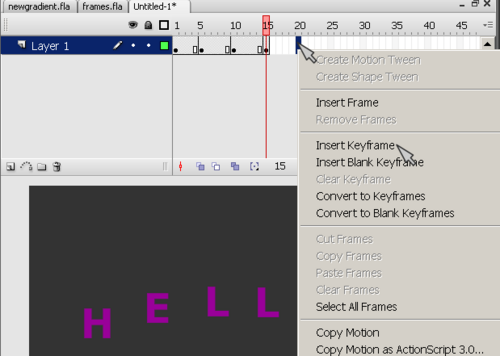
Now we repeat this procedure by adding new letters in new frames. So first we will transform frame 5 into a new keyframe. The important thing is to understand that there are two kinds of new keyframes:
- Blank ones that will clear the stage, i.e. the objects will be gone. That's not what we want here.
- Keyframes that carry "forward" contents of the keyframe before. We will use this one.
The procedure is the following (see the picture below)
- Right-click in a frame, then select Insert Keyframe (not insert blank keyframe).
Repeat this, until you incrementally spelled out "HELLO".
- Step 6
Test if it works:
- Firstly you simply can move back an forth the playhead (red rectangle that sits on the top of the timeline)
- Then you can test the movie (menu Control->Test Movie). This will open a up a new window where you can see more or less what an end-user would see.
- Step 7
Now we want to tune a few things:
(1) You may not be happy that the movie starts with letter "H" already displayed. Right-Click on Frame 1 and Insert Frame (not a keyframe!). Then drag the black dot in the new frame 1 to frame 2. Finally insert a few new frames by click-right on frame 1 again.
(2) Your Movie may be too slow or too fast. Flash animation is not time-based (as in SVG for instance) so you have to fix a frame rate. You can change the frame rate (number of pictures shown/second) in two ways:
- Click on an empty spot on the stage and change the rate in the properties panel that you should see below
- Menu Modify->Document (CTRL-J)
For this animation about 15 frames are about right I think.
(3) You may also align the letters. But you have to do this in the same way for each keyframe, else they will jump around, which actually may be an effect you like. To align objects, there is an align pane (Window->Align). Anyhow, next time make sure to place your objects exactly where they should be.
- Step 8
Now you can publish this as a web page.
- Make sure to save the animation find in some place you can remember because Flash will put the exported Flash, HTML and JavaScript there.
- Then, click on an empty spot in the stage and click the "Publish Settings" button or menu File->Publish Settings.
- Click the publish button when you are happy with the settings. It will put all the necessary files in the same directory where your *.fla file sits.
- Then click on either the Flash *.swf file or the *.html file and see if it works.
As an exercise, you now can add extra keyframes after frame 1,5,10, etc. and move up or down letters. Alternatively, read on ...
Frame-by-frame shaky animation
Sometimes, e.g. in trailers or in little advertisement boxes you can see some sort of shaky or jittery icons. Let's do one.
The *.fla, *.swf and *.html files flash-cs3-shaking-hello.* can be found here: http://tecfa.unige.ch/guides/flash/ex/frame-by-frame-intro/
- Step 1 - change stage size
- Define size and background color of your stage (I use 400x200 px this time). To do so, click with the selection tool on an empty spot of the stage and change the properties.
- This time, we will use two layers, so create 2 layers, call one of these "hello".
- Step 2 - draw a hello word
- In the "hello" layer, draw the word "Hello" with the pencil for a change
- Select the pencil
- put it into "Smooth mode"
- Put Flash into object mode (circle in the options area of the tools panel)
- Select a wide stroke (15px or more)
Go back to drawing tutorial if you don't how to use object mode and how to set the smooth control for the pencil.
- Step 3 - fix the hello word
- You may have to fix the Word "Hello", since despite smooth mode your drawing may not be so hot.
- Firstly use the Free Transform tool to adjust size, rotation, etc. of each letter.
- Then use the Subselection tool to fix certain letters, probably your "o" will be ugly.
- To do good work, you need to set magnification to something like 400 (Menu View->Magnification).
- Then you can drag around the distortion points' (squares) and kill some of these and/or move the curve control handles (dots attached to a line).
- Sorry, no further explanation about envelope transforms here.
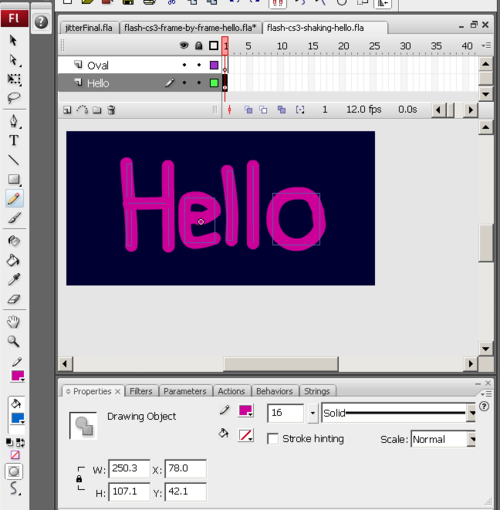
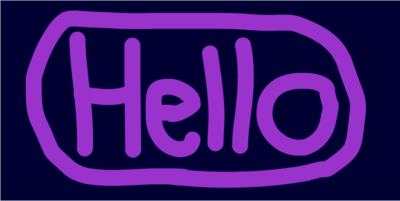
- Finally select all letters with the selection tool and center them. You may also may make the whole drawing bigger or smaller (just change the "W" property in the properties panel while everything is selected, i.e. see the screen capture below).
So now you should have (very) roughly something like this:
- Step 4 - Draw an oval
- Draw an oval or something around the "Hello" word if you want. Use another layer for this and lock the "Hello" layer while you do this. See the Flash layers tutorial if you don't know how to use layers.
- Again, use the subselection tool to fine tune, if you feel like.
- Step 5 - Make a new keyframe for both layers
Create a new keyframe in frame 2 (as explained above).
- Right-click; Insert Key Frame for the "hello" layer
- Right-click; Insert Key Frame for the "oval" layer
- Now you should have a copy of both the "hello" word and the Oval in the new frame.
- Step 6 - Make changes
- Now you can make slight changes to to your drawings in frame 2 (so make sure that frame 2 is selected !)
- I changed color a bit for everything
- Unlock the "hello" layer if you have to
- "Edit->Select All"
- Change the color in the properties window
- Then twist a little bit some letters and maybe the Oval
- You can do this for instance with the subselection tool or the Freetransform tool. (I only used the subselection tool and basically turned a few Curve control handles).
Below is a picture of the slightly altered graphics:
- Step 6 - Add other frames
Just two frames will do, but you can add more of course :)
This example was a bit more professional. We tried to select good stage size and made some efforts to get the drawings right.
Rocket science
Frame-by-frame animation is also quite useful if you want to create animated objects that you then can reuse in another animation.
The *.fla, *.swf and *.html files flash-cs3-rocket.* can be found here: http://tecfa.unige.ch/guides/flash/ex/frame-by-frame-intro/
I imported this rocket from Uncyclomedia Commons:
It's an SVG file that I first opened with Illustrator. I then copy/pasted it to Flash. See the Clipart article (i.e. the section on Importing to Flash
What we would like to do is to animate the flames.
- Step 1 - Break the rocket into components
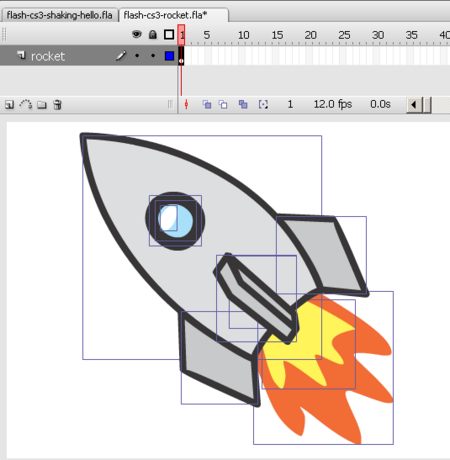
- Break the rocket apart (right-click->Break Apart). You now should see various rectangles drawn around its various shapes.
- Flames are made with 2 shapes (the two rectangles in the lower right)
- Step 2 - Put the flames into another layer
The easiest way is to use distribute these to other layers
- Select the 2 flames (hold down the SHIFT key and click on the orange and yellow parts
- Then Right-click->Distribute to layers
- Rename the two layers you created.
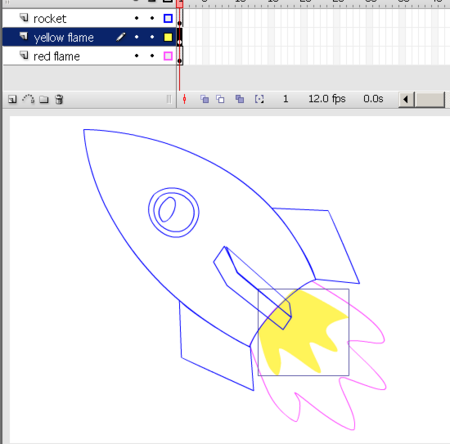
Now you should have something like in the screen dump below. I am positioned in the yellow flame layer and show the other two as outlines.
- Step 3 - Duplicate the layers in frames 2 and 3
- As explained above, in frame 2: Right-click->Insert Keyframe. Do this for each of the three layers
- Repeat this for frame 3.
- Step 4 - Change the flames for each frame
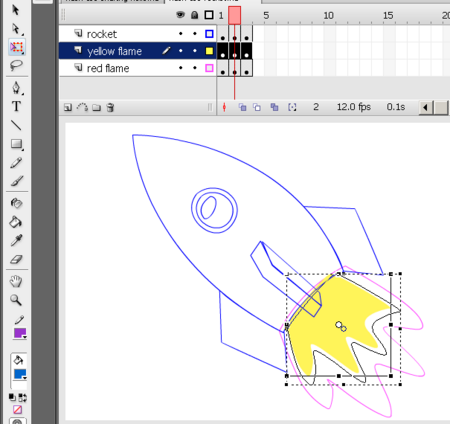
- I simply used the Free Transform tool and dragged the rectangle towards the lower right.
- By doing this you also might move the rectangle itself, just push it back underneath the rocket... (either with the arrows, or with the selection tool).
- In order to do this right, you should each time put all the other layers (rocket plus one of the flames) in outline mode with the layers tool.
- Step 4
- Test and enjoy :)
- Publish, or alternatively just File->Export Movie. This will just save a *.swf Flash animation file (no HTML).
Reuse frame-by-frame animations as movies
The flash files we just created can be used as components in new Flash animation.
The *.fla, *.swf and *.html files flash-cs3-rocking-hello.* can be found here: http://tecfa.unige.ch/guides/flash/ex/frame-by-frame-intro/
- Step 1 - Import *.swf files into the library of a new Flash file
- Create a new flash file (File->New)
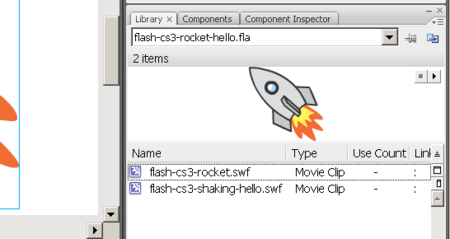
- Then import stuff you made: File->Import->Import to library
- Select the flash-cs3-rocket.swf file
- Do the same with the flash-cs3-shaking-hello.swf file
You now have a nice rocket and a flashing hello in your library:
- Step 2 - Drag the symbols (movies) to the stage
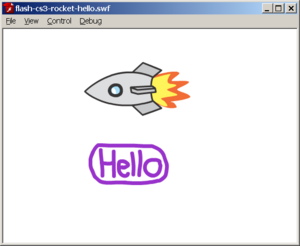
- Now you rocket is too big :(
- No problem. Use the Free Transform tool to make it smaller and to rotate
- Hold down the SHIFT key when you resize it from a corner !
Here is the result:
- Step 3 - Learn about motion animation
See the Flash motion tweening tutorial and before this enjoy the flying rocket:
Links
Example materials
Example files used (including *.fla source) can be found here:
- Click on either an *.html or *.swf file to see.
- Get just the *.fla file if you want to make modifications. The standard copyright of this wiki applies.
