Flash layers tutorial: Difference between revisions
Jump to navigation
Jump to search
m (using an external editor) |
m (using an external editor) |
||
| Line 26: | Line 26: | ||
=== Overview picture === | === Overview picture === | ||
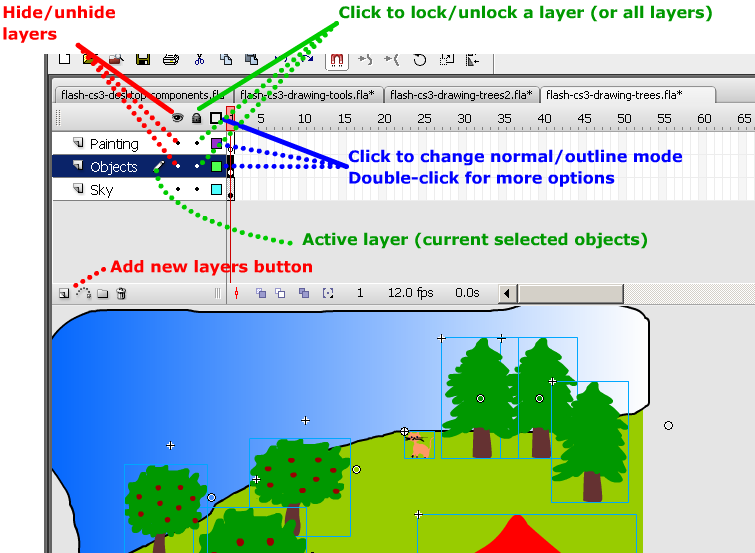
[[image: | [[image:cs3_layers_annotated.png|frame|none|The Flash CS3 Layers tool]] | ||
=== Drawing in a layer === | === Drawing in a layer === | ||
Revision as of 17:15, 7 August 2007
This article or section is currently under construction
In principle, someone is working on it and there should be a better version in a not so distant future.
If you want to modify this page, please discuss it with the person working on it (see the "history")
<pageby nominor="false" comments="false"/>
Definition
This is part of some Flash tutorials.
- Learning goals
- Learn how to use layers
- Prerequisites
- Flash CS3 desktop tutorial. It's probably a good idea to use a layout similar to the ones I suggest there.
- Quality and level
- This text should technical people get going. It's probably not good enough for beginners, but may be used as handout in "hands-on" class. That is what Daniel K. Schneider made it for...
- It aims at beginners. More advanced features and tricks are not explained here.
Introduction
Layers help you organize items for more complex document.
- You can draw and edit objects on one layer without affecting objects on another layer.
- You can lock layers (to protect from editing)
- You hide layers, make them visible in other layers, or just the outlines.
The layers tool is part of the Timeline panel.
Overview picture
Drawing in a layer
To draw, paint, or otherwise modify a layer simple click on the the layer in the Timeline to make it active. A pencil icon next to it indicates that the layer is active.
Creating new layers
Either:
- Insert->Timeline->Layer
- Click on layer icon (left most item in the Edit bar just below the timeline)
When you create a Flash document, it only contains a single layer.
