Stitch Era - vector graphics
<pageby nominor="false" comments="false"/>
Introduction
This is a beginner's tutorial for the Stitch Era embroidery software. It explains how create and edit vector graphics that later could be translated to embroidery objects (stitch sections).
There are three reasons for learning how to use vector graphics
- Repair/adjust vectorized bitmap (raster) images
- Work with imported vector graphics (as opposed to use the original source program)
- Draw vector art with Stitch Era
Of course, these three use cases can be combined in a project.
The Interface
When you start a new empty project you will find yourself automatically in the Artwork tool, i.e. the vector graphics environment as shown in the following picture.
At this point you now either can import artwork, e.g. like discussed in Stitch Era - simple digitizing or start drawing.
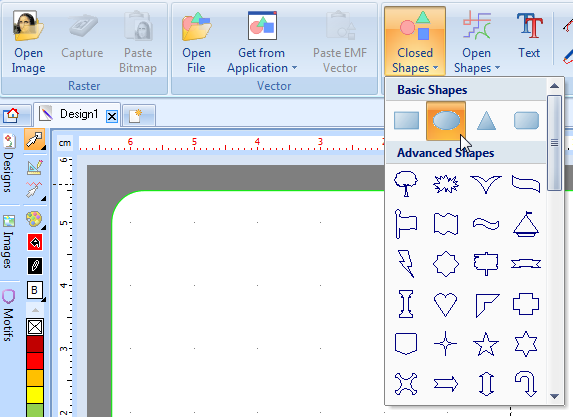
Let's insert an ellipse as shown below. Select the ellipse icon from the Closed shapes pull down menu, then move the mouse into the work area below and drag it.
If you aim to create a circle, you could watch the dimensions at the bottom of the Stitch Era screen. However, we suggest to draw an approximate object and then edit it's properties later.
After you inserted a first vector object or when you select one, the the interface will change and display the full tool set.
Firstly, you may want to change colors. Play with "fill color" and "border color". You also may notice the "Layout" tab in the top menu. It would allow you to change the size, position and rotation of the object and align/distribute several objects. More about this later.
Vector object properties
Fills and borders
Firstly, you must understand that vector objects like circles are made of two parts:
- The border (also called outline, stroke or line)
- The fill, i.e. the inside
In the format tab, by selecting one of the rectangles (see fig. below) you can select whether you want
- a fill-only object (Vectors-only body), i.e. the border is made invisible
- a stroke-only object (Vectors-only outline), i.e. the shape is made invisible
- an object that has both (Vectors outline + body).
For embroidery (as well as for other multi-media projects) you will work with all three.
Shape of vector objects
The shape of an object is defined by its border, or more precisely by so-called control points or nodes that will define the exact path of the border. Control points are either white or cyan and can be moved and curves connecting to the next nodes can be changed through handles represented as small little pink points.
Since borders are not defined by pixels but by control points, vector objects are scalable upwards or downwards. A drawing will remain the same whether it has the size of a bed linen or a shirt pocket or a football field.
In stitch era, there are different kinds of control points. These are defined by three parameters that one can change in the Nodes ribbon:
- Straight / curved sides. A straight node (point) will have a straight line to the nodes before and after the path defining the outline or simple stroke. Curved nodes have curved lines to the nodes before and after (unless one of these nodes is a straight node). Straight nodes show as rectangles.
- Normal nodes / corner node. Normal nodes are white. Corner nodes are shown as filled cyan nodes.
- Symmetric / uniform nodes. Symmetric and uniformed nodes are not visually distinguishable. However handles of uniform nodes may be handled independently.
In addition, a vector object is defined by its width, height, position and rotation. All of these can be manipulated through the eight grey rectangular controls that sit on the bounding box rectangle.
Size
You could change the size and x/y length of an object in two ways
- Click on the object. A so-called bounding box will appear and let you drag control points that define its dimensions
- Use the Layout tool
(more later ...)


