Stitch Era - adapting stitches: Difference between revisions
m (using an external editor) |
|||
| Line 59: | Line 59: | ||
Let's have a look at an example. | Let's have a look at an example. | ||
The following picture is a [http://www.openclipart.org/detail/97201/cartoon-ladybug-by-martouf cartoon ladybug] found at OpenClipArt.org. | The following picture is a [http://www.openclipart.org/detail/97201/cartoon-ladybug-by-martouf cartoon ladybug] found at OpenClipArt.org. Its eyes are made of three circles and difficult to auto-digitize. | ||
[[image:ladybug-coccinelle.svg|frame|none|Cartoon ladybug. Source: [http://www.openclipart.org/detail/97201/cartoon-ladybug-by-martouf Martouf/openclipart.org] ]] | |||
Let's what autodigitizing does: | |||
* Open the SVG in either Illustrator (preferably) or Corel. If you don't own either one you can try importing via Inkscape or else vectorize the PNG picture... | |||
* Import the SVG opened in Illustrator to Stitch Era with '''Artwork->Get from Application''' | |||
* Since the eyes are made of four layers (black head, white eye balls, black pupils and white pupil part) we should simplify. We do it the easy way: | |||
** Select all (CTRL-A) | |||
** '''Combine Vectors''' -> '''Simplify'''. This operation will punch all the objects on top through the objects underneath, i.e. we we will wind up with a simple flat structure | |||
[[image:stitch-era-ladybug-flat.png|frame|none|Flattened ladybug vector art]] | |||
* We then further simplify the drawing by removing the vector borders. | |||
** In the Object manager, select all the vectors that have borders and make them fills only (in the format panel on top, click on the Vectors Only Body rectangle) | |||
** Combine the 2 parts of the mouth (Combine->Addition) | |||
* For easy of stitching, move all the black vectors up and you should have something like this: | |||
[[image:stitch-era-ladybug-flat-borderless.png|frame|none|Flattened borderless ladybug vector art]] | |||
* '''Convert->To Embroidery''' | |||
* Select '''Art to Stitch (Intelligent)''' ... using default parameters | |||
Revision as of 12:52, 10 October 2011
Introduction
Although I don't really plan to investigate working at stitch level, it turned out that even simple vector-based and auto-digitized designs do gain from making changes at this very low level.
- Tutorial home page
- Stitch Era embroidery software
- Learning goals
- Be able kill, move and add stitches withing a stitch section
- Prerequisites
- Stitch Era embroidery software (in particular have a grasp of the workflow).
- Stitch Era - simple digitizing
- Stitch Era - adjusting stitch sections
- Related pages
- Stitch Era - trouble shooting
- Materials
- You can reuse the pictures. In the wiki, click on picture to make it larger, then click again and save it.
- Quality and level
- This text should technical people get going with Stitch Era. I use it an optional master degree course in educational technology.
- Next steps
- none so far ....
Two examples I encountered:
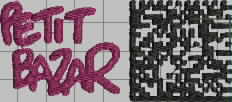
- In my first one-day SEU class (oct. 2011), someone wanted to create a fairly small QR tag. Digitizing is easy, since QR code only has one color (black) and clean lines. However, there are many jump stitches and instead of removing all these, you'd rather have them pass through the corners of the rectangles. Of course, a few will remain as you can see in the simulated picture below.
- Eyes are always a problem. Small circles are not auto-digitized or turn our to be rather slim and ugly ZigZags. One solution is to make these bigger, an other is to add stitches manually and/or move them.
More to come (hopefully) - Daniel K. Schneider 15:38, 7 October 2011 (CEST).
Moving a stitch
In order to enter stitch editing mode:
- Hit F12 (or select Edit Stitches in the upper left Designs panel
- Hit F11 to exit from this mode (or some other magic command)
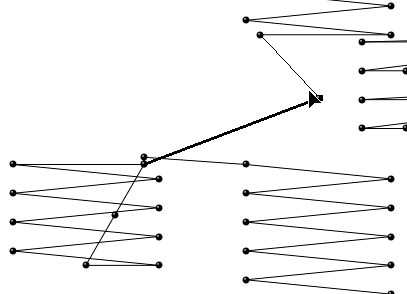
You now can drag stitches (hold down the mouse and do it). By default, only one point will move.
If you untick Keep in place then the whole group of stitches after the arrow will move. Try it to see :)
Btw. the QR code was embroidered and was recognized with a cell phone app.
Inserting a stitch
- Select a stitch somewhere
- You now can insert a stitch somewhere
- The "arrowed" stitch and the stitch after it will be connected
- In the left-most panel, select insert Insert
- Then click somewhere. Each click will inster a new stitch
- Hit ESC once you are done.
Let's have a look at an example.
The following picture is a cartoon ladybug found at OpenClipArt.org. Its eyes are made of three circles and difficult to auto-digitize.

Let's what autodigitizing does:
- Open the SVG in either Illustrator (preferably) or Corel. If you don't own either one you can try importing via Inkscape or else vectorize the PNG picture...
- Import the SVG opened in Illustrator to Stitch Era with Artwork->Get from Application
- Since the eyes are made of four layers (black head, white eye balls, black pupils and white pupil part) we should simplify. We do it the easy way:
- Select all (CTRL-A)
- Combine Vectors -> Simplify. This operation will punch all the objects on top through the objects underneath, i.e. we we will wind up with a simple flat structure
- We then further simplify the drawing by removing the vector borders.
- In the Object manager, select all the vectors that have borders and make them fills only (in the format panel on top, click on the Vectors Only Body rectangle)
- Combine the 2 parts of the mouth (Combine->Addition)
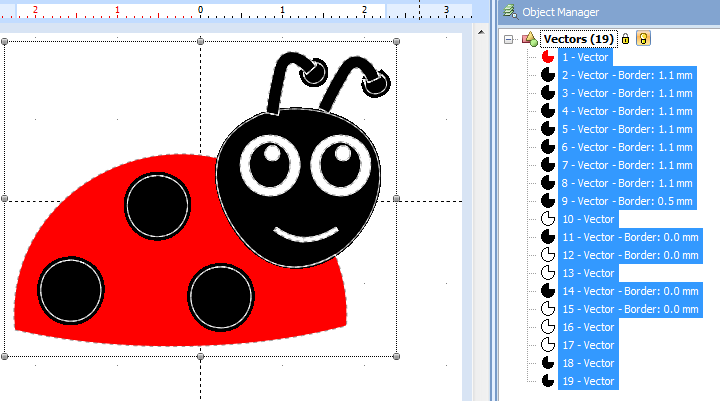
- For easy of stitching, move all the black vectors up and you should have something like this:
- Convert->To Embroidery
- Select Art to Stitch (Intelligent) ... using default parameters


