Stitch Era - adapting stitches: Difference between revisions
Jump to navigation
Jump to search


m (Created page with "{{stub}} == Introduction == Although I don't really plan to investigate working at stitch level, it turned out that even simple vector-based and auto-digitized designs do gain ...") |
m (using an external editor) |
||
| Line 5: | Line 5: | ||
Although I don't really plan to investigate working at stitch level, it turned out that even simple vector-based and auto-digitized designs do gain from making changes at this very low level. | Although I don't really plan to investigate working at stitch level, it turned out that even simple vector-based and auto-digitized designs do gain from making changes at this very low level. | ||
[[image:stitch-era-part-QR-code.png|frame|none|Part of a QR tag]] | |||
Two examples I encountered: | Two examples I encountered: | ||
* In my first one-day SEU class, someone wanted to create a fairly small [http://en.wikipedia.org/wiki/QR_Code QR tag]. Digitizing is easy, since | * In my first one-day SEU class (oct. 2011), someone wanted to create a fairly small [http://en.wikipedia.org/wiki/QR_Code QR tag]. Digitizing is easy, since QR code only has one color (black) and clean lines. However, there are many jump stitches and instead of removing these, you'd rather have them pass through the corners of the rectangles. | ||
* Eyes are always a problem. Small circles are not auto-digitized or turn our to be rather slim and ugly ZigZags. One solution is to make these bigger, an other is to add stitches manually and/or move them. | * Eyes are always a problem. Small circles are not auto-digitized or turn our to be rather slim and ugly ZigZags. One solution is to make these bigger, an other is to add stitches manually and/or move them. | ||
| Line 14: | Line 15: | ||
* Hit F12 (or select '''Edit Stitches''' in the upper left ''Designs'' panel | * Hit F12 (or select '''Edit Stitches''' in the upper left ''Designs'' panel | ||
* Hit F11 to exit from this mode (or some other magic command) | * Hit F11 to exit from this mode (or some other magic command) | ||
[[image:stitch-era-stitch-edit-mode.png|frame|none|The Stitch Edit tool / mode]] | |||
You now can drag stitches (hold down the mouse and do it). By default, only one point will move. | |||
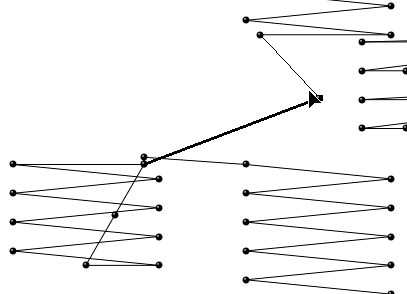
[[image:stitch-era-moving-a-stitch.png|frame|none|Moving a stitch and keeping the rest in place]] | |||
More to come - [[User:Daniel K. Schneider|Daniel K. Schneider]] 15:38, 7 October 2011 (CEST). | More to come - [[User:Daniel K. Schneider|Daniel K. Schneider]] 15:38, 7 October 2011 (CEST). | ||
Revision as of 15:43, 7 October 2011
Introduction
Although I don't really plan to investigate working at stitch level, it turned out that even simple vector-based and auto-digitized designs do gain from making changes at this very low level.

Part of a QR tag
Two examples I encountered:
- In my first one-day SEU class (oct. 2011), someone wanted to create a fairly small QR tag. Digitizing is easy, since QR code only has one color (black) and clean lines. However, there are many jump stitches and instead of removing these, you'd rather have them pass through the corners of the rectangles.
- Eyes are always a problem. Small circles are not auto-digitized or turn our to be rather slim and ugly ZigZags. One solution is to make these bigger, an other is to add stitches manually and/or move them.
Moving a stitch
In order to enter stitch editing mode:
- Hit F12 (or select Edit Stitches in the upper left Designs panel
- Hit F11 to exit from this mode (or some other magic command)

The Stitch Edit tool / mode
You now can drag stitches (hold down the mouse and do it). By default, only one point will move.

Moving a stitch and keeping the rest in place
More to come - Daniel K. Schneider 15:38, 7 October 2011 (CEST).