Microsoft Word 2003: Difference between revisions
| Line 113: | Line 113: | ||
Formatting elements inside the table can be same as the ones you use for ordinary text. | Formatting elements inside the table can be same as the ones you use for ordinary text. | ||
In the | In the Table->Insert>table dialog (first time you use it): | ||
* set number of columns and rows to 1 | * set number of columns and rows to 1 | ||
* Autofit to Window | * Autofit to Window | ||
| Line 119: | Line 119: | ||
This sort of works, However, tables don't work very well either in MS Word, e.g. you can't for instance define a margin around a table (MS margins just do padding inside the table). Use a blank line for this.... | This sort of works, However, tables don't work very well either in MS Word, e.g. you can't for instance define a margin around a table (MS margins just do padding inside the table). Use a blank line for this.... | ||
You can't insert something between 2 tables (huh I must be dreaming). So insert | You can't insert something between 2 tables (because if you insert a table after a table the two sort of seem to merge, huh I must be dreaming). So insert three blank lines and insert the table into the middle one. | ||
Finally, the best and quickest way to insert a new table is to insert a blank line (standard paragraph line), then select ''Table->Autoformat'' or the corresponding icon in the table part of the toolbar. Click on the table you want and then ''Apply''. | Finally, the best and quickest way to insert a new table is to insert a blank line (standard paragraph line), then select ''Table->Autoformat'' or the corresponding icon in the table part of the toolbar. Click on the table you want and then ''Apply''. | ||
[[image:word2003-using-tables-for-boxes.png|thumb|300px|none|Customize Word]] | [[image:word2003-using-tables-for-boxes.png|thumb|300px|none|Customize Word]] | ||
Of course, tables like most other features become a real nightmare when you try for real to understand how they work, i.e. how table styles would interact with text styles or how to set a table style to a fixed width so that when you click on the style a table could just exactly position itself with the precise margins. Forget it. You can't efficiently write real text with Word. Just a draft and then you have to make manual adjustments I guess. | |||
=== Inserting a Textbox === | === Inserting a Textbox === | ||
Revision as of 09:12, 16 August 2007
Introduction
I (Daniel K. Schneider) rarely use Word and when I have to I find it extremely difficult to produce moderately good looking text, e.g. of the kind that would be expected in a self-published textbook. In addition, Word does things to me I didn't ask for, e.g. create new styles or renumber items.
With a program like FrameMaker I can quite easily achieve what I want (in the past I also managed with formatting software) and it does not try to do things not told to do. Also I don't know anyone who even has a moderately good working knowledge to do things efficiently.
Therefore I will try to make an effort to write down a few tricks I might learn. I am particularly interested in:
- Having word executing my orders without helping me
- Creating larger text elements efficiently, e.g. vignettes with title, paragraphs of various forms and appropriate numbering, or figures that include a title, automatic number of the caption...
Btw I got the same problems with Open Office, actually I like it even less (except for the drawing program which is great).
General advice for Word 2003
So the goal is to use Word to write a real text. So far, I only have this much advice below ....
Use styles
That's so obvious that I won't go into it in detail.
To see, or change, the base of a style, modify the style. Via Format->Styles and Formatting you can display the Styles. This pane has five sections:
- On top: Current style: Click on it to modify
- Select All to select all text elements with this style, New Style to create a new style
- A list of the recently used styles
- A list of all other styles
- On the bottom, you can define which styles you want to see....
To print styles you have:
- File->Print
- Then change "Print What" to Styles
set up the toolbar
After a while you may want to use shortcuts (instead of the pulldown menus)
Select tools->Customize->Toolbars
- You can add/remove various groups of tools
Set your preferences
The basic idea is to turn off all "helpful" features, since they create havoc. Read Daiya's Setting Up Word.
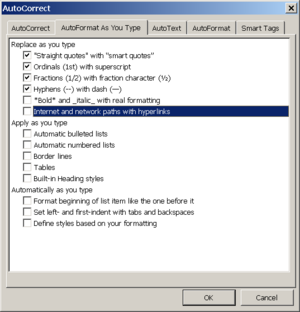
Select tools->Autocorrect Options and fix all tabs ...
- Fix autocorrecting
- This actually can't harm a lot, it even can be useful (but you may go over each in option and the long list in "Replace as you type"
- Fix AutoFormat As You Type
- Take most everything off
- Tools->Options->Edit->Prompt to Update Style; Prompt to update style
- Untick "Automatically update the style from now on" if by mistake it's on.
- When you create a style, "Add to template"
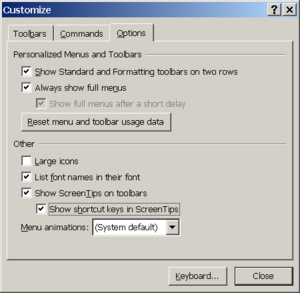
- Tools->Customize->Options
I use these:
How to manage special strands in a text
To problem is to find an efficient way to insert and specially mark various feature strands in a textbook, e.g. conclusions and summaries, lists of definitions, reference boxes, review questions, self-assessment (usually simple quizzes), small exercises etc.
In a modern textbook, these are usually marked as a "box", e.g. with some background color.
I didn't find an efficient way to do this. Below documentation for several attempts. I finally settled down to use tables ...
Multiple Styles
Make a style for each element you plan to have in these feature strands, usually:
- A title
- paragraphs
- bullets
- Maybe a caption
- A ending style (i.e an empty line with a tiny font).
Start by doing 1 style, e.g. the "normal" paragraph style.
- Define a font
- Define a background color: Modify Style->Format Border->
You also may add space after each kind of paragraph, but tick "don't add space between paragraphs of the same style" when you edit the paragraph style".
Example:
- Learning Goals Title
- Learning Goals Para
- Learning Goals Bullet
- Learning Goals End
Problem: I didn't manage to get the bullets right (unless I align them fully to the left and leave out spacing before or after. Here is how the 2 bad solutions (bullet and bullet2) look:
If anyone could help with this, I'd appreciate. An other solution is to give up color and just change the font, insert 2 horizontal lines, etc.
Section breaks
- Sections allow to break down a document in to several sections, each of which may have different formatting. E.g. used to separate the first pages from the rest.
- Probably not that useful, since removing one of these may crate havoc
Repurposing of tables
One possibility to get standardized boxes is to create a table with a single cell or maybe 2-3 cells in a single column.
You have to define a new table style and give it a name. Typically you want to make the following changes in the autoformat style, i.e. not in each table. (table->Table AutoFormat->modify style)
- Base style on Table Normal
- Change Background color
- Margins on top and bottom for the default cell. This will add some (colored) space on top and bottom (e.g. what is normally called "padding").
- Margins left of the table
Formatting elements inside the table can be same as the ones you use for ordinary text.
In the Table->Insert>table dialog (first time you use it):
- set number of columns and rows to 1
- Autofit to Window
- Tick "Remember ...."
This sort of works, However, tables don't work very well either in MS Word, e.g. you can't for instance define a margin around a table (MS margins just do padding inside the table). Use a blank line for this.... You can't insert something between 2 tables (because if you insert a table after a table the two sort of seem to merge, huh I must be dreaming). So insert three blank lines and insert the table into the middle one.
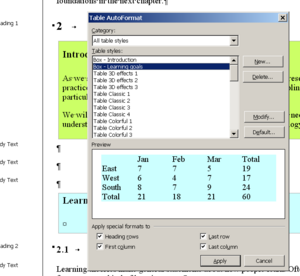
Finally, the best and quickest way to insert a new table is to insert a blank line (standard paragraph line), then select Table->Autoformat or the corresponding icon in the table part of the toolbar. Click on the table you want and then Apply.
Of course, tables like most other features become a real nightmare when you try for real to understand how they work, i.e. how table styles would interact with text styles or how to set a table style to a fixed width so that when you click on the style a table could just exactly position itself with the precise margins. Forget it. You can't efficiently write real text with Word. Just a draft and then you have to make manual adjustments I guess.
Inserting a Textbox
Insert->Textbox inserts a box with a floating textbox inside
- If you click on textbox or the surrounding "graphics box" you can set background color and line color
- This solution fixes the margins problem we had with the single cell table solution above.
- But I can't get Word to remember various styles of boxes (you only can set it as default)
... Therefore I prefer the table solution (even if formatting is less powerful).
Inserting a word document
A similar trick is to insert a word document by itself:
- Insert->Object
... but a little overkill
Macros
E.g. O'Reilly provides for its authors a menu with macros to insert special text elements like figures.
A macro then would insert a series of empty paragraphs, each one with an appropriate style. There are 2 ways to create macros:
- By recording steps
- By using Visual Basic, requires a week or two of investment I guess.
To create macros by recording, see the Create a macro (Microsoft tutorial).
Basically this means that you can to things like to inserting a series of styles or insert a portion of selected text into a textbox and then format it (did not test the latter). E.g. you could automatize the Multiple styles solution outlined above.
Links
General Beginners and mid-level tutorials
These links are not sorted or commented (no time), but when I made them (August 2007) they all seemed to useful and have real contents. Most Google search for "Word XP tutorial" leads to utter junk ...
- http://www.uwec.edu/help/word03.htm Microsoft Word 2003, LTS Online Help Documentation, University of Wisconsin. Quite a good tutorial for both beginners and and somewhat advanced users.
- Word 2003 Courses at Microsoft.
- Tutorials at Rudgers Writing Program. Includes some good beginners tutorials for Word 2003.
- Word Tutorial I (PDF), Word XP, beginner's level, from UC Berkeley Calpact
- Word Tutorial II (PDF), Word XP, mid level, from UC Berkeley Calpact
- Microsoft Word. Three beginners tutorials from University Information services, Georgetown University
- Word 2000 Tutorial and Word 2007 Tutorial, Florida Gulf Coast University.
- Microsoft Word Modules from Intern4Classrooms (i4c).
- Tutorials - Microsoft Word at BetterSolutions.com
Word FAQ's
- The Word MVP site includes a great number of useful FAQs and mini-tutorials. Can help advanced users.
Tutorials on how to write a book with word
- So You Want to Write a Book with MS Word by Daiya Mitchell. This was the only useful link I found. The text includes links to the related The Word MVP site
- One Professional's Steps for Writing a Book by John McGhie
Avaliable style sheets
(to write large documents, more needed)
- Microsoft has a large list of templates, e.g. Books (not useful for writing "real" books")
- O'Reilly
- BCS book template
Word macros
- Word2003 Macros at Microsoft
- What is a macro and why you should care, by The Crabby Office Lady, Microsoft. This is a good conceptual introduction.
- Wordprocessing.about.com has some tutorials (search). Ok if you can deal with all the blinking advertisements...
Use of annotations
(i.e. comments for other readers)
- Editing Electronically Submitted Papers (Web by Design, Indiana University]


