InkStitch - Geneva-simple typefaces: Difference between revisions
Jump to navigation
Jump to search
mNo edit summary |
|||
| Line 19: | Line 19: | ||
* Delete all the doubles | * Delete all the doubles | ||
* Arrange the glyphs in the table | * Arrange the glyphs in the table | ||
[[file: hershey-sans-table-1.svg|400px|thumb|none|Hershey 1 stroke font table]] | |||
Change stroke width and type | Change stroke width and type | ||
| Line 25: | Line 27: | ||
* Set Cap to round (easier to deal with than rectangular probably) | * Set Cap to round (easier to deal with than rectangular probably) | ||
* Verify shapes, smooth some(I fixed $, @, &, 0, O, Q4 and make strokes smaller ($, @). | * Verify shapes, smooth some(I fixed $, @, &, 0, O, Q4 and make strokes smaller ($, @). | ||
[[file: hershey-sans-table-2.svg|400px|thumb|none|Rounded caps and stroke width = 1.5mm]] | |||
=== Disgression: create a simple fill font === | |||
=== Transform the stroke-based fonts into path === | === Transform the stroke-based fonts into path === | ||
Revision as of 14:51, 30 June 2018
This page describes how we created a simple Hershey font.
Planned procedure:
Creation of the font
Configure a font
Create a Hershey glyph table
- Menu Extension -> Render -> Hershey Text
- Change Action to "Write glyph table"
- Font face: Sans 1-stroke
Adjust the size and arrangement
- Select all
- Set total width to 210mm
- Delete all the doubles
- Arrange the glyphs in the table
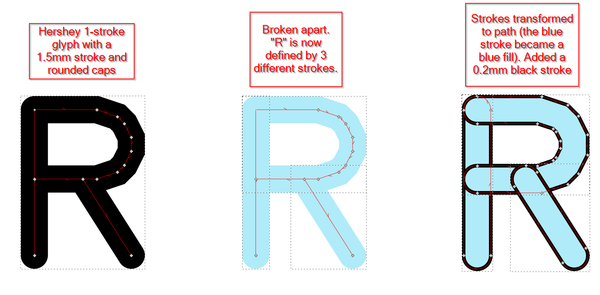
Change stroke width and type
- Select All (always, unless otherwise said)
- Set stroke Width to 1.5mm
- Set Cap to round (easier to deal with than rectangular probably)
- Verify shapes, smooth some(I fixed $, @, &, 0, O, Q4 and make strokes smaller ($, @).
Disgression: create a simple fill font
Transform the stroke-based fonts into path
Break glyphs into several path
- Select all
- Change the stroke color to light blue (because this way you can more easily see what is going on in the next steps)
- Menu Path -> Break apart
Some letters are now composed of several path
Transform the strokes to paths
- Select all
- Menu Path -> Stroke to Path
You now should have Glyphs with Paths. These for the moment just have fills.
- Select all
- Add a black stroke, make it about 0.2mm
Fix each letter to reduce overlap
For each letter that has major overlaps, delete segments of overlapping path
- Select the letter with a rectangle
- Optionally give different colors to different segments
- Hit F2 (Edit Path tool)
- Select segments in the tips of some path and kill them.
You also can recombine some path.
Alternatively, you also could import to illustrator. Its pathfinder tool can remove all major overlaps (or is there a way to do it in Inkscape ?). Save as SVG in Illustrator and repopen it in InkScape
- Remove Fill
- Set Stroke Paint
- Set Stroke Width to 0.1mm
- Group all objects into one glyph group
- Create two subpath
- Verify directions of subpath
- Add rungs


