Help:COAP-3180/week1: Difference between revisions
Jump to navigation
Jump to search
m (→Dates) |
m (→Tips) |
||
| Line 49: | Line 49: | ||
* Select ''Input View'' | * Select ''Input View'' | ||
* Menu ''More Actions->Embed in your Website'' | * Menu ''More Actions->Embed in your Website'' | ||
* Copy/Paste the code | * Copy/Paste the code to a "Anything Flake" (see below) | ||
; Import | ; Configure Pageflakes | ||
* Firstly (if this isn't already the case) create a new page in Pageflakes or alternatively decide that you default home page will do. | |||
* Make this page public: | |||
** Click on the big button (top right) | |||
** Then click in the left menu on ''Make Pagecase'' | |||
** Make the page public ("publish Page to the world") | |||
* If you wish: | |||
** you can invite other people (e.g. classmates) and give them editing rights. | |||
** You can change the theme and the layout (same menu to the left). | |||
Here is a screendump of the publication dialog: | |||
[[image:pageflakes-publish-page.png]] | |||
; Import a Zoho Creator application (database) into PageFlakes | |||
* Create an ''Anything Flake'' | * Create an ''Anything Flake'' | ||
** Hit the big round button on top right | ** Hit the big round button on top right | ||
Revision as of 19:51, 29 October 2007
Homework 1 - COAP 3180 Fall 2 2007
Summary
Finish the classroom activity, i.e.
- Create a public pagecast with Pageflakes
- Build a little dabase with Zoho creator
- Integrate this db within Pageflakes
Note: If you prefer to remain anonymous, do not leave Name, Firstname, professional email etc. or anything that can identify you on the public page.
Tasks
- Think about a little database (list) of things that you would like to put on the web. Then make a list of properties that describe such a "thing".
- Implement a Zoho creator database
- Add some data
- Make this Zoho application public (users can see data)
- Create a public pageflakes page and import the Zoho creator widget
- Add an explantation using some Pageflake widget
- Add some related news feeds to the Pageflakes page, i.e. the Pagecast should include the Zoho database plus some useful extra information.
Dates
- This homework is due at start of the week 2 Monday lesson
- The instructor will ask the URL of your public Pageflakes URL
- Each homework counts 10% in your global evaluation. The six best homeworks will be taken into account.
Evaluation
- Task completion (are all elements present)
- Quality of Zoho database (but don't make it too big)
- Quality of Pageflakes pagecast
Tips
- Make sure where you are
- Pageflakes with your login
- Zoho: Switch to Zoho Creator
- Help
- Both Zoho and Pageflakes have built-in help
- Zoho also provides videos, e.g. http://creator.zoho.com/collateral/gettingstarted/index.html
- Export widget from zoho
To export the widget from Zoho:
- Click on Edit this application
- Share the application to the public
- Click on Access this application
- Select Input View
- Menu More Actions->Embed in your Website
- Copy/Paste the code to a "Anything Flake" (see below)
- Configure Pageflakes
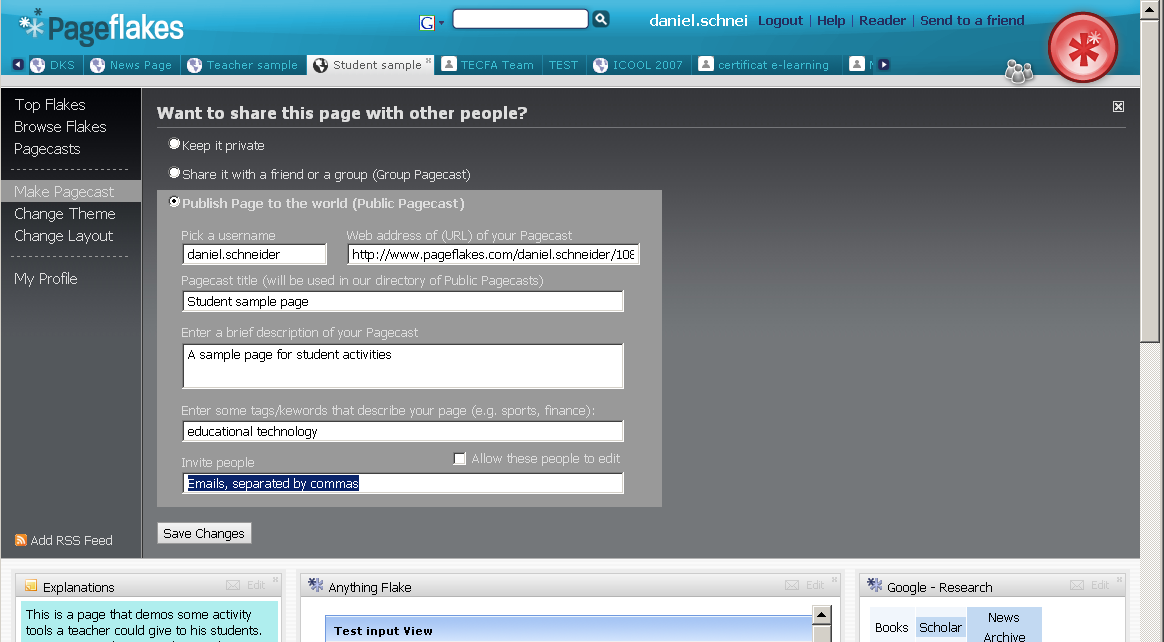
- Firstly (if this isn't already the case) create a new page in Pageflakes or alternatively decide that you default home page will do.
- Make this page public:
- Click on the big button (top right)
- Then click in the left menu on Make Pagecase
- Make the page public ("publish Page to the world")
- If you wish:
- you can invite other people (e.g. classmates) and give them editing rights.
- You can change the theme and the layout (same menu to the left).
Here is a screendump of the publication dialog:

- Import a Zoho Creator application (database) into PageFlakes
- Create an Anything Flake
- Hit the big round button on top right
- Select the Anything Flake from the "Pagecasting & More" column
- Edit and paste the code from Zoho
Links
- Main links
- http://www.zoho.com/
- http://creator.zoho.com/ (Direct access to creator)
- http://student.pageflakes.com/ (variant for students)
- http://www.pageflakes.com/
- Example Pageflake
- http://www.pageflakes.com/daniel.schneider/ (not really used)