Animate CC 2018 - Interactive animated web sites
This article or section is currently under construction
In principle, someone is working on it and there should be a better version in a not so distant future.
If you want to modify this page, please discuss it with the person working on it (see the "history")
(a first version will be completed until April 25 2018).
Introduction
This is a quickly made tutorial about creating a simple menu-based HTML5 Canevas web site with Adobe Animate CC.
Learning goals
- Use the Animate CC environment, select an appropriate configuration
- Create and use layers
- Use frames to create "page contents"
- Use simple drawing tools (rectangles and paint) plus alignment
- Create menu buttons and timeline navigation
- Create embedded movie clips (Animations)
- Start/stop embedded movie clips
You can download an Animate CC design file (*.fla) after each important section in case you were unable to do it yourself or if you want to compare your solution with ours...
The Animate CC environment
As of 2018, Adobe uses the same kind of user environment across most of its products. The Interface of Animate CC did not change much since Flash CS4, i.e. users familiar with Flash Professional versions of the last 10 years will not feel lost.
After launching the software:
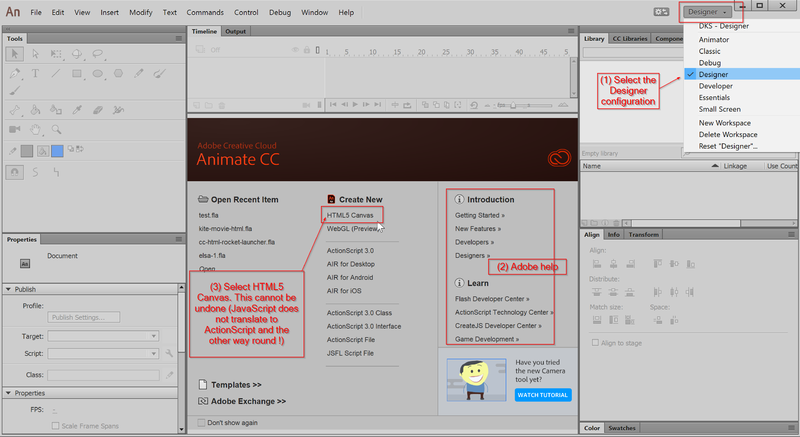
- We suggest putting the interface into
Designerlayout. You can change that later though and even create your own favourite configuration. Read the Flash CS6 desktop tutorial for some information about docking panels. - Make sure to select
HTML 5 Canvas. If you don't you will have to exit Animate CC and start over again.
Most important interface elements
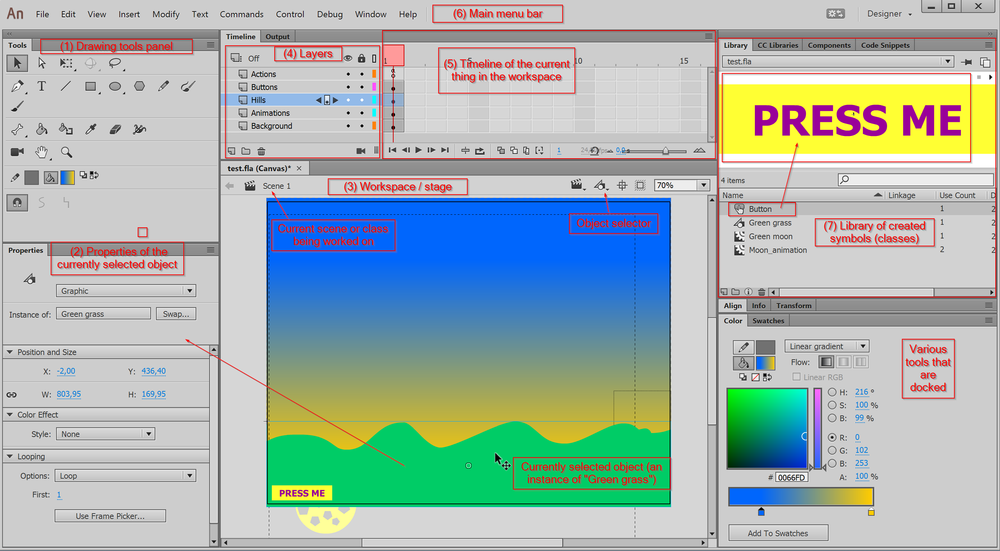
The most important interface elements with respect to our goal are:
- The tools panel (top left) in Designer layer - all the drawing tools
- The properties panel - allows changing properties of the currently selected object
- The stage, i.e. the workspace where you assemble objects and create drawings
- The layers section of the Timeline panel - create and manage layers
- The timeline - create frames for displaying different information at different times
- The menu bar on top - allows to access most functionality available in various panel through menus
- The library panel - manage Symbols, i.e. "classes" or "blueprints" for animation, button and drawing objects
HTML5 Canvas site template - Layer and frame structure
Animate CC will create code for the HTML5 Canvas element, i.e. will not create code that interacts with the rest of the HTML page. Think of it as "Flash" made with JavaScript code. The "application" we will create will sit inside a <canvas> </canvas> element of an HTML page. Depending on its purpose you will have to make it big enough. By default the canvas size is set to 550 x 400 px. We rather suggest using at least 800x600 pixels for creating interactive animations. Click somewhere in the workspace and adjust the size in the properties panel to the left.
- Size: W: 800 and H:600 px
You can make this size responsive, e.g. have it adapt to the size of a small HTML page.To so, open Publish settings -> Basic, see Make responsive
In order to create a menu-based side we will use the main timeline. Instead of using the frames for creating animations (as typical banner designers) do, we use the timeline to represent various contents (pages). Many game developers also use this strategy. You can ignore what that means precisely for now.
In the first steps, we will create various drawing layers in order to make editing more simple and more safe. Unlike other drawing programs (e.g. Illustrator or Inkscape), drawings can change over time in Animate CC. Each step in time is called a frame. Layers have at least one frame. Frames can be either empty (include nothing) or include something, e.g. drawings, JavaScript code, or so-called movie clips. Frames also can extend, i.e. the content of a drawing in frame 1 can still show in frame 25 if you extend it.
Create a few layers and give them a useful name
Each "page" will have the same several layers. These will include:
- A global
Global menuwith buttons - A global
Actionslayer that includes the menu code - A
Backgroundslayer with some (optional) drawing objects - An
Animationslayer that includes so-called movie clips (animation objects) - A
Foregroundslayer with some (optional) drawing objects (animations objects will run behind these)
Please create five layers now (you always can add/remove or change these.
- In order to create a layer, click on the
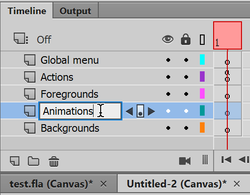
new layerbutton (bottom left or the layer section). Do that five times. - Name each created layer by double clicking on its name
- Sort the layers like in the following picture. You can drag them up and down. By default, the last layer will be drawn in the back. The the layer on top will be drawn in front.
- Save your file now !
Lock all layers by clicking on the lock symbol.
As you can see, next to the layer names you can make visible/invisible, lock/unlock, draw everything/just the outlines. If Animate CC doesn't let you draw, unlock. If it does not show fills, click on the outline square, etc.
Create five new blank key frames in the animations layers
Since we plan to put different contents in each frame, we now must create blank keyf rames for the three layers that will be different, i.e. foregrounds, animations and backgrounds.
For each of these layers:
- Unlock the layer, by clicking on the layer's lock symbol
- Click in frame 1
- Hit five times F7' (or FN-F7 on some machines) or right-click (''Insert blank key frame')
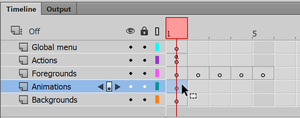
The result after doing this for the Animations layer should look like this, i.e. you should see five little circles
- Lock the layers again.
You are done when each frame of these three layers (Foregrounds, Animations and Backgrounds) includes a empty little circle.
Contents of these layers should be identical in all pages. We therefore just extend frame 1:
- Unlock the Global menu layer
- Select layer Global menu and click in frame #5
- Hit either F5 or right-click and select Insert frame.
Now if you want to "see" something in the workspace.
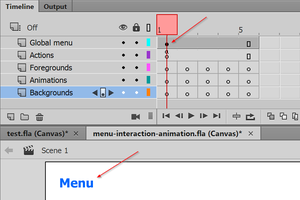
- Select frame 1 of the global menu layer
- Insert some text with the
T(text) tool in the drawing panel to the left, e.g. menu.
The result should look like the following screenshot. As you can see, there is a black dot in frame 1 of the Global menu layer. It tells that there is some content inside, e.g. the word "menu" in our case.
Finally, also extend the Actions layer
Source code (in case you missed something):
Create buttons
Creating a button is fairly simple, since as in HTML (and Flash too) anything can be a button. However, since a button should usually include some animation - i.e. the user should notice when he or she moves the cursor over a button or presses down - there will be some extra work to do.
Unfortunately, modern editions of Animate CC do not include pre-built buttons. You can buy some, copy from Flash CS6 or create your own. Let's create a simple model. We show below how to do this step by step.
Create a button symbol
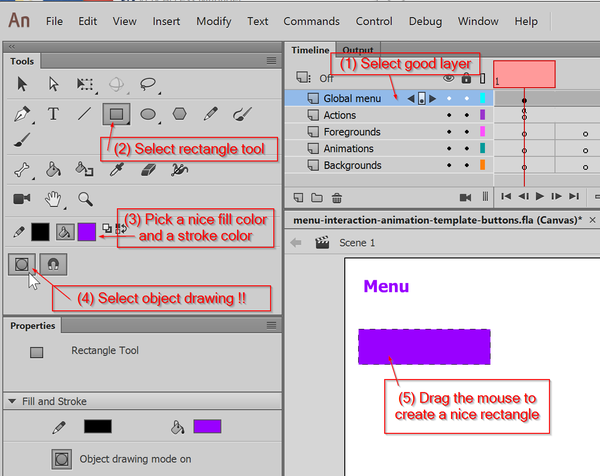
Step 1: Draw a simple shape representing the button
- Unlock and select the global menu layer (drawings for buttons will go there)
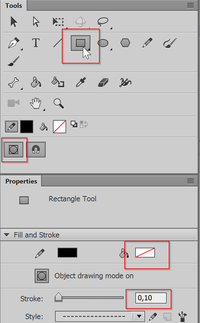
- In the tools panel to the left, select the rectangle tool and also tick the object draw icon (or you will regret later).
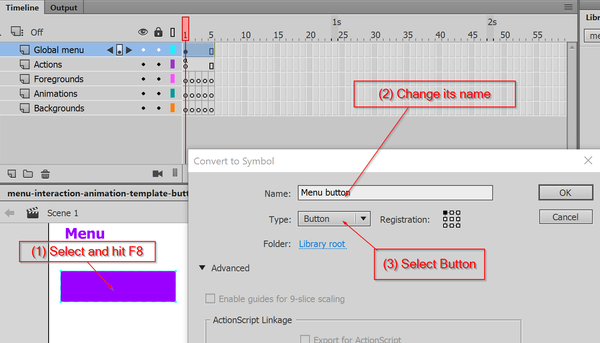
Step 2: Transform the rectangle into a button symbol
- Click on the selection tool (black arrow) in the Tools panel
- Select the rectangle on the stage
- Hit
F8or right click and selectConvert to Symbol
You now should see a popup panel called Convert to Symbol.
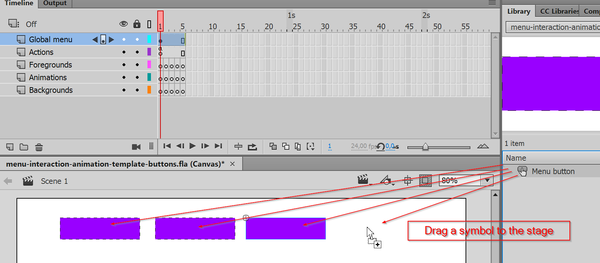
You now will see a so-called Symbol in the library panel to the right. Drag the symbol from the library to the scene. You will find a new instance. Notice, that you could delete all instances (drawings in the workspace), but the symbol will survive in the library.
The goal now is to create a moderately good looking (but working) button, as you could see in this HTML page.
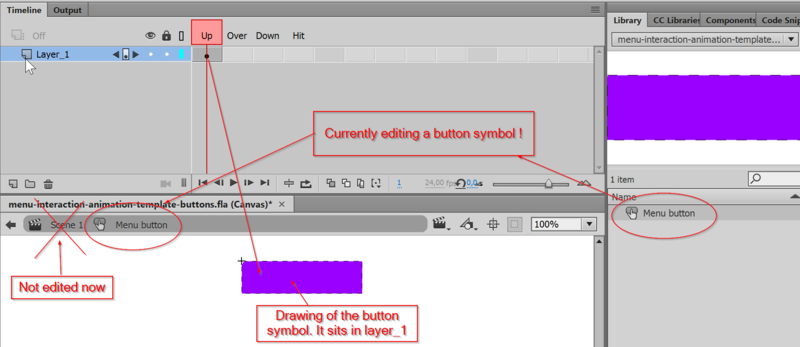
You will first learn how to edit a Symbol. A symbol represents a class, i.e. a kind of blueprint that you could reuse several times. A Button symbol is a special kind of class that allows creating any sort of animated button. To edit a symbol, double click on the symbol in the library panel. You also could double click on an instance in the workspace, but then you also will see the other objects in the workspace which might be confusing.
Now, do double click on the symbol in the library that we called "Button menu". You are now editing just a symbol, i.e. a class. As you can notice, the workspace looks differently, i.e. you only see a drawing of a rectangle. Make very sure to remember that you can edit things at various levels, i.e. the main scene (also called main timeline) or various things like buttons or animation clips that you will create. These classes themselves can contain other objects. Beginners are very often confused about this and do not pay attention to what they really edit.
A button symbol is an Animate CC class that makes use of 4 already defined animation frames. You cannot change this logic. The four different frames are used to define how a button should display depending on the user action.
- Up
- Drawing that appears "as is" when the button is displayed in a frame of your animation.
- Over
- The button graphics as it appears when the user moves the mouse over it. E.g. it defines highlighting.
- Down
- The button as it appears when the user presses the mouse (just during the time the mouse button is held). It shows the pressing down effect.
- Hit
- This frame allows to define the sensitive area - i.e. the are that reacts to mouse overs and clicks - with a graphic. Its contents are needed to define the aread but will not be shown.
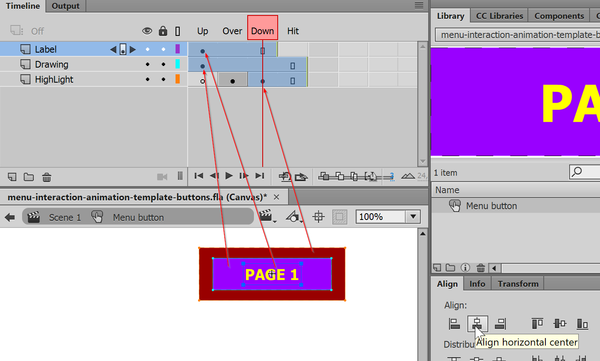
Let's now add some simple graphics to these four frames:
- Rename Layer_1 to Drawing
- Create a layer called "Label"
- Click in frame 1 i.e. Up
- Add some text with the text tool: Select the "T" from the tools panel, select a color, put the cursor on top of the rectangle and type. You can reposition both with the align tool (Menu Window->Align)
You also might extend the graphic to all frames, i.e. the text will appear in all three states (up, over and down).
- Click in frame 3, i.e. Down (of the same "Label" layer) and hit F5 (this way the same text will be shown in frames 1,2 and 3
- Select the Drawing layer and hit F5 in frame 4 (Hit).
Add some highlighting hints
- Create a new layer and call it Highlight. Drag the layer all the way down in the layers section.
- Select frame 2 in this layer and hit F7 to create a new empty keyframe
- Draw a larger rectangle in this frame #2 (Over). This will show when user mouses over the button.
- Now do the same for the Down frame. Select it and draw yet another rectangle, e.g. some kind of red. This will show when the use holds the mouse down.
Buttons that you can find online are of various complexity. Most have several layers and include several graphic objects. Layers contain drawings for these four button frames. The Flash engine will then select the appropriate frame for display according to user action (mouse over, mouse down, etc.).
With the 3rd frame selected, you now should see something like this:
Let us test this button now in the HTML browser.
- Use menu
Control -> Test Movie -> In Browser - Move the mouse over the buttons and click on the buttons. You now should see some animations.
Source code that you can copy, if you are in a hurry.
Create five buttons
- Go back to the scene (click on "Scene 1" or use the little pull down menu on top of the stage)
- Now, make sure that the five buttons fit on either the top or another margin of the scene. If they don't, make them a bit smaller: Edit the Menu Button symbol (object in the library) again and reduce the three rectangles drawings.
- Remove all buttons from the scene (select and hit delete). Do not worry, the button symbol in the library is safe (unless you kill it, which you should not)
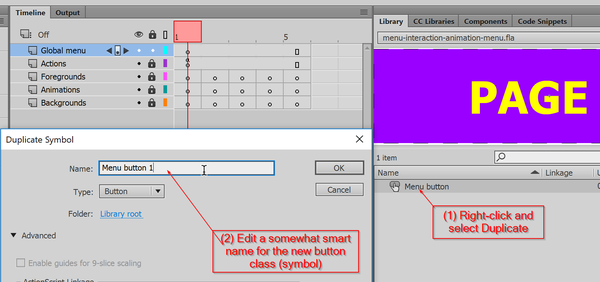
We could reuse five times the same button symbol for our application. However, the text would be same for each. In order to get buttons with different texts we have to create five different symbols. To do so, we simple duplicate our button symbol. We then can adapt the text for each one.
- Go to the library panel. If it disappeared, repair the layout by selecting "Designer" from the pull-down menu on top right and clicking "Reset".
- Select Menu Button (or whatever you called it)
- Right click and select
Duplicate - In the popup menu give a good name, e.g. Menu Button 1
- Repeat that five times.
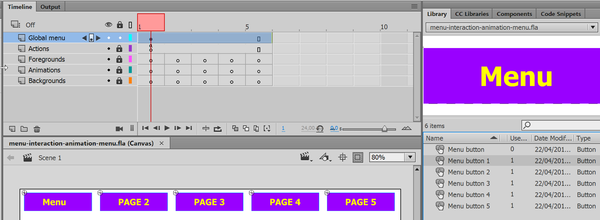
You now should have six buttons (one spare)
- Edit each of these to fit your (provisional) needs. Click on the text area to edit. For now, we suggest just using text like this:
- Menu Button 1 = Menu
- Menu Button 2 = Page 2
- Menu Button 3 = Page 3
- etc.
- Drag each of these onto the scene, e.g. near the top. Use the align and distribute tools to make the layout pretty.
- Lock the "Global menu" layer again.
The final result could be something like this:
Before we can test this structure we will have to tell HTML5 not to "play this animation". Remember that we use the frames of the main animation time line to represent pages.
- Unlock the Actions Layer. If this layer is missing, Animate CC will create one.
- Hit
F9or MenuWindow -> Actions - Copy/paste or type:
this.stop();into the Actions popup window - Hit F9 again to quit (there is no need to save).
Now let us see if the five buttons display in HTML
- Hit CTRL-ENTER (or use menu
Control -> Test
Adding provisional contents
For each Frame add some contents. Unless you already have a precise idea for the page contents you plan to create, we suggest just adding a little "doodle" that you later can remove.
- Unlock the "Backgrounds" layer
- Click into Frame 1 of this layer
- Select the paint brush tool and make sure to tick Object Drawing (last row of the tools panel)
- Set the stroke in the Properties panel to 20
- Draw something
Repeat for all five frames
- e.g. Select frame 2 in the "Backgrounds" layer
- Draw something.
The goal now is to create a working navigation framework:
You now can profit from your JavaScript coding skills or else learn some JavaScript. Our goal is to display a given frame after a user clicks on a given button. E.g., when the user clicks on the Page 3 button, we should see Page 3 (i.e. contents of frame 3). Let us walk through the steps:
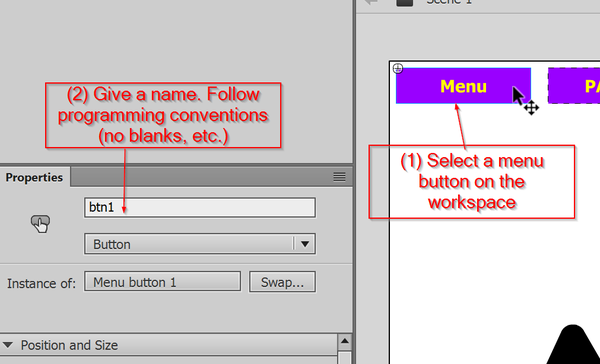
(1) Give an instance name to each button
This is like providing an HTML element with an id attribute.
- Select the first button (menu in our case)
- In the properties panel, call it "btn1"
Repeat that for each menu button, until you got a list of buttons from btn1 to btn5.
(2) Create event handlers for each button plus a navigation function
- Unlock the Actions layer
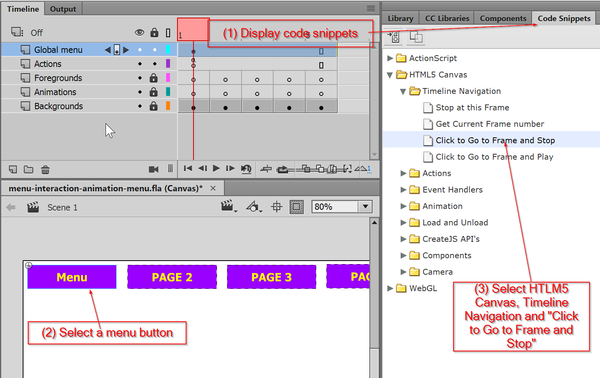
- Display the <code>Code snippets tool</code> using menu
Window -> Code snippets. We suggest docking this panel next to the library. - Select a Menu Button on the workspace, e.g. btn1
- Then, open HTML5 Canvas -> Timeline Navigation -> Click to Go to Frame and Stop
The Action (programming) window will pop up and you will get some code that you only need to change a little bit, e.g. adjust the frame number where it should navigate. For example, in the following code you only need to change the second last line:
this.gotoAndStop(0); // as opposed to gotoAndStop(5).
Warning: In JavaScript, counting starts at 0 meaning that frame #1 in Animate CC will be frame #0 in JavaScript. This is a bit confusing.
Below is the kind of code that Code Snippets will produce:
/* Click to Go to Frame and Stop
Clicking on the specified symbol instance moves the playhead to the specified frame in the timeline and stops the movie.
Can be used on the main timeline or on movie clip timelines.

Instructions:
1. Replace the number 5 in the code below with the frame number you would like the playhead to move to when the symbol instance is clicked.
2.Frame numbers in EaselJS start at 0 instead of 1
*/

this.btn1.addEventListener("click", fl_ClickToGoToAndStopAtFrame.bind(this));

function fl_ClickToGoToAndStopAtFrame()
{
	this.gotoAndStop(5);
}
Do not repeat this mindlessly. Each time you click on a code snippet it will be added to the code. Make sure to remove code that you do not want. Instead of selecting each button and using code snippets, you also could just copy paste code for the previous button and adjust. Each button must have a different event handler and each event handler must specify a different function.
Alternatively, if your buttons are named btn1 ... btn5 you can copy/paste the following code:
- Click in frame one of the Actions layer and hit F9
- Copy paste the following code. It looks different but does the same.
// Prevent HTML5 from playing the scene
this.stop();

this.btn1.addEventListener("click", move1.bind(this));
this.btn2.addEventListener("click", move2.bind(this));
this.btn3.addEventListener("click", move3.bind(this));
this.btn4.addEventListener("click", move4.bind(this));
this.btn5.addEventListener("click", move5.bind(this));

function move1() {	this.gotoAndStop(0); }
function move2() {	this.gotoAndStop(1); }
function move3() {	this.gotoAndStop(2); }
function move4() {	this.gotoAndStop(3); }
function move5() {	this.gotoAndStop(4); }
One could write some more elegant code:
- Replace frame numbers by named frames
- Use a switch statement that would move according to the button name that could be found in the event parameter passed to the function.
(3) Test navigation
Now let us see if the five buttons will do HTML navigation
- Hit CTRL-ENTER (or use menu
Control -> Test
Source code in case you did not manage:
Working with named frames
Let us assume that you want to get rid of frame #3. Select frame 3 in all all layers, right click and remove frames. This works fine, but will mess up your nice JavaScript code, since frame 4 will become frame 3, etc.
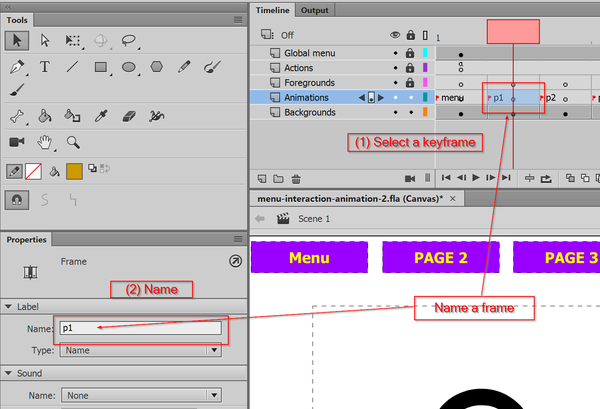
To avoid that, you could give a name to the frames used in navigation. In any layer that has a complete set of keyframes, e.g. the Actions Layer, do the following:
- Unlock the layer
- Select frame 1
- Give it name in the properties panel, e.g. "menu"
- Select frame 2
- Give it name in the properties panel, e.g. "p2".
You now can change the JavaScript code like this, i.e. used quoted frame names instead of frame numbers:
this.btn1.addEventListener("click", move1.bind(this));
this.btn2.addEventListener("click", move2.bind(this));
this.btn3.addEventListener("click", move3.bind(this));
this.btn4.addEventListener("click", move4.bind(this));
this.btn5.addEventListener("click", move5.bind(this));

function move1() {	this.gotoAndStop("menu"); }
function move2() {	this.gotoAndStop("p1"); }
function move3() {	this.gotoAndStop("p2"); }
function move4() {	this.gotoAndStop("p3"); }
function move5() {	this.gotoAndStop("p4"); }
Add contents
You now can add contents to each "page". We suggest using one or all of the three Foregrounds, Animations and Background layers for this.
If you want to remain at this level, you simply could add some pictures or movies (using menu File->Import) and some text. However, the initial plan is to add some animations.
Creating and using an embedded movie clip
Per definition, the Animate CC scene - i.e. your whole Animate CC file - is a movie clip. However, since we used the main timeline to create "pages" we now will have to use so-called embedded movie clips to create various animations. You can use any Animate CC tutorial to learn more about Animations, but remember not to use the main timeline.
Flash includes several types of animations, some of which were explained in the Flash animation overview made for CS6. Animate CC adds the Camera tool.
In this tutorial we will introduce basic motion animation, called Motion tweening in the old Flash terminology. Motion animation includes:
- Changing the position over time (moving) along a path
- Changing size of the envelope over time, e.g. making the object smaller or bigger
- Changing the rotation of the object over time
- Changing the tint over time, e.g. paint some color over the object
- and more
The word "tweening" (a short for in between-ing) explains how it works. As a designer you only to specify a few so-called keyframes that defined changed properties (e.g. a new position or a new rotation angle). The computer will then calculate a smooth transition between these keyframes. As a minimum, you need a start and an end keyframe. This principle is no different from other animation frameworks, e.g. CSS3 animation or SVG animation.
Creating a movie clip
- Unlock the animation layer and click in frame 2.
- Hit
CTRL-F8or MenuInsert -> New Symbol - In the popup window, give it a name, e.g. sunrise animation and select
Movie Clip - You now will see an empty blank page within which you can create drawings, animations, etc.
Draw a rectangle for reference:
- We now suggest drawing a rectangle without fill in order to visualize the size of your animation. If your main scene is 800x600 pixels, make it for example 600x400 px. Note that the vector objects you will create are easily scaleable. The only problem are fonts.
- Select the rectangle tool and make sure to tick Object Drawing Mode
- In the preferences, select a stroke color, remove the background color, and make the stroke thin.
- Draw a big rectangle.
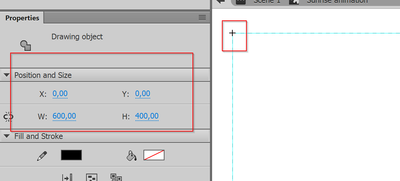
Repair position and size of the new rectangle:
- Select the rectangle with the selection tool (black arrow on top left of the tools panel)
- In the properties panel set:
- Set X:0 Y:0 W:600 and H:400
Remember that this rectangle will just give some guidance for creating an animation. You can remove it later ...
Create a simple motion animation
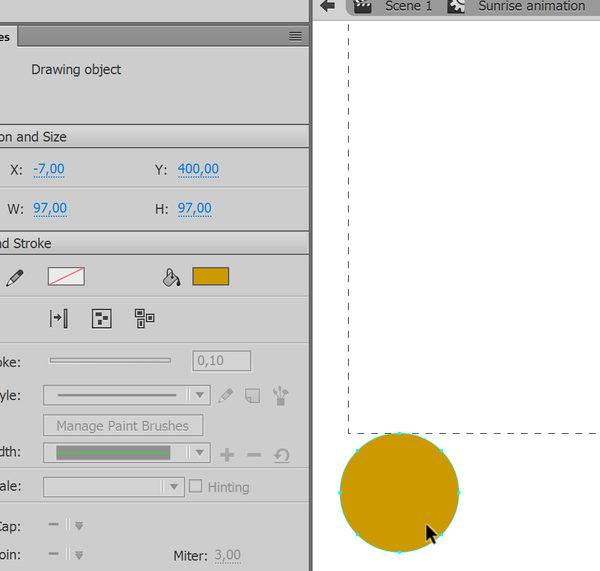
Draw a round orange ball:
- In the Tools Panel, select the Oval tool
- Make sure to be in Object drawing mode
- Select a fill color, e.g. orange
- Remove the stroke color
- Hold down the SHIFT key and create the ball in the workspace below the lower left side of the rectangle.
Turn the graphic into a Symbol since only symbols can be motion animated.
- Select the sun (circle)
- Hit
F8or right-click - In the popup window, select Move Clip and call it "Sun"
- Select the sun and give it an instance name in the properties panel, e.g. "mySun"
Extend the drawing in the background layer (must be done before creating the motion tween in Animate CC 2015!)
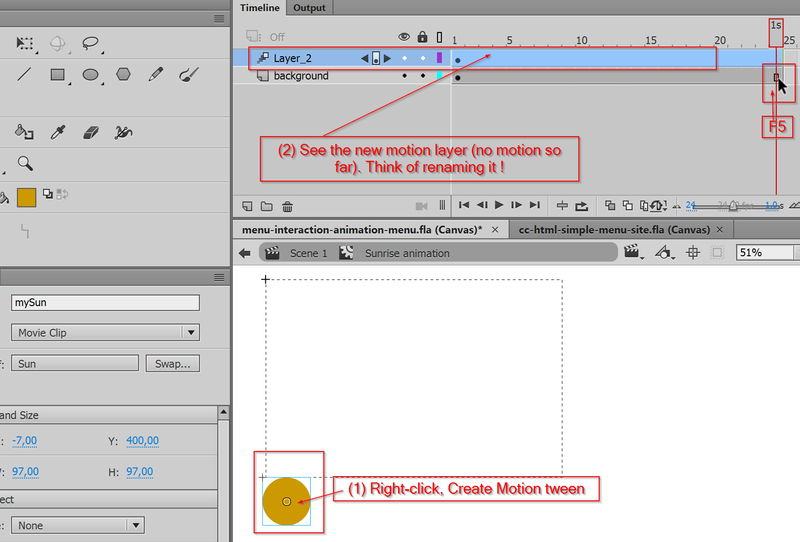
- If you want an animation that lasts one second, select the background layer, frame 24 and hit F5.
- If you want a longer lasting animation, select frame 50 instead, for example.
Create the motion animation
- Now right-click on the object in the workspace and
Create Motion Tween
As result you will see a new layer in the timeline of this object that includes 24 (or more) blue frames
- Select the other layer, select frame 24 and hit F5. This will extend the rectangle drawing across all frames
Now make sure that the red play head (on top of the timeline) is still in position 24
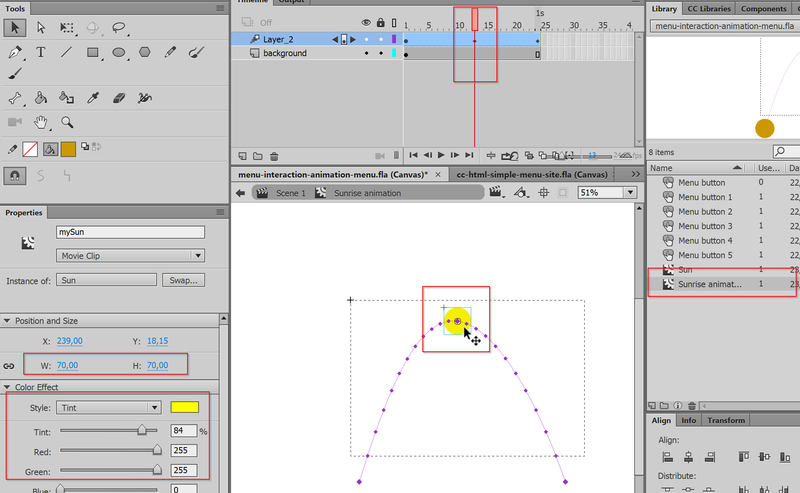
- In the workspace, drag the sun to the right.
You now see a motion animation line:
- Move the the mouse close to the middle of the line until the cursor changes into a curve icon. Now hold down the mouse and push upwards. Do not click on the line, just press the mouse button.
- Move the playhead towards the middle. The sun should now sit on top.
- Make it a bit smaller in the properties panel
- Add some yellow tint (also in the properties panel). You cannot simply change its color.
The result should more or less look like this:
Use the animation
So far, our new animation is just a symbol in the library. To use it, you will have to drag onto the scene:
- Go back to the scene (click on Scene1 on top of the workspace)
- Unlock the Animations layer
- Select frame 2 of the Animations layer
- From the library drag the Sunrise animation onto the workspace. The reference rectangle we made before should help you position the animation
- You can adjust the size of the animation instance in the properties panel. Select the animation object and adjust W and H values.
Enjoy:
- Hit CTRL-Enter.
- http://tecfa.unige.ch/guides/flash/cc-html5/menu-site/menu-interaction-animation-1.html
- http://tecfa.unige.ch/guides/flash/cc-html5/menu-site/menu-interaction-animation-1.fla
Control embedded animation clips
By definition any animation will play as soon as the movie clip is shown. E.g. in our example, if you move from the "menu" frame to "page 1" frame you will see the rising sun animation repeat itself forever.
Stopping an embedded animation after it ran once
To stop an animation after it ran once, do the following:
- Edit the embedded Movie clip (E.g. double-click on Sunrise animation in the library panel)
- Add an Actions layer.
- In the last frame of the Actions layer(e.g. frame 24 or frame 50), add an empty key frame: Click and hit F7
- In this keyframe, hit F9 and add the following line of code
this.stop();
Running example and source code:
- http://tecfa.unige.ch/guides/flash/cc-html5/menu-site/menu-interaction-animation-2.html
- http://tecfa.unige.ch/guides/flash/cc-html5/menu-site/menu-interaction-animation-2.fla
In general - but not always - it is better to leave control to the user, i.e. allow the user to stop and start an animation.
Twice embedded movie clips
We inserted in page 3 a new Rising Moon animation that is a bit less ugly than the one on page 1. It works with the same principles as the simple animation we introduced above.
- Have a look at it.
- The whole animation sits inside a Movie Clip symbol, i.e. Pale Moon Animation in the library of the example file.
- This Pale Moon Animate includes three times the same Moon motion animation. Let's explain this with a little schema
- The Scene 1, frame 3 (aka "p2"):
- contains the myPaleMoon object, i.e. an instance of the
Pale Moon clip. It includes a background, a foreground, a button and "moving moon" clips
- contains the myPaleMoon object, i.e. an instance of the
- More precisely, the Pale Moon clip itself:
- contains three instances (moon_anim, moon_anim2 and moon_anim3) of the
Moon_animationclip
- contains three instances (moon_anim, moon_anim2 and moon_anim3) of the
- The larger moon_anim instance is controlled by the Start/Stop button.
Start/stop a movie clip
In principle you just could use the following JavaScript code to start/stop an animation:
this.anim.play()this.anim.stop()
Or, alternatively:
this.anim.paused = false; // or true
Stopping the animation at start
In practice, stopping an animation before it starts does not seem to work, since the animation starts moving before JavaScript executes the code. This wasn't the case in ActionScript. There are two workarounds:
- Start the animation in frame two of the timeline (not tested)
- Use the following code fragment:
setTimeout(stopit,0);
function stopit(){
  exportRoot.myPaleMoon.moon_anim.paused = true;
}
- exportRoot is the object representing the main clip
- myPaleMoon is the clip that has animation clips inside
- moon_anim is an instance of an animation.
Notice: If you wanted to stop the Sun rising animation, you would refer to it with something like:
exportRoot.mySunrise.paused = true;
Adding a start/stop button
The following code allows to stop/start three different animations. After the user clicks on the button, the state of animation is reversed, i.e. the paused property is either true or false. This works as expected (unlike stopping an animation before it can start).
this.btn1.addEventListener("click", go.bind(this));

function go(ev) {
	console.log("go: Mouse clicked"); // test if the click worked-:
	// reverse animation states
	// paused is set to its opposite (either true or false)
	this.moon_anim.paused = ! this.moon_anim.paused;
	this.moon_anim2.paused = ! this.moon_anim2.paused;
	this.moon_anim3.paused = ! this.moon_anim3.paused;
	console.log("this.moon_anim.paused=" + this.moon_anim.paused);
}
Source code and running example (look at frame 3)
- http://tecfa.unige.ch/guides/flash/cc-html5/menu-site/menu-interaction-animation-3.html
- http://tecfa.unige.ch/guides/flash/cc-html5/menu-site/menu-interaction-animation-3.fla
Clicking on objects to stop / start
Instead of using buttons to control stop and start, you also could simply use the objects themselves as buttons. This is demonstrated with the parrot animation on page 4.
JavaScript code used is the following. Note that we also use a simpler way of defining event handlers using the on method. This wasn't found in the Adobe documentation, but in the Easel.js documentation.
The three parrots are instances of the same clip called Parrot_Clip. Their names are Tom, Tim and Tibor (for a reason no one remembers).
setTimeout(stopit, 0);
function stopit() {
	exportRoot.Tom.paused = true;
	exportRoot.Tim.paused = true;
	exportRoot.Tibor.paused = true;
}

// Method addEventListener + bind "sold" by Adobe.
// "this in the function will refer to the scene
// "this" est la scène, utile quand un seul bouton déclenche qc.

this.Tibor.addEventListener("click", startStop.bind(this));

function startStop(ev) {
	console.log("Event=" + ev + ", target=" + ev.target);
	this.Tibor.paused = !this.Tibor.paused;
}

// Method on
// "this" in the function will refer to the object that triggers the event.

this.Tim.on("click", startStopObj);
this.Tom.on("click", startStopObj);

function startStopObj(ev) {
	// console.log("Event=" + ev + ", this=" + this);
	this.paused = !this.paused;
}
The animations are simple motion tweens. Instead of moving like in the previous example, we just rotate parts of the parrots. The only noticeable point is that we moved the rotation point. This explained in some more details in some older Flash_object_transform_tutorial#Rotations Flash object transform tutorial. The interface for changing a rotation point is mostly the same in Animate CC.
Source code and example:
- http://tecfa.unige.ch/guides/flash/cc-html5/menu-site/menu-interaction-animation-4.html
- http://tecfa.unige.ch/guides/flash/cc-html5/menu-site/menu-interaction-animation-4.fla
Drawing in Animate CC
Drawing in Animate CC is similar to drawing in Flash. Until this section is updated see the old basic drawing and the advanced drawing list of tutorials in the old Flash tutorials.
Links
- Animate CC user guide (Adobe)
