Stitch Era embroidery software
<pageby nominor="false" comments="false"/>
Introduction
Stitch Era Universal (sometimes abbreviated as SEU by Sierra is an advanced free embroidery design software that you can get under certain conditions:
- You only get it from an authorized dealer. E.g. since I live in France, I got it from the french authorized reseller. For countries like Switzerland that do not have authorized resellers you will have to send some mail to headquarters.
- You need to register and obtain a license number and key (and renew these periodically)
- The application must be connected to the Internet permanently and there are advertisements. However they don't flicker, just eat up some space to the right.
- The free version limits stitch count to 40'000 stitches. That's a fairly large design, unless you fill up all the space with stitches.
The purpose of this entry is to help people get going past the very first steps. It will never become a stitch era manual. I just will use it to write down a few tricks and tips while I learn myself ... - Daniel K. Schneider 16:49, 16 May 2011 (CEST).
Tip: Most images in this article can be enlarged by clicking on them...
Download and installation
Stitch Era Universal is distributed by Authorized Distributors (either via CD or online) unless you are lucky to live in a country without. Installation and use requires a permanent Internet connection. Software contains advertising. Download can take a long time and you need to find a download site for your country (e.g. for France use Annika's site). You first have to install a downloader, then a download the > 400 MB installation files with the downloader program.
After going through the complicated finding-a-place-to-download, the double download and authentication, we found that this program runs fine on Win 7 64 bit.
Issues
- The program may sometimes enter infinite error loops with different types of mistakes: We encountered:
- vector our of bounds errors (e.g. the program tries to draw outside its window).
- Access violations
In these cases, the program must be killed with the Windows task manager. This happened to us in several situations, but always when moving/resizing stitching or combined stitching/vector objects in the work area.
- After a longer pause it will take some time to wake up
Therefore: Save before moving/resizing operations, although there is an automatic autosave that automatically will open the safe file after a crash.
The user interface
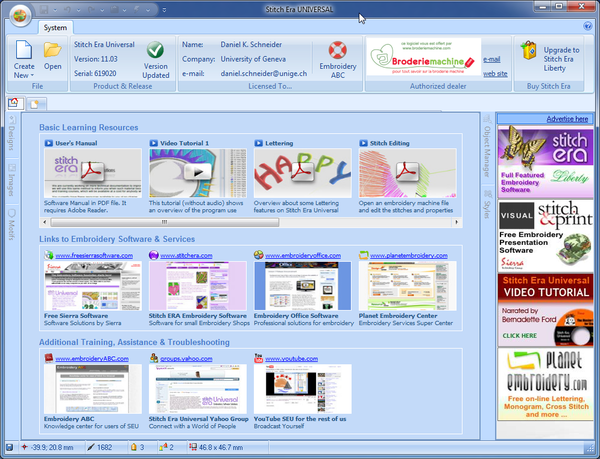
At start up, Stitch Era software that does have a license and a key should look like this:
- Before you click on Create New, download the manual and read some of it (first item under Basic Learning Resources in this startup screen).
- For a new design, select quick start using a simple wizard. You then can specify textile and hoop size (ordered by machines).
The interface is fairly complex and we really suggest reading at least parts of the manual and/or looking at some training videos. Links for documentation is available in the start-up screen for example.
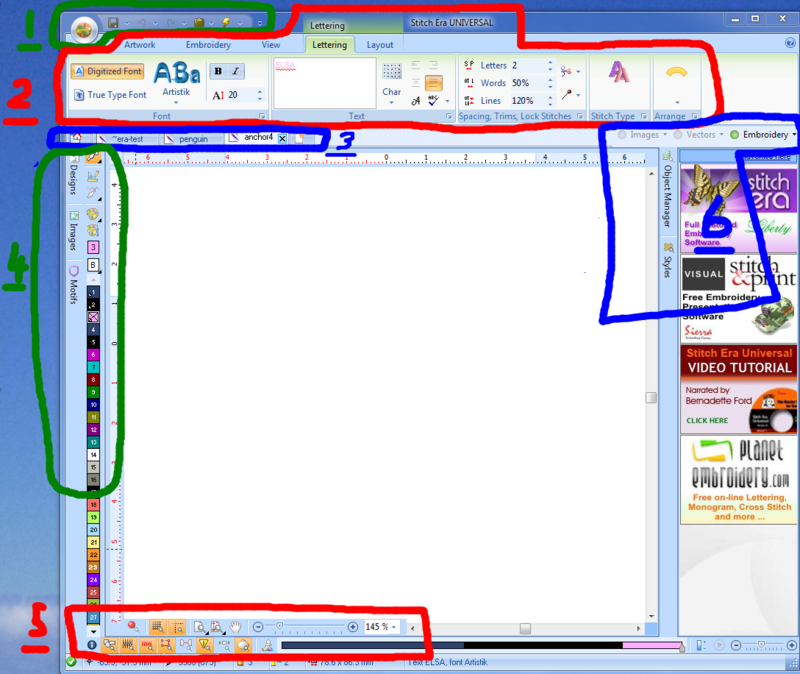
The annotated screen capture below shows the most important areas of the user interface.
Below is a very provisional tools overview.
- File Menu button and quick access toolbar
- Main tools / Ribbon bar. These can change contextually.
- Artwork
- Allows to import bitmaps and vector graphics
- Draw vector shapes that do not include stitching information yet. This is maybe the preferred way to start drawings as opposed to directly inserting stitch parts available through the Embroidery tab or Designs->Create sections.
- Embroidery
- Define materials and hoop
- Retrieve patterns
- Allows to insert stitch parts
- View
- Allows to define various view parameters (including a refresh button and a satellite view)
- Includes snap and measure tools
- Body
- Change parameters of a fill (shapes)
- Border
- Change parameters of a stroke (lines)
- Layout (Rescale, rotation, etc. but also repetitions)
- Ribbon bars on top (shows type of selected object and help you understanding what you can do with it).
- Area (shows what you can change for a selected part, i.e Body+Border+Layout)
- Path (shows what you can change for a stroke, i.e. border + layout)
- Lettering (shows that you can change lettering and layout)
- Block (shows that you selected more than one object)
- Artwork (shows what you can do with selected vector graphics)
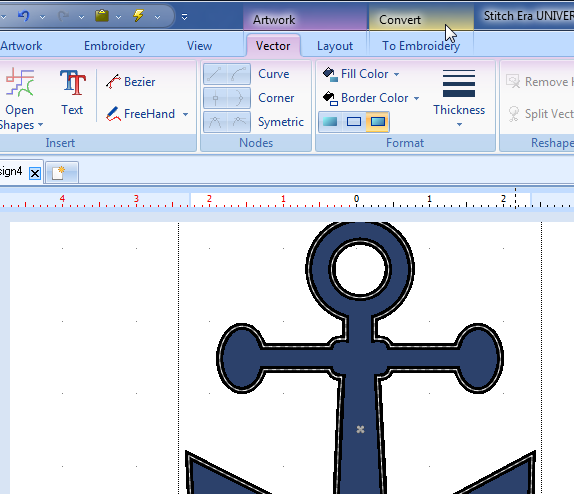
- Convert (shows that you could convert a vector image to stitches)
- Package ?
- Artwork
- Document bar
- Allows to open/close documents and create new ones.
- Clicking on the home icon will bring you to the start page.
- Create and edit tools / color management / color palette
- Designs
- Select Object (press mouse button for a while for options): Press this to return to select mode !
- Create Sections: Define how to create new different kinds of parts, i.e. fills vs. strokes, kind of stitches.
- Edit Stitches
- Images (changes contextually, e.g.:
- When stitchable object is selected: Change Color palette and optimize Needles
- When a vector object is selected: Change color, etc.
- Motifs
- Provide information about "needles" that will be used. In single needle machine, think of this as threads that you will have to change.
- Double-click allows to change parameters, e.g. the color, thread make/model and number.
- Designs
- Display and reference controls (at the bottom)
- Object manager and Styles (to the right)
- The three little toggle buttons (images, vectors and embroidery) allow to show/hide these types of objects
- The object manager gives you fine grained control over both vector objects and stitch objects.
Simple digitizing of vector graphics
We found that digitizing vector graphics is much easier than digitizing bitmaps (see below). This is not a surprise of course. Vector graphics are clean mathematical descriptions of shapes (lines and fills) whereas bitmaps are just collections of pixels. Therefore, if ever you can, avoid starting with *.jpg, *.gif, *.png pictures. Digitizing photographs is another issue and much more difficult since you also will have to reduce colors, despeckle, smooth lines, etc.
Below is the rough procedure for creating embroidery stitch files from simple vector graphics. Stitch Era seems to be a fairly sophisticated embroidery suite and it can do much more. But starting with imported graphics files is probably the kind of stuff other beginners would want to try first, so here is the rough procedure:
(1) Get a vector image
- Finding clip art on the web is quite a nightmare (read Clipart for some tips).
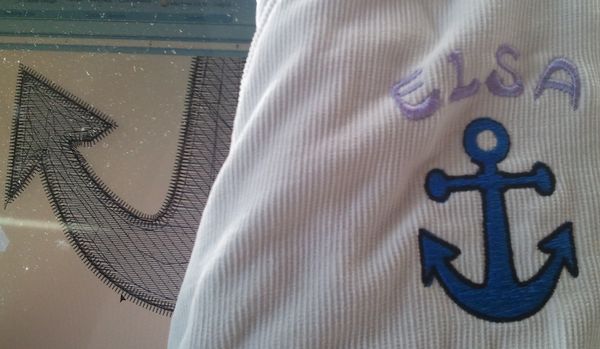
- We got ours from http://openclipart.org, i.e. this nice anchor. Click on "Download SVG" and then just save as anchor.svg somewhere. Read about SVG, the only nice vector format on the web.
(2) Import the vector graphics to Stitch Era
- Open the vector image in Inkscape (a free program), Illustrator CS5 (I tested with both) or another vector program that can copy a drawing to the Windows clipboard.
- Still in the drawing program, select all (Ctrl-A in most programs) or the part you wish to stitch and copy it (CTRL-C in most programs)
- Then go to Stitch Era and click on paste EMF vector. Notice: The "Get from Application" feature doesn't work for me, which is too bad since EMF is lossy with respect to AI or SVG format. Probably, because I got a fairly new version of Illustrator.
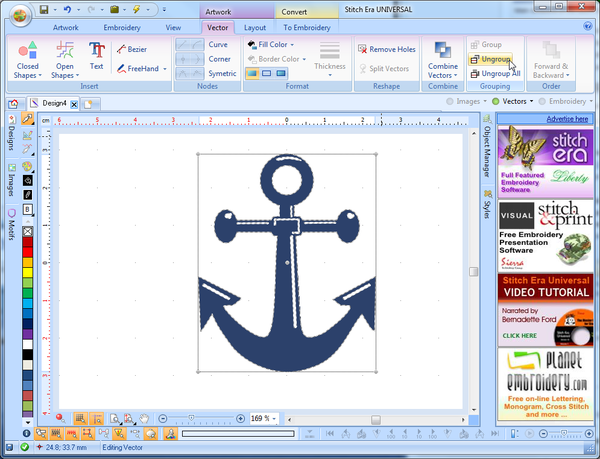
- You now should see something like this:
(3) Optional: Edit the vector graphics
- You now have the choice to edit this a bit if needed. In principle you better do any editing in the drawing program. Anyhow, I clicked on ungroup all in order to get rid of the white lines which are not needed for stitching. This was actually a bit tricky since I couldn't see these parts (for a reason I don't understand). I therefore selected the blue part (click) and moved it way to the left and then selected the empty area with the white stuff and hit delete...
- I then made the borders a bit fatter with the "Thickness" pulldown menu. You can define thickness for parts (not combined objects)
- Then move on to auto-punching (I guess it's called that way), but save the file first.
(4) Convert to stitches
- If not already done so, select the object first, e.g. move the cursor into the drawing area and press CTRL-A
- Click on Convert (notice how the tabs change in the program). If you can't see the "Convert button", make sure you really selected the object on the screen !
- You now can choose between letting the program decide for you or vectorize fills (areas) and strokes (lines) yourself. Try Art to Stitch (intelligent) first. Untick the little round Vectors button to the right in order to see the stitches.
- If you are unhappy, you could hit CTRL-Z and change for instance the stitch pattern (tab in the popup menu after clicking on Art to Stitch).
(5) Add other clipart or lettering or whatever
- ... as you like
(6) Export
- Save this file if not already done so. Keep the *.dsg file for re-editing
- Click on the "File" button (top left) and export to the desired machine format, e.g. I chose *.jef for Elna/Janome.
The result
Not too bad for my second digitalization / stitching (the first one was a smaller anchor without the lettering). There are some mistakes, probably because the tissue moved. I didn't iron a stabilizing tissue underneath. Also, the anchor head doesn't look as good since the bobbin underneath ran out of thread and I forgot to backtrack after changing it I think.
A picture showing the machine "printing" it, is in the Elna 8300 article.
Digitizing bitmaps
Digitizing bitmaps (raster images) is more difficult than converting vector graphics to stitches and for at least two reasons:
- Usually bitmaps include too many colors (photographs always do). As you shall see, even a pretty simple drawing my include over 20 colors.
- Lines are not clearly drawn and must be guessed by the digitizing modules
- Speckles (i.e. small shapes) can be found and will have to be reduced.
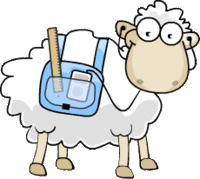
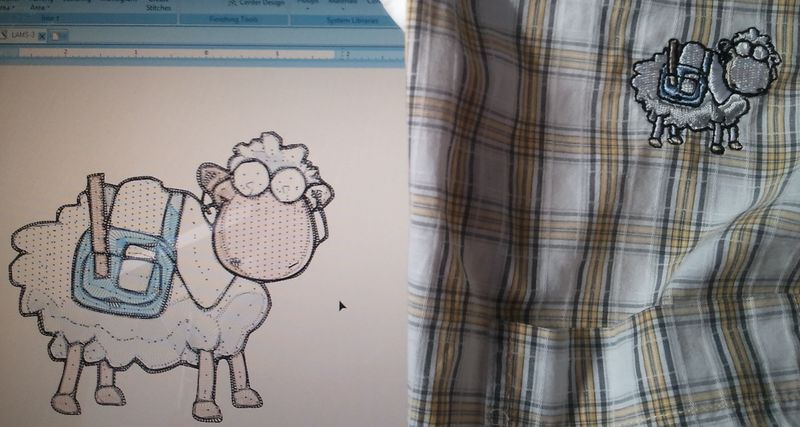
As example, we shall use a drawing that is the mascot of the LAMS (Learning Activity Management System) software. The original vector image isn't available anymore and we therefore had to start from a somewhat fuzzy raster image, i.e. a 32KB *.gif file, that you see to the right and that you can enlarge.
Loading a bitmap
Procedure:
- Go to the Artwork tab
- Click on "Open Image" and select the image file (*.gif, *.jpg, *.png, etc.)
- Resize the image (you also could do this later, once it is vectorized)
- Crop the image if needed (top left button), i.e. reduce useless margins ton top, bottom, left and right.
- In both cases, make sure that you can see the whole picture by zooming in or out.
Reduce colors
We now suggest reducing the number of colors
Procedure:
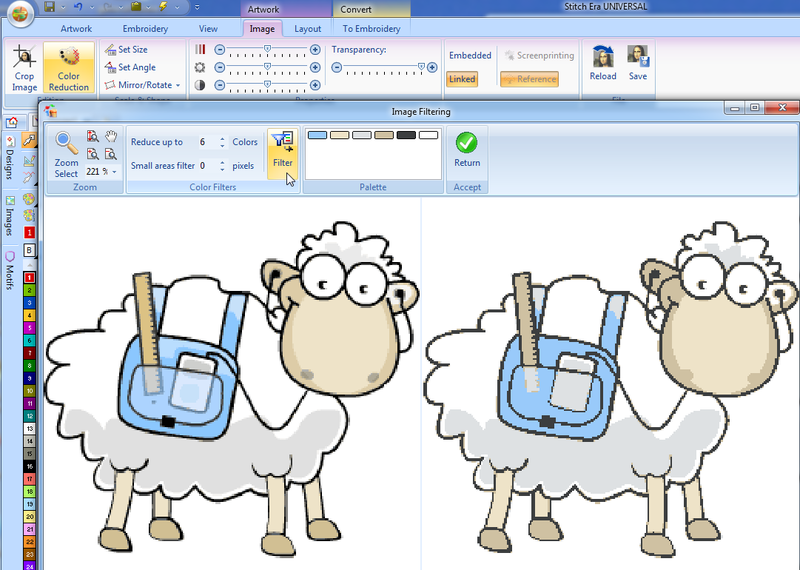
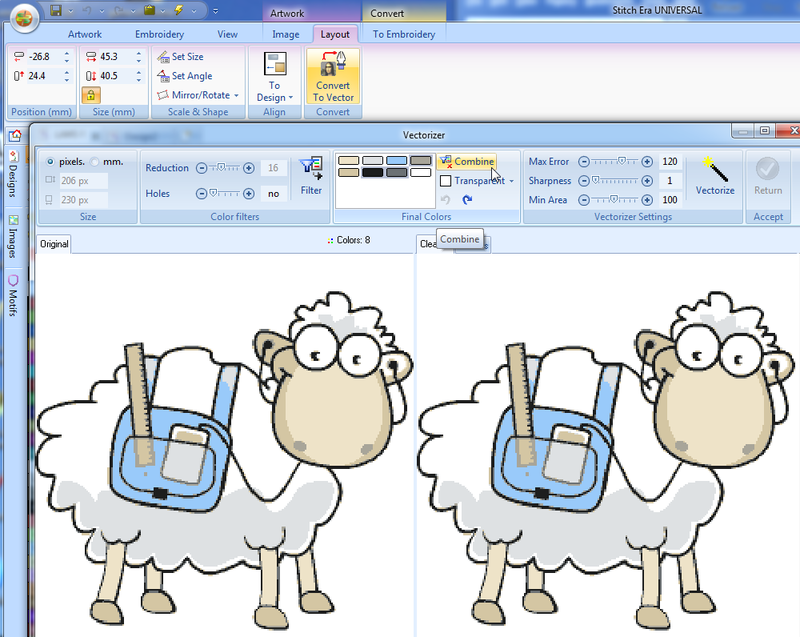
- Click on the Color reduction button and the Image Filtering tool will pop up
- Select the number of colors. Less is usually better, but on the other hand important parts should still keep their "identity". E.g. looking at the first screenshot below, i.e. a 6-color version, one could argue that the "holes" of nose should not go away.
- Click on the Filter button and carefully examine the result to the right. If some shapes that you would like to stitch disappear, then augment the number of colors and try again by clicking on the filter button.
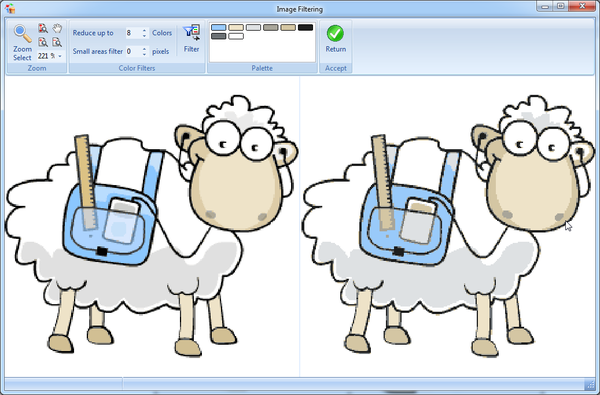
- After two trials we settled down for 8 colors:
The following screen capture shows a better result: the nose holes are still there. However, we have too many speckles, e.g. a dot in the saddle bag but we will remove these later. You also may notice the the IPod is no longer recognizable as such. Since it's a fairly small object that doesn't matter much. If it does matter, consider the option of adding some precise vector graphics at a later stage. Our goal for now is to reduce colors as much as we can since changing threads a lot is not an option we like. Also, we (and you) probably don't have that many color variations anyhow. One maybe has two versions of beige, but not three.
- Click on the green Return button to accept this color reduction.
- Save the file under a different filename, e.g. lams-2.dsg. We feel that it is important to keep a safe version for each major design step.
Conversion to a vector image
The bad strategy: Now that we have a simple bitmap we could start converting it directly to stitches. We might click on Convert (top menu bar) and see three choices: Art to stitch (intelligent), Art to Stitch (Area only and Image to Stitch. "Art" refers to clean graphics, and in particular vector graphics. Our picture is sort of in between, e.g. some lines are quite fuzzy. We therefore should select Image to photo-stitch. However, we will not use this procedure and do a proper vectorization first.
Let's start.
- Select the Layout tab in the top menu bar line. Don't miss that or you never will even see the Convert to Vector button.
- Click on the Convert to Vector button.
Step 1:
You know can cleanup the picture a bit, i.e. remove some speckles, manually merge colors and finally decide about the background color.
(1) Since we already reduced colors, we won't to that again. Move the slider Reduction to a figure that is higher. Since we have 8 colors, move to 16 for example. (And the reason why we reduced colors with the image filtering tool beforehand is simple, for some reason one cannot enter just 7 colors for example...)
(b) You may attempt to close so-called holes. "Holes" are small speckles, e.g. 2x2 pixels that we could eliminate. For our LAMS, we selected no, since it would destroy the borders for the legs. However, you also could select 4 and the wind up with some more "create" embroidery. To try out these changes click on Filter. You now can see a cleaned up picture in the right panel
(c) Looking at the 8-color pictures (both sides), you notice maybe that we have three sorts of grey, a medium, a dark and very dark (or maybe it's black). We now can select these three colors. Hold down the CTRL key and select each color and hit the Combine button. You then can immediately undo these mergers with the little undo icons. The resulting color is sort of a mix between the selected colors. If you find it ugly, don't worry, you will be able to change colors later if you wish.
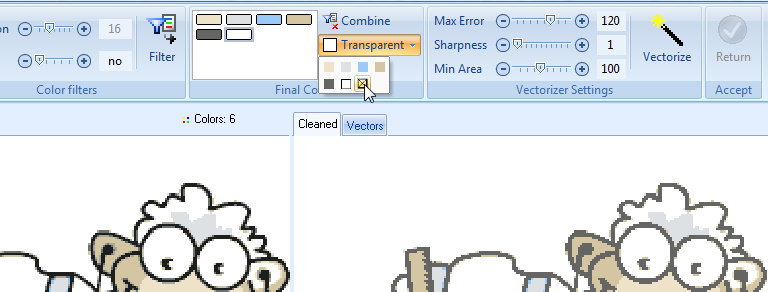
(d) Now there is final and very important decision to make. By default the vectorizer will treat white color as transparent background color. This means that white areas of the lamb won't be vectorized and could not be printed. If you plan to print the mascot on a white shirt, it's probably a good decision not to print the white areas, since the black outlines perfectly will define the contour of the lamb.
However, since we plan to print on other textiles than white, we do want the white areas to be vectorized. Therefore we turn transparent off.
Step 2:
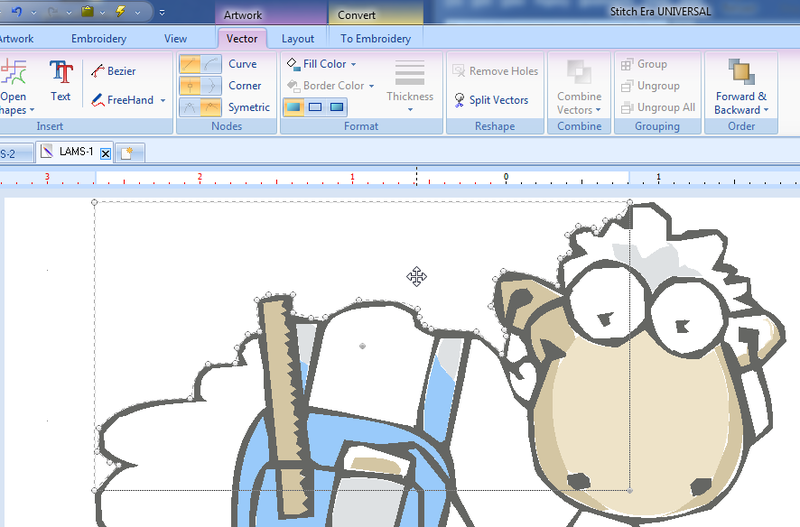
We now can transform this cleaned image into a so-called vector image, i.e. an image that will contain lines and files (as opposed to colored pixels that we have now).
In the vectorizer section there a three parameters we can tune:
- Max Error: increases or decreased the curvature with respect to the original picture.
- Sharpness: Will reduce the number of points that define lines and outlines of shapes.
- Min Area: Allows to eliminate smaller areas.
In a drawing like this one that was originally a drawing (as opposed to a paint or a photograph), there isn't much need to reduce sharpness and defined minimal areas (unless you scanned the pictures or the bitmap is really bad quality). We just left all the sliders in the minimum position. Since the picture was made by graphist we will his/her curves and put Max Error to 160, i.e. near the maximum. The sharpness parameter interacts with the Max Error. If Max error is big, sharpness will have less impact. If Max error is low, sharpness will have high impact. Try it ....
Vectorization is a trial and error process that you could repeat as much as you like. We decided to use the following parameters:
- Max Error = 160
- Sharpness = 1 (in order to preserve some of the lines in the statchel area)
- Min Area = 10 (the minimum, since the picture looked fairly clean).
You now can click on Accept/Return
Remove unnecessary white areas
If you did decide to vectorize white areas you now have a really large background that will be stitched. Since we only want to stitch the lam, we have to remove these. That is easy.
- Just click around the lamb and remove all the rectangles that go outwards by hitting the delete key. You also should remove the areas between the walkman cable and the face since these are not par of the sheep either.
- Save the file under a yet different filename. E.g. lams-3.dsg
Convert the vector image to stitches
- Select the whole vector drawing: Hit CTRL-A or select the lamb with a larger than the lamb rectangle
- Now clik on Convert on the very top menu. If you can't see this button, then forgot to select...
Now you should see four options:
- Select Art to Stitch (intelligent)
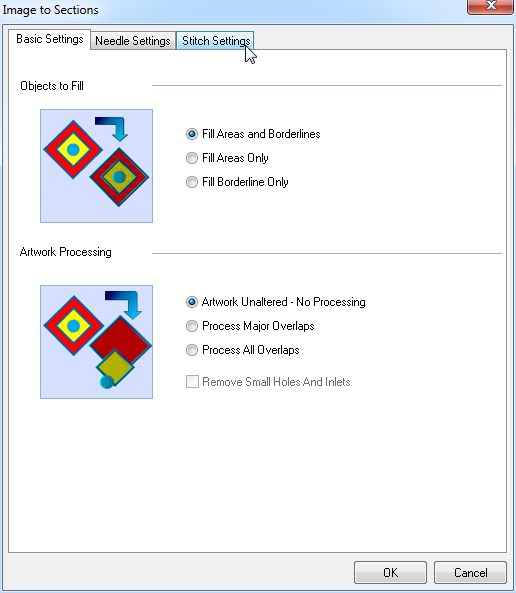
You now can configure three kinds of conversion parameters. Do not click on OK before you are done with all three tabs.
- Basic settings allow to define whether you want to stitch just the lines, just the fills or both. We select both here. Then you also could decide how to deal with overlaps. Since we vectorized a picture we don't have overlaps and don't need to care.
- You then can change the needle setting. E.g. we could replace our ugly grey with a nice black. You also could do this on your embroidery machine ...
- Finally, you then can select default pattern type, i.e. define how fills will be stitched. You also can decide whether the program will treat a shape as a line or fill (in terms of stitching). We left all the defaults
- Now click on OK. If you are unhappy, hit CTRL-Z and restart. Make sure to tick the vectors button (little green button on top right), else you cannot see your drawing !
Add extra art and fix thread color numbers
(1) If you feel that something is missing you now can add other elements. E.g. you could add big eyes, since the left one was somehow lost in the process.
- Untick embroidery (top right button)
- Remove small ugly graphics for eyes
- Replace by nice round eyes (use "Closed shapes for that")
(2) Optimize Needles
- Since you don't wish to rethread more then once the same color, click on the optimize needles button in the Images palette in the toolbar to the left.
- Finally, you could assign the right color palette and use color numbers of the thread make you use (e.g. Madeira instead of system DB). More about this later...
Now generate the stitch file. Select the file button (top left) and Save File -> Export as Embroidery Machine Format. Select *.jef for Elan/Janome or whatever format your machine does... the print and enjoy.
The result doesn't look exactly as expected since we probably didn't understand that the very light beige was encoded as some sort of white that we then fed into the machine. It's probably a good idea to create a full palette with all your threads and then use these or just use the system colors and then guess. A mixture of the two is confusing for the machine if we understood right....
Also, this kind of complicated embroidery should maybe be a bit bigger and it might be a good idea to try a version with white areas removed.
Anyhow, this was my very first embroidery from a bitmap and my second "creation" in total and I am happy with respect to that. - Daniel K. Schneider 18:53, 20 May 2011 (CEST).
Create the stitches and look at them
- Click on the lightning button on top. This will produce all the stitches.
For visualization, you could
- Untick the Vectors button (top right)
- Tick the simulation view (3D) in the lowever left (F7)
Again, if you are unhappy, hit CTRL-Z and restart.
Simple drawing
To create vector graphics, click on Artwork (top menu). Vector graphics must be converted in same way as imported graphics, i.e. fully automated or half manually by selecting "Art to stitch" area or line only. Press the yellow flash in the quick toolbar once you are happy with the selected parameters
Besides importing graphics, you can create vector graphics with five tools:
- Closed shapes (a set of predefined shapes)
- Open Shapes (a set of predefined pathes)
- Text (not lettering..)
- Bezier: draw so-called Bezier curves
- FreeHand: draw freehand (with optional smoothing)
Once you inserted objects with any of these tools you can modify them in several ways:
- Clicking on an object shows controls that you can move to change the path or shape
- Pressing the CTRL button allows to rotate most parts
- Right-click (context menu) gives various options
Vectors are defined by several types of nodes
- ... more to come
Constructive solid geometry
- You also can define new shapes by combining shapes like in some CAD/CAM programs, e.g. you could subtract one shape from another like creating moon with two circles. Use the Combine menu for that.
Lettering
There two basic ways for creating letters
- Start from vector letters and then convert to stitches. This may work with large letters and even then not lead to optimal results since digitizing stitcheable letters is an art by itself ....
- Use specialized lettering software that can produce stitches from letters. In the SEU program, Words are represented as Stitching objects of type Text. Each text then is composed of either simple characters (like a "c") or composed characters like an "m". This probably also depends on the font. There are two kinds of built-in lettering fonts:
- Special purpose digitized "artistic fonts"
- Standard digitized true type fonts.
Good lettering software will recompute the stitches when you change font type and/or font size.
In SEU digitized words are editable, i.e. you can fix spelling mistakes (see below)
Word editing
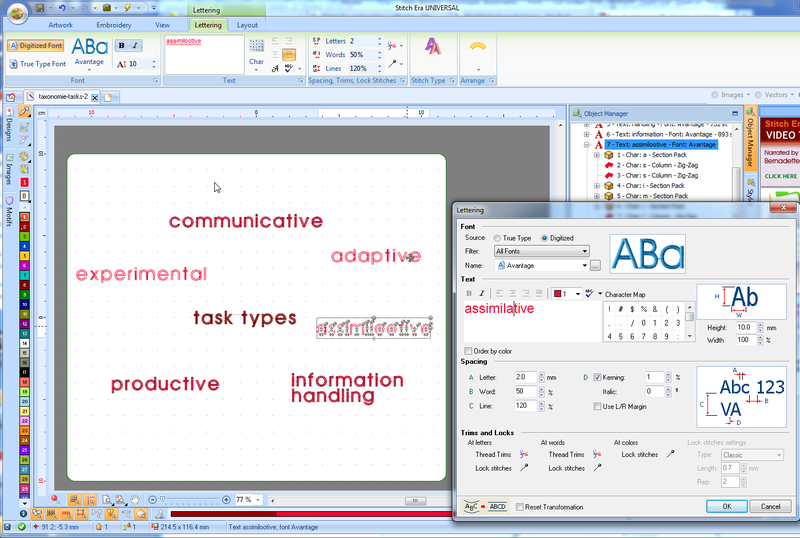
The Lettering panel that allows to edit text, is available through the context menu (select the object, right click on the object and select Text properties) or as expansion of the text panel in the main menu bar.
This panel allows to edit text, to change fonts, size, distances. In addition you may specify trims and locks.
Tips:
- We found it very good voodoo to tick Reset Transformation after changing sizes and distances. Somehow, the Reprocess All (lightning button in the quick access bar) doesn't reprocess all the time. E.g. for small letters (smaller than recommended), the textbox is not resized without ticking "reset transformation".
How small can one print ?
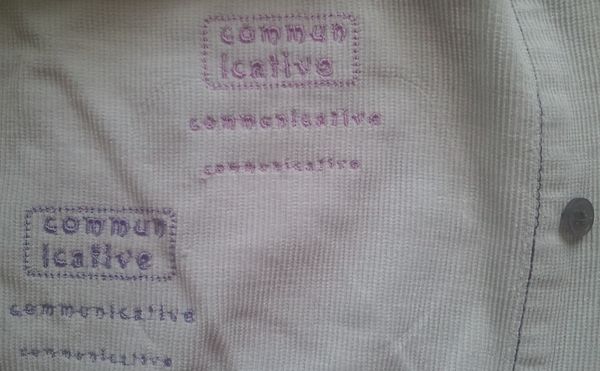
After a little test we believe that one could go as low as 5mm in height under the following conditions:
- fabric must be flat
- fabric must be stabilized
- contrast between fabric and letters must be high
- Stitching speed should be slowed down a bit
The following picture shows a test that doesn't respect these principles:
- Top right uses the the digitized Artistik font with sizes 10mm, 7mm and 5mm
- Bottom left group used the True Type Arial Rounded MT font with the same sizes
Open questions:
- Is is possible to print digitized fonts otherwise than with a zig-zag technique, i.e. use straight lines instead ? Below 1mm, zig-zag does seem to have problems. We tried to convert stitching to vectors and then to redigitize, but at some point the program crashed. Otherwise one also could change the stitch patterns. To explore more ....
- How much work is editing at the stitch level in order to fix some badly converted characters? We found that "w"'s are not well liked when working with "tiny" Arial and similar fonts.
Drawing embroidery objects
Instead of drawing vector objects first you can directly create embroidery objects.
- Select embroidery in the main menu bar on top or select "Create Sections" in the little design panel to the left.
Links
- Official
- Stitch Era Universal Website #1
- stitchera website #2
- EmbroideryABC webiste #3
- Official documentation and forums
- Stitch era distributes a nice 250 page printable PDF manual (see the start page). Last time checked it was here.
- The Stitch era community formus
- Yahoo group StitchEraUniversal
- YouTube training and demo videos
- Tutorials in other languages
- Tutoriels vidéo et traduction française du manuel par Chantal.
