Stitch Era embroidery software
<pageby nominor="false" comments="false"/>
Introduction
Stitch Era Universal by Sierra is an advanced free embroidery design software that you can get under certain conditions:
- You only get it from an authorized dealer. E.g. since I live in France, I got it from the french authorized reseller. For countries like Switzerland that do not have authorized resellers you will have to send some mail to headquarters.
- You need to register and obtain a license number and key (and renew these periodically)
- The application must be conntected to the Internet permanently and there are advertizements. However they don' flicker, just eat up some space to the right.
- The free version limits stitch count to 40'000 stitches. That's a fairly large design, unless you fill up all the space with stitches.
The purpose of this entry is to help people get going past the very first steps. It will never become a stitch era manual. I just will use it to write down a few tricks and tips while I learn myself ... - Daniel K. Schneider 16:49, 16 May 2011 (CEST).
Download and installation
Stitch Era Universal is distributed by Authorized Distributors (either via CD or online) unless you are lucky to live in a country without. Installation and use requires a permanent Internet connection. Software contains advertising. Download can take a long time and you need to find a download site for your country (e.g. for France use Annika's site). You first have to install a downloader, then a download the > 400 MB installation files with the downloader program.
After going through the complicated finding-a-place-to-download, the double download and authentication, we found that this program runs fine on Win 7 64 bit.
The user interface
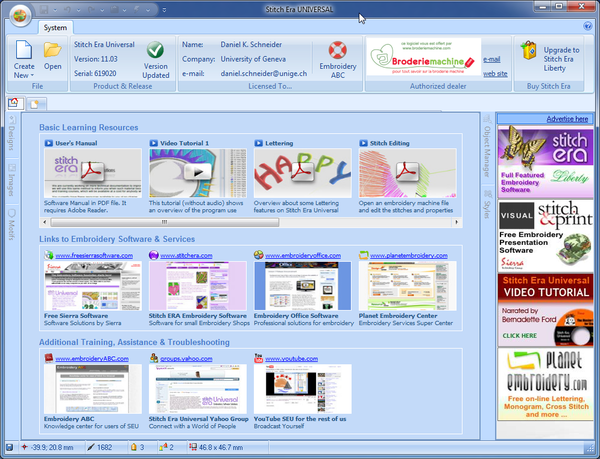
At start up, Stitch Era software that does have a license and a key should look like this:
- Before you click on Create New, download the manual and read some of it (first item under Basic Learning Resources in this startup screen).
- For a new design, select quick start using a simple wizard. You then can specify textile and hoop size (ordered by machines).
The interface is fairly complex and we really suggest reading at least parts of the manual and/or looking at some training videos.
- You have links to both in the start-up screen, else see below.
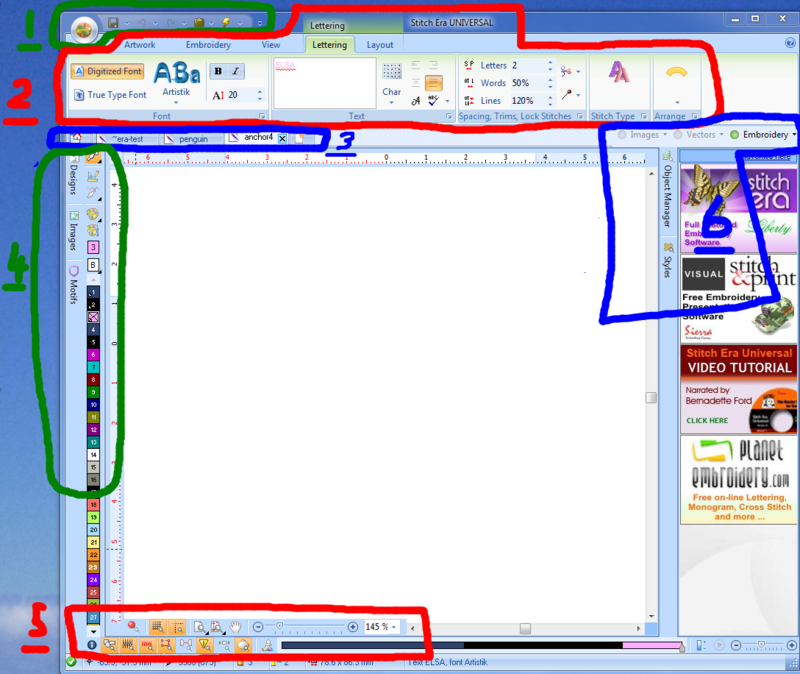
- File Menu button and quick access toolbar
- Ribbon bar (main tools). These can change contextually.
- Create and edit tools / color palette
- Display and reference controls
Simple digitizing
We found that digitizing vector graphics is much easier than bitmaps and this is not a surprise of course. Therefore if ever you can avoid starting with *.jpg, *.gif, *.png pictures whenever you can. Digitizing photographs is another issue and much more difficult since you also whould have to reduce colors, despeckle, smooth lines, etc.
Below is the rough procedure for stitching from simple vector graphics. Stitch Era seems to be a fairly sophisticated emroidery suite and can do much more. But it's probably the kind of stuff other beginners would want to try first ...
(1) Get a vector image
- Finding clip art on the web is quite a nightmare (read Clipart for some tips).
- We got ours from http://openclipart.org, i.e. this nice anchor. Click on "Download SVG" and then just save as anchor.svg somewhere. Read about SVG, the only nice vector format on the web.
(2) Import the vector graphics to STitch Era
- Open the vector image in Inkscape (a free program), Illustrator CS5 (I tested with both) or another vector program that can copy a drawing to the Windows clipboard.
- Still in the drawing program, select all (Ctrl-A in most programs) or the part you wish to stitch and copy it (CTRL-C in most programs)
- Then go to Stitch Era and click on paste EMF vector. Notice: The "Get from Application" feature doesn't work for me, which is too bad since EMF is lossy with respect to AI or SVG format. Probably, because I got a fairly new version of Illustrator.
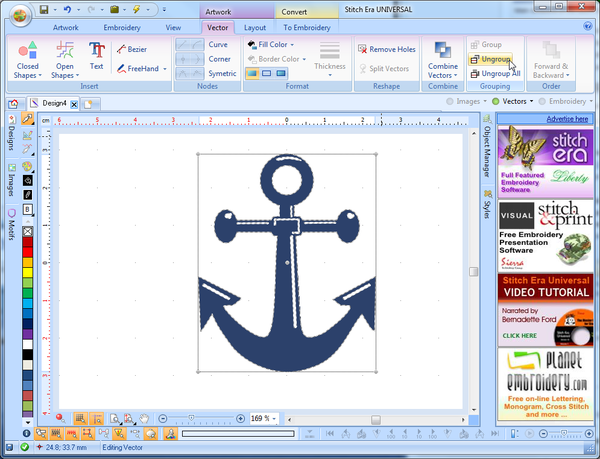
- You now should see something like this:
(3) Optional: Edit the vector graphics
- You now have the choice to edit this a bit if needed. In principle you better do any editing in the drawing program. Anyhow, I clicked on ungroup all in order to get rid of the white lines which are not needed for stitching. This was actually a bit tricky since I couldn't see these parts (for a reason I don't understand). I therefore selected the blue part (click) and moved it way to the left and then selected the empty area with the white stuff and hit delete...
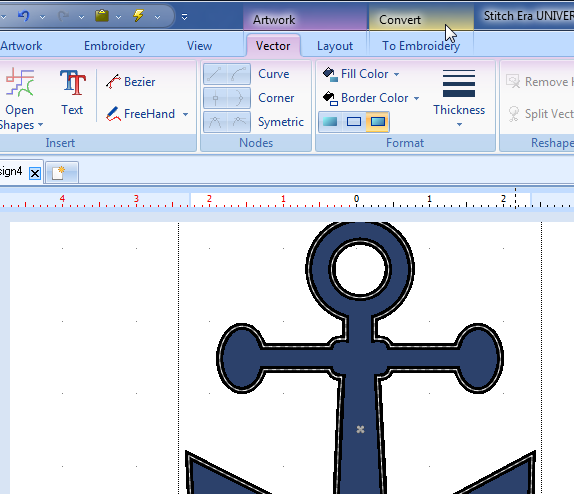
- I then made the borders a bit fatter with the "Thickness" pulldown menu. You can define thickness for parts (not combined objects)
- Then move on to auto-punching (I guess it's called that way), but save the file first.
(4) Convert to stitches
- If not alread done so, select the object first, e.g. move the cursor into the drawing area and press CTRL-A
- Click on Convert (notice how the tabs change in the program). If you can't see the "Convert button", make sure you really selected the object on the screen !
- You now can choose between letting the program decide for you or vectorize fills (areas) and strokes (lines) yourself. Try Art to Stitch (intelligent) first. Untick the little round Vectors button to the right in order to see the stitches.
- If you are unhappy, you could hit CTRL-Z and change for instance the stitch pattern (tab in the popup menu after clicking on Art to Stitch).
(5) Add other clipart or lettering or whatever
- ... as you like
(6) Export
- Save this file if not already done so. Keep the *.dsg file for re-editing
- Click on the "File" button (top left) and export to the desired machine format, e.g. I chose *.jef for Elna/Janome.
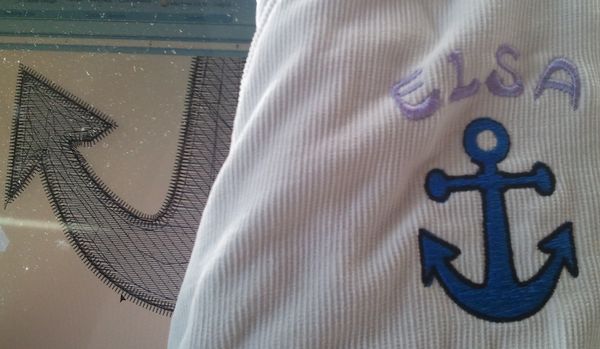
The result
Not too bad for my second digitalization / stitching (the first one was a smaller anchor without the lettering). There are some mistakes, probably because the tissue moved. I didn't iron a stabilizing tissue underneath. Also, the anchor head doesn't look as good since the bobbin underneath ran out of thread and I forgot to backtrack after changing it I think.
A picture showing the machine "printing" it, is in the Elna 8300 article.
Links
- Official
- Stitch Era Universal Website #1
- stitchera website #2
- Official documentation and forums
- Stitch era distributes a nice 250 page printable PDF manual (see the start page). Last time checked it was here.
- The Stitch era community formus
