Stitch Era - stitching children's drawings
Introduction
This article describes how to create embroidery from from children's drawings and give advice on what kinds of drawings are easier to stitch.
Firstly you should scan the drawing or if you don't have a scanner take a clean picture. Then you can follow the steps we outline below.
Stitching a drawing is both easy and difficult. Color management is easy if the drawing was made with pens and without much overlap. Dealing with large surfaces can be a problem if you plan to create a large and easily wearable design.
The major problem is to modify the drawing or the stitch sections so that they overlap a bit. Without overlap, there will be gaps which may or may not be a problem depending on the drawing.
Dealing with a PDF scan
Our scanner at work produces PDF files, a format you cannot import to Stitch Era. There are two paths: Either import the PDF to a drawing software or save the PDF in a picture format and directly import to Stitch Era.
Tracing a PDF with either Inkscape or Illustrator has two major drawbacks. It will create one single path with a single color. Adding color to elements then means to make cuts in selected areas of the vector path and color.
Therefore we suggest translating the PDF into a PNG image file.
- Under Windows, you can use the commercial Adobe Acrobat Pro program (I don't know if the free reader can export. If not just make a screen capture using a software like Greenshot
- Under Linux, either install ImageMagik or search for another solution. ImageMagik also is available for Windows and Mac.
Conversion with ImageMagik, using the command line:
convert -density 300 -quality 100 input.pdf output.png
Vectorizing a drawing in Stitch Era
If you can rely on a clean scan, you should be able to reduce the colors to the ones that the child really used.
Clip the picture
Firstly you should crop the image
- Import the picture
- Select
Artworktab, thenOpen Image(button to the left in the menu bar)
- Select the picture
Artworktab, thenLayout> (subtab), thenCrop Image- Start in the upper left corner and drag the cursor. It will crop if you release the mouse button. Hit CTL-Z if you got it wrong.
Resize the picture
- Select the picture
- Click on Artwork -> Image
In the upper left you can change its size. e.g. the width to 90 (which means 9cm). You also can reduce vectors or even stitch areas, but its easier to reduce the picture first.
Reduce the colors
In the same toolset (Artwork->Layout) you can reduce colors. For an embroidery you should use a minimum of colors, maybe between 5 and 10. We strongly suggest to do this even if you believe that you only can see N colors. Various physical constraints from paper and drawing plus the scanning will actually give you lots of colors. E.g. in picture below, there are several shades of green due to different pressure, overlays, etc.
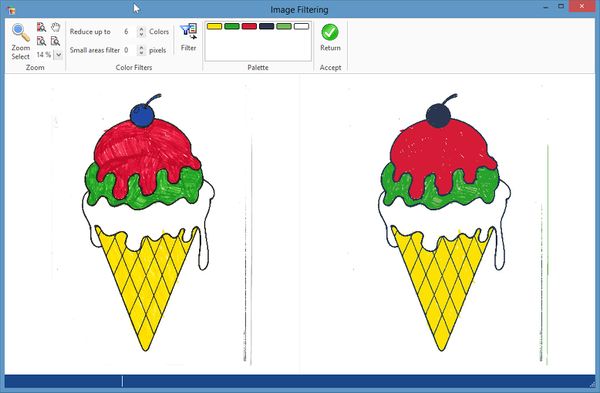
- For the following drawing I counted the colors (5) plus white background: 6 colors
- Enter the number and if you are happy with the result click Accept.
Too many colors is better than not enough since you always can merge later. Compare the two following pictures. The 6 color solution is not good since it merged dark blue with black. The 7 color solution does have blue. You later can merge the two greens.
We also should have cropped the ice cream picture a bit. But the lines to the right won't be vectorized or else could easily be removed ...
Finally, save the file now and maybe create a backup copy.
Create a vector image
Now should create a vector image. In theory you could directly digitize pictures but this only works with a given kind, e.g. portrait with strong contrasts.
Select Artwork -> Image tab
- Decide if you want to reduce holes. E.g. set holes to 10.
- Click on
Filter (not needed to reduce colors since we already did that, but we need to preprocess the picture). Make sure that white is selected as transparent color if white is only used in the background. If the child did use white that must be stitched then deselect.
- Vectorize using the standard settings first. Hit the
Vectorize Icon. If you want to simplify the result a bit, try setting sharpness to a higher value.
- Vectorizing takes some time. Watch the progress bar in the lower left before you think that the program is stuck.
- Then in the right picture panel, select "vectorized" tab if necessary.
- If you are happy with the result click
Return . Else read more in the Stitch Era - digitizing complex bitmap images tutorial
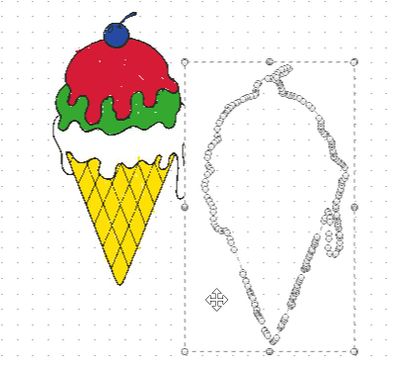
The following picture shows a design where we merged two greens and did not keep white as background (to be eliminated). We easily can remove the "outer" white.
Unless you want to stitch a badge-like design remove the background (outer white). Drag it out before killing in order to make sure that it is not connected to some "inner" white that you want to stitch. If it was connected then, CTRL-Z back into position. Then, you should learn how to cut vectors (read Stitch Era - vector graphics).
Auto digitize
- Save the file, and create a backup copy
- Select all, click in an empty space, then hit CTRL-A
- Select embroidery tab and then hit
Art to Stitch
For a picture like this one you could lower the density of both patterns and satin stitches to 4mm to make it less heavy to wear. This can be fixed in the advanced settings of the Art-to-Stich (intelligent) dialog.
If you have a multi-needle machine we suggest ticking "Cut after stitch sections" in the advanced settings
For more information about digitizing, read the other Stitch Era tutorials.
Repairing
You also should learn how to trouble shoot, in particular how to fix broken direction lines.
Open the object manager and fix one by one each error. Click on the object you want to fix, either in the object manager or in the error console and hit SHIFT-F6 to maximize. Consider deleting tiny sections. Do not ignore errors for large sections, since faulty sections will not be stitched !
- To try first: Select the stitch section that has problem. In the context menu (right click) that pops out over the workspace (drawing) area, select autocomplete. This will attempt to finish problematic sections, e.g. ones that have main reference or section line problems. If you stitches now a are generated, you are done.
The following picture shows a complex stitch section that extends all over and around the design. Autocomplete helped finish to stitch generation for sub-sections.
Direction line problems: delete all yellow direction lines except one. Select a yellow handle and hit the DEL key. For the one you kept, one make sure that it stretches all over the stitch section (drag the yellow handles)
View the result before you stitch
- Untick Auxiliar, tick Embroidery and it CTRL-F9 if you made any modifications
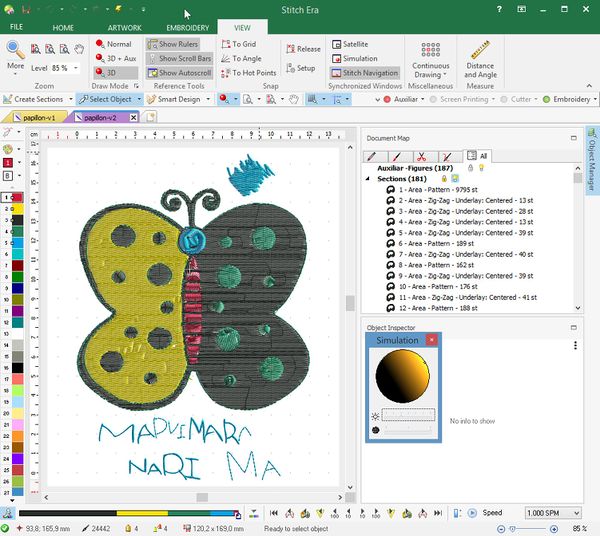
- Open the View Tab and Select 3D in Draw Mode. You can adjust quality and luminosity with the little pull out menu.
This picture "suggested" to replace the running stitches for the "lettering" at the bottom by zigzags, which we did. Also, one can see irregularities in the wing patterns. That is a question of taste. I think that children's drawings should be irregular :)
Test printing and tuning
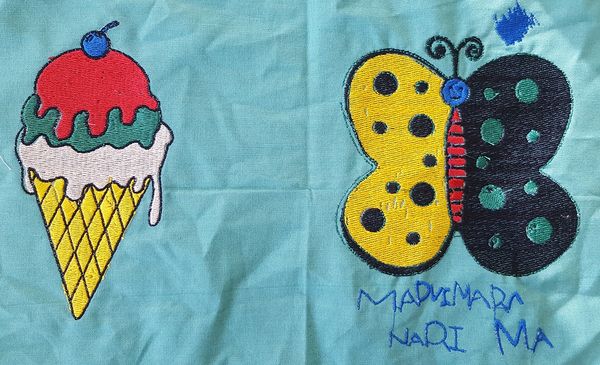
Below is the result of the procedure as explained above (i.e. a fairly quick solution):
 Test print with our Brother PR1050X
Possible improvements:
- Some pull compensation or changing the definition of the tissue (we used the default settings: none). As you can see, the long patterns horizontally pulled the tissue a bit.
- Better preparation of the tissue, including a stronger stabilizer (I used my favorite auto-adhesive tearaway backing). Hooping probably should have been a bit better too, although I must say that the PRX1050 standard hoops are pretty easy to use.
- Have the vectors overlap before digitizing or modify some stitch sections to overlap. In particular the zizag contour of the butterfly to the left should be made to overlap and the green running stitch must be moved closer or maybe be removed. This can be quite tedious. You can enlarge any object (either in both or a single direction) but then you also will to adjust size and position of the other objects. The best solution is to edit the vectors, i.e. move the control points. Before doing so, you really should trim the vectors i.e. make them simpler. Select at least two, then you can "trim shapes" through the combine vectors dialog (in the layout ribbon bar or in the context menu). Read Stitch Era - vector graphics for more information.
- Another, simpler alternative is to create a border line for larger sections, but the result will probably be uglier. Since Stitch Era (unless I missed something) does not allow adding borders to simple vector paths you should use a workaround. You could select the vector object, right click and select contour with offset -> Custom. Alternatively export the design as *.emf or *.dxf, import into some drawing program and edit there. E.g. Inkscape allows importing EMF and then adding a stroke to a fill. After saving and importing to Stitch Era there will be two vectors: One for the fill and another for the stroke (border line).
The result and discussion
We made this test with a total of three drawings, two of which discussed above. The final result wasn't too convincing since the embroidery went on a stretchable jeans jacket. You can see that the tissue is a little bit warped here and there. However, as discussed above, some imperfections of the surfaces were wanted since these are designs made by a young child.
Hooping was difficult. I got it too loose in two cases, since it was difficult to pull the tissue with its seams and I used a simple auto-adhesive stabilizer that would not stick enough to the tissue when pulled. Also, I had to reduce two pictures a bit because I did not manage to fit a 13x8cm hoop well enough, i.e. I made them fit the 10x10cm hoop.
Reducing the size of a stitch design is an easy procedure. Select all embroidery objects, then resize, then regenerate the stitches with CTL-F9 (not the stich sections !)
Generally speaking it seems that drawings made with thick color pens are fairly easy to deal with as opposed to paintings for example. Stitching large designs on flexible tissue is a problem. Consider drawings with empty space and avoid narrow zig-zag lines for these.
Below is an overview of things to do:
- Change saturation, contrast and brightness to maximize features that you want to stand out and stitch with different colors
- Reduce colors to maximum about twice the number of colors you plan to stitch
- Merge the reduced colors to the colors you plan to stitch. In the same step, try to eliminate small holes
- Vectorize as aggressively as possible and eliminate small parts
- Smooth vectors if possible (if you CTRL-A, then the program can crash) and adjust some if needed.
- Have vectors overlap if you want a connected surface
- Verify choice of textile type (it will influence pull compensation) and make sure that hoop size is defined
- Then digitize
- Modify stitch sections if needed, e.g. transform all running stitches to zig-zag or the other way round.


