Illustrator for laser cutting and engraving: Difference between revisions
No edit summary |
|||
| Line 57: | Line 57: | ||
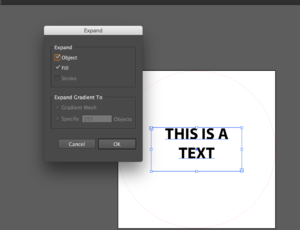
[[Image:Expand object.png|thumb|none|left|How to expand stroke and fill in Illustrator]] | [[Image:Expand object.png|thumb|none|left|How to expand stroke and fill in Illustrator]] | ||
=== Add text === | |||
== Prepare the file in Illustrator to be printed through InkScape == | == Prepare the file in Illustrator to be printed through InkScape == | ||
Revision as of 21:32, 14 January 2020
This article or section is currently under construction
In principle, someone is working on it and there should be a better version in a not so distant future.
If you want to modify this page, please discuss it with the person working on it (see the "history")
Software description
Adobe Illustrator is a vector graphics editor. It's part of the Adobe Creative Cloud suite, and it's sold in a subscription-based model. Illustrator is compatible (although not completely) with InkScape. Both software allow exporting in .svg, PDF, .eps, and .ps formats.
Main Tools
Illustrator has a variety of tools for selecting, drawing, typing, painting, rotating, reshaping, creating graphs, zooming and moving objects (to cite a few). One of the most important tool is the pen tool, which allows to create straight and curve lines, create (and delete) anchor points on paths.
How to create a 8 cm diameter badge
Create the project and the outer circle
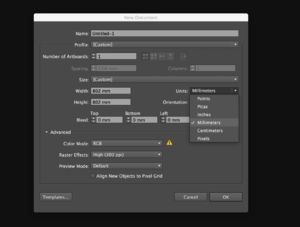
Start with opening a new project and set its size to be 802 mm (800 mm for the circle and 2 mm to work as a margin). It is possible to change the units (if not already in millimiters) by selecting the right unit from the drop-down menu, as shown in the picture below.
To later align the 8 cm circle to the center of the page one can use the rulers or align the circle to the center of the Artboard.
- To show the rulers, either click Ctrl+R (or Cmd+R for Mac users) or go to View>Rulers>Show rulers.
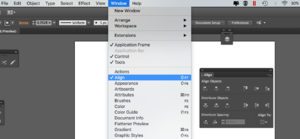
- To show the align menu, go to Window and select Align. A menu will appear on your workspace.
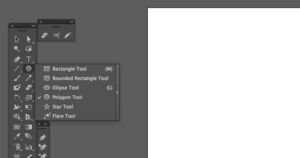
To draw the circle, select the ellipse shape in the tool menu on the left and drag the shape while holding the shift key in order to draw a perfect circle. If the ellipse tool is not available directly, click on the small triangle on the right bottom corner of the shape tool: all the shapes will appear.
Once the circle is created, select it and adjust its size to be 800 mm on both height and width from the Transform panel.
At this point, align it to the center of the Artboard, remove the fill and set the stroke weight to be 0,01 mm and change the colour to red (RGB: 255, 0, 0). This is the circle that the laser will cut, is therefore important to set the right colour and stroke weight.
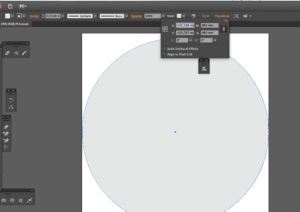
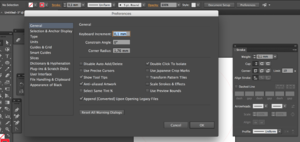
If the stroke units are not set to millimetres, is possible to change them. Go to "Preference" in the Control Panel (the panel that runs across the document window), select Units and change to millimetres the units for the stroke, as shown in the image below.
Align to pixel grid option
It is possible that, despite having set all the units to millimetres, you are not able to reduce the stroke weight down to 0,01 mm. This is probably due to the fact that the Align to pixel grid option is checked in the Transform panel. This Illustrator feature allows to create sharp images for the web. The pixel grid assumes the smallest measurement is 1 pixel (1 point, or 0,1 mm) so you can't draw a stroke smaller than 1px (or 1 pt or 0,1 mm). To change this setting go to "Transform" in the Control Panel and uncheck the "Align to pixel grid" option.
How to create the inner image
You're now ready to create (or import) the image or text that will be engraved. Make sure that the fill colour is set to black (RGB: 0,0,0). All the objects (text and images) that you wish to engrave must have only the fill (no stroke).
Outline stroke
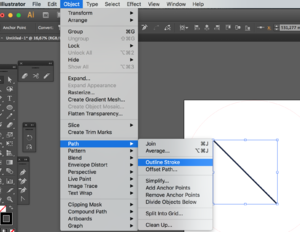
If your object has lines, these must be transformed so has to have only a fill. In order to do so, select the line and go to Object>Path>Outline stroke. This will transform the line into a shape with no stroke and only fill.
Expand objects
If you have more complex objects or a text, the principle is the same but the procedure is slightly different. Even though texts have no stroke, they must be transformed into shapes (paths) in order to be engraved. In order to do so, select the objects, go to Object>Expand and select either Object, Fill, Stroke, or all of them (depending on what you want to transform).
Add text
Prepare the file in Illustrator to be printed through InkScape
If the computer connected to the laser machine doesn't have Illustrator installed, you can export your graphics under the SVG format. When printing an .svg file created via Illustrator through InkScape, you need to take into account the fact that the two softwares does not use the same resolution. Illustrator exports .svg in 72 dpi, while Inkscape does so in 90 dpi. Therefore you have to scale up your image to 125%, so as to have the correct size when opening the file in InkScape. In order to do so, before exporting:
- Select all the elements you want to scale.
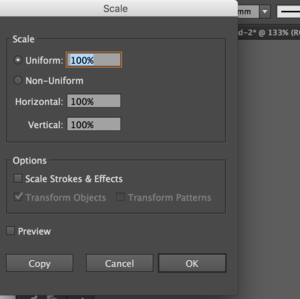
- Go to Objet > Transform > Scale and select a uniform scale at 125%. Deselect the option Scale stroke and effects in order to avoid the stroke of outer circle to be affected by the scaling.
- Adjust your Artboard (Shift + O) or change it from File>Document Setup>Edit Artboards
- Save as .svg
Sources
- Abobe Illustrator page on Wikipedia
- Illustrator pour la découpe et la gravure laser on EduTechWiki
