Stitch Era - creating embroidery patches: Difference between revisions
| Line 17: | Line 17: | ||
== Example study - 3D printing badge == | == Example study - 3D printing badge == | ||
[[File:3d-printed-hand-noun_353559.svg|thumb|200px|right]] | [[File:3d-printed-hand-noun_353559.svg|thumb|none|200px|right]] | ||
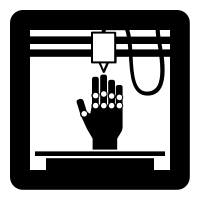
Let us start with a [https://thenounproject.com/willadams0/collection/3d-printing/?i=353559 3D printed hand] from the noun-project. | Let us start with a [https://thenounproject.com/willadams0/collection/3d-printing/?i=353559 3D printed hand] from the noun-project. | ||
| Line 32: | Line 32: | ||
We now have three vector objects, i.e. the printer, the hand and a platform. We changed colors for each one. | We now have three vector objects, i.e. the printer, the hand and a platform. We changed colors for each one. | ||
[[File:3d-printing-icon-2.png|thumb|600px|3D printing icon imported and ungrouped]] | [[File:3d-printing-icon-2.png|thumb|none|600px|3D printing icon imported and ungrouped]] | ||
Since a back is supposed to be stitched fully, we now will add a background. The simplest way to do this, is to create a contour and then fill it: | Since a back is supposed to be stitched fully, we now will add a background. The simplest way to do this, is to create a contour and then fill it: | ||
| Line 42: | Line 42: | ||
Now transform the red rounded rectangle into a light blue filled rectangle with a fat border. | Now transform the red rounded rectangle into a light blue filled rectangle with a fat border. | ||
[[File:3d-printing-icon-4.png|thumb|600px|Background with a fat black border]] | [[File:3d-printing-icon-4.png|thumb|none|600px|Background with a fat black border]] | ||
Revision as of 20:03, 12 December 2017
Introduction
This article describes how to create embroidery patches, also called cloth badges for example, and that you can attach to cloth by various means.
A typical embroidery patch has the following properties
- It is stitched on some solid fabric (or special plastic)
- It usually covers the whole surface
- It is relatively small, i.e. 3cm to 8cm
- It can have various shapes, e.g. astronaut patches are round.
The difficulty consists in getting the borders right.
Example study - 3D printing badge
Let us start with a 3D printed hand from the noun-project.
Before importing it to Stitch Era we made some adjustment to the SVG in Inksacpe
- Adjust size to 8cm by 8cm using Inkscape.
- Adapt document size to drawing size plus 1mm (File -> Document Properties)
- Save as optimized SVG
- Save as simple SVG
Import to stitch Era, adjust size (again) and ungroup
- Importing to Stitch Era was OK, but the size was wrong
- Artwork Tab -> Layout. Set the size to 80
- Artwork Tab -> Layout. Un group all
We now have three vector objects, i.e. the printer, the hand and a platform. We changed colors for each one.
Since a back is supposed to be stitched fully, we now will add a background. The simplest way to do this, is to create a contour and then fill it:
- Select all or just the printer object
- Artwork Tab -> Layout. Click on
Contour with Offset - Select Custom and keep the defaults (outer offset)
- Kill the superfluous objects created inside the printer (2 red vector lines)
Now transform the red rounded rectangle into a light blue filled rectangle with a fat border.
