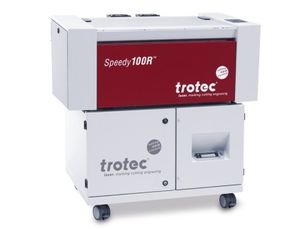
Trotec Speedy 100R: Difference between revisions
Jump to navigation
Jump to search
Print
m (→Print) |
m (→Parameters) |
||
| Line 67: | Line 67: | ||
== Parameters == | == Parameters == | ||
* Input: Any 2D CAD or drawing file. For cutting, the stroke of the vectors should be 0.1mm or smaller. | |||
* Set geometry parameters | |||
* Engraving depth is varied through the laser power or the speed (energy per area unit principle) | * Engraving depth is varied through the laser power or the speed (energy per area unit principle) | ||
* For cutting, Hz settings (pulses per second) should be set to low, in particular if materials are flammable. | * For cutting, Hz settings (pulses per second) should be set to low, in particular if materials are flammable. | ||
Revision as of 15:18, 16 September 2016
Introduction
This page will document the Trotec Speedy 100R that TECFA (me) are in the process of acquiring - Daniel K. Schneider (talk) 18:10, 14 September 2016 (CEST)
Specifications of the 100R at TECFA
This system easily fits into an office and it just needs two electrical standard plugs.
Speedy 100R
- 50 W CO2 laser (Iradion tube)
- 610 x 305 working surface
- 180 cm/sec speed
- Box size: 982 x 780 x 457 mm
- 80 kg
- Air cooling
ATMOS Compact exhaust fan
- 815 x 675 x 555 mm
- 88kg
Official home page:
Outline of the workflow
Preparation steps
(1) Switch the machine on
(2) Place work piece
- open cover
- Place piece into upper left-hand corner, against horizontal and vertical rules
(3a) Focus laser beam (manually)
- By default (for the mid-resolving lens) the beam is located 5.08 cm (2.0 in) below the lens.
- Position the processing head over the work piece
- Hang the focus tool on the external ring of the working head
- Then, move up (by little steps) the working table
(3b) Alternatively, focus laser beam with software
- Click the icon “focus laser” in the Trotec JobControl (make sure that material thickness, table height and lens type are OK !)
Create a graphic
- Any vector graphic will do, since jobcontrol will work from the print file
Preparing the print file
- Select File Print to access the printer driver
- In the Job Control software, specify
- engraving material
- engraving direction
- orientation of the work piece
- orientation of the plate
- Position the job on the plate with a double click
Establish Connectionin JobControl
- Verify
Exhaust Readyin Engraver Control (green arrow) in the Control of the JobControl
- Press
STARTbutton (green arrow) in Job Control.
Parameters
- Input: Any 2D CAD or drawing file. For cutting, the stroke of the vectors should be 0.1mm or smaller.
- Set geometry parameters
- Engraving depth is varied through the laser power or the speed (energy per area unit principle)
- For cutting, Hz settings (pulses per second) should be set to low, in particular if materials are flammable.
Materials
Acrylic (plexi)
There are two different types of acrylic – cast and extruded. The cast acrylic becomes white or mat after engraving, the extruded acrylic remains clear. (Speedy 100 Manual, p. 43)
Links
- Migros Materials (local do-it-yourself shop)
- verre acrylique (500 x 250 x 5 = CHF 12.90)
