Arnitel: Difference between revisions
m (→Filling) |
|||
| (12 intermediate revisions by the same user not shown) | |||
| Line 1: | Line 1: | ||
== Introduction == | == Introduction == | ||
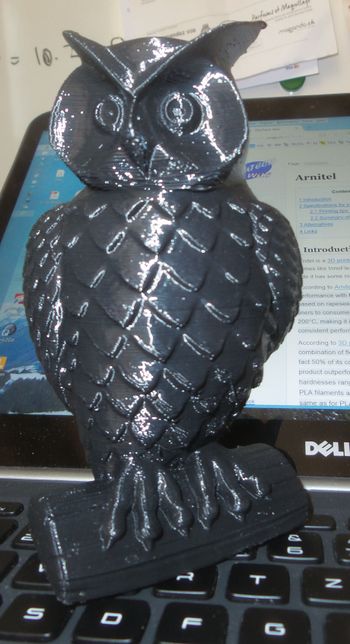
[[File:big-owl-keyboard.jpg|thumb|350px|Arnitel OWL (model made by [http://www.thingiverse.com/thing:18218 Cushwa] (Thingiverse link). Print quality is quite bad, but it was my second Arnitel print. I printed it too fast and too hot]] | |||
Arnitel is a [[3D printer filament]]. It's chemical name is DSM Arnitel Eco and it is made by [http://www.dsm.com/products/arnitel/en_US/home.html DSM]. It is also sold under re-branded names like InnoFlex or "Flex Eco" This elastic plastic is difficult to print since it doesn't stick well to the platform. On the positive side it has some nice properties and it doesn't stink. | Arnitel is a [[3D printer filament]]. It's chemical name is DSM Arnitel Eco and it is made by [http://www.dsm.com/products/arnitel/en_US/home.html DSM]. It is also sold under re-branded names like InnoFlex or "Flex Eco" This elastic plastic is difficult to print since it doesn't stick well to the platform. On the positive side it has some nice properties and it doesn't stink. | ||
| Line 15: | Line 17: | ||
Rumours on the Internet vary widely with respect to printing. In sum, it's about the same picture as with ABS printing. | Rumours on the Internet vary widely with respect to printing. In sum, it's about the same picture as with ABS printing. | ||
* Nozzle temperature is from 210 to 260. It seems that more elastic Arnitel should printed cooler than lesser elastic one (makes sense). Melting temperature is between 180 and 200 (probably). I'd say, for starters, go as high as possible and then go down. I settled at | * Nozzle temperature is from 210 to 260. It seems that more elastic Arnitel should printed cooler than lesser elastic one (makes sense). Melting temperature is between 180 and 200 (probably). I'd say, for starters, go as high as possible and then go down. I settled at 225 degrees for Arnitel Eco 45-D. | ||
* Bed temperature from 55 to 110. The hotter, the better probably since it will stick better. However, too hot temperatures make it expand more and therefore could increase warping. In addition, '''if your printer parts are made with PLA they will bend''' if you heat a lot. (I happened to my Felix Printer after heating the bed to 110 degrees and I had to bend the extruder back with heat gun.... not really optimal) | * Bed temperature from 55 to 110. The hotter, the better probably since it will stick better. However, too hot temperatures make it expand more and therefore could increase warping. In addition, '''if your printer parts are made with PLA they will bend''' if you heat a lot. (I happened to my Felix Printer after heating the bed to 110 degrees and I had to bend the extruder back with heat gun.... not really optimal) | ||
* Print speed: from 40 to 80 mm/s. Faster is OK since flow isn't a problem with Arnitel, but fast probably produces less nice results. | * Print speed: from 40 to 80 mm/s. Faster is OK since flow isn't a problem with Arnitel, but fast probably produces less nice results. | ||
* You need to use some strong adhesive tape or glue (e.g. | * Arnitel warps. You need to use some strong adhesive tape or '''glue''' (e.g. a Pritt Power Stick) if you plan to print more than a few layers with an object that is larger than 2cm. '''Remove the glue''' before you start printing with PLA again. | ||
* Keep the roll stored in plastic (same is true for most filaments ....) | * Keep the roll stored in plastic (same is true for most filaments ....) | ||
; In addition | ; In addition | ||
* Your printer should have a | * Your printer should have a hot-end that stays cool at the top (ventilator, heat diffusing tube). Otherwise the plastic will get too weak after some printing and can not be pushed down anymore and will flow out into the extruder. E.g. I can see this happen with the Felix 1.0 but not with the better designed 2.0 | ||
* If an object detaches through warping you can fix it with adhesive gum in order to finish a print (stop the printer and take your time). | * If an object detaches through warping you can fix it with adhesive gum in order to finish a print (stop the printer and take your time). | ||
* In order to have nicer looking results, augment retraction a bit. | * In order to have nicer looking results, augment retraction a bit. | ||
[[File:owls-arnitel2.jpg| | [[File:owls-arnitel2.jpg|thumb|none|800px|It takes some time to learn it. From left to right: warped, head injury, clogged hot end, belly injury, OK]] | ||
=== Printing tips using a Felix 2.0 printer === | === Printing tips using a Felix 2.0 printer === | ||
Since Arnitel Eco doesn't stick well to the platform (it gets loose once it cools down), you will have to apply the whole bag of tricks: | Since Arnitel Eco doesn't stick well to the platform (it gets loose once it cools down), you will have to apply the whole bag of tricks: | ||
* Heat the bed as much as you can. In principle you can heat at 95 degrees, but '''do not''' | * Add some sticky tape or some PVA glue stick (e.g. Pritt Power stick) or hairspray with a "plastic base". Alternatively, you could try replacing the Kapton tape of the platform with PET tape. PET tape also seems to work better with ABS. | ||
* Heat the bed as much as you can. In principle you can heat at 95 degrees, but '''do not''' since the heat then may cause the PLA extruder to bend downwards.... If you use glue, then the temperature can be lower. | |||
* Make sure that the print head is very close to the platform (1-2 sheets of paper max.). | * Make sure that the print head is very close to the platform (1-2 sheets of paper max.). | ||
* Make the first layer compact (e.g. 75% of the usual height). This is to "press" it down. | * Make the first layer compact (e.g. 75% of the usual height). This is to "press" it down. | ||
* Add a raft (squeezed, underneath and extended at least 1 cm on each side so you can tape it down if gets loose. This will allow for some warping, i.e. the object will warp and pull up parts but not all of the raft and that | * Add a raft (squeezed, underneath and extended at least 1 cm on each side so you can tape it down if gets loose. This will allow for some warping, i.e. the object will warp and pull up parts but not all of the raft and that means no print abort. | ||
* Print slower than for PLA printing, e.g. at 50 - 75% (but not too slow, or the extruder may clog) | * Print slower than for PLA printing, e.g. at 50 - 75% (but not too slow, or the extruder may clog) | ||
* | * For high and delicate objects, add cooling loops (print circling without printing) or print two objects instead of one. | ||
* Fan should be on for better results. However, since the object will probably warp a bit, turning off the fan will reduce the risk of the nozzle ripping away the part from the print bed. In addition, keeping it on, might cause warping to occur later, since the plastic will keep longer a warm temperature. Therefore: maybe have the fan off for the first 50 layers, after that it's up to you. Definitively use a fan for wide objects with little filling or the whole filling will melt down. I always have the fan on, except if I hear scratching noises ... | |||
* Fan should be on for better results. However, since the object will probably warp a bit, turning off the fan will reduce the risk of the nozzle ripping away the part from the print bed. | * Temperature: 225 (?) ... though some folks seem to print with 205 degrees, other with 250... | ||
* Temperature: | * 0.2mm layers, 0.35 width | ||
* 0.2mm layers, 0. | * 10% fill (or you cannot squeeze your toys ...) | ||
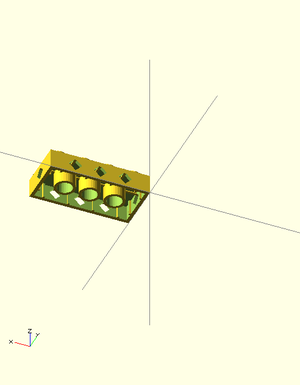
[[File:lego-4x2x4-diamonds.png|thumbnail|right|300px|frame|Lego compatible brick with "diamond" holes]] | [[File:lego-4x2x4-diamonds.png|thumbnail|right|300px|frame|Lego compatible brick with "diamond" holes]] | ||
| Line 51: | Line 54: | ||
* If you don't mind an ugly bottom, you also can try printing without glue, but then tape down the draft after it starts detaching.... | * If you don't mind an ugly bottom, you also can try printing without glue, but then tape down the draft after it starts detaching.... | ||
* consider that you cannot print (I can't at least) all the sorts of objects you could print with PLA. E.g. objects that have a wide bottom plus some height will have a strong urge to warp. Something that is thin (less than 10 layers) ''and'' wide could be done before the print starts warping. If you must print objects that are larger than 2cm and have high walls, consider structural changes. E.g. put holes in the walls that "pull" the object towards its center. To the right is a picture of a modified Lego brick that should reduce warping. | * consider that you cannot print (I can't at least) all the sorts of objects you could print with PLA. E.g. objects that have a wide bottom plus some height will have a strong urge to warp. Something that is thin (less than 10 layers) ''and'' wide could be done before the print starts warping. If you must print objects that are larger than 2cm and have high walls, consider structural changes. E.g. put holes in the walls that "pull" the object towards its center. To the right is a picture of a modified Lego brick that should reduce warping. | ||
[[File:big-owl-gummed.jpg|thumbnail|800px|none|If a larger object starts warping you still can save it by fixing its base with adhesive gum or by taping down the raft. I now systematically put glue on the platform before printing (Pritt Power which is washable at 40 degs)]] | |||
=== Filling === | |||
Since Arnitel is very tough and it sticks well together, you can use very little filling. I'd recommend using the fan. | |||
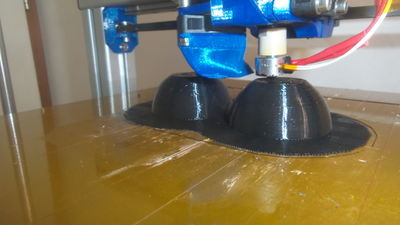
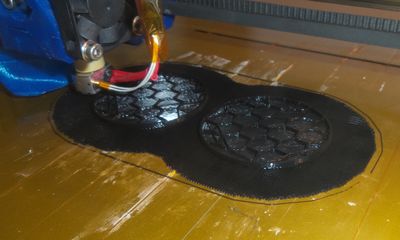
<gallery caption="Printing with Arnitel - 5% fill !" widths="400px" heights="300px"> | |||
arnitel-filling-1.jpg|Half spheres in print | |||
arnitel-filling-2.jpg|Filling of half spheres | |||
</gallery> | |||
BTW, using a raft for large objects is not necessary, but if you use glue, it's easier to get of the platform that way. | |||
== Alternatives == | == Alternatives == | ||
Latest revision as of 18:50, 2 September 2015
Introduction

Arnitel is a 3D printer filament. It's chemical name is DSM Arnitel Eco and it is made by DSM. It is also sold under re-branded names like InnoFlex or "Flex Eco" This elastic plastic is difficult to print since it doesn't stick well to the platform. On the positive side it has some nice properties and it doesn't stink.
According to Arnitel Eco page, “Arnitel® Eco material is a bio-based thermoplastic copolyester (TPE) that delivers high performance with the added benefit of a lower environmental impact. The material is 50% made from renewable resources, based on rapeseed oil instead of mineral oil. Yet…it performs outstandingly for demanding applications ranging from oven pan liners to consumer electronics to sports and leisure, automotive and furniture.”. [...] “The material has a melting point of up to 200°C, making it ideal for applications with peak temperatures close to the melting point. In fact, the material maintains consistent performance across its entire operating temperature from low to high extremes, outperforming other elastomers.”
According to 3D printing blog, “Arnitel is a high-performance ThermoPlastic Copolyester (TPC) that offers you a unique combination of flexibility, high temperature resistance and strength. Arnitel Eco is manufactured using renewable feedstock, in fact 50% of its content comes from renewable resources, and in particular, rapeseed oil instead of mineral oil. This elastic product outperforms conventional rubbers according to the manufacturer across a variety of applications, and is available in hardnesses ranging from 40 to 70 Shore D. The Arnitel Eco 3D printer filament can be used with any 3D printer that supports PLA filaments as you need to have an extruder temperature of about 230 degrees Celsius for the Arnitel when printing, the same as for PLA.”
- Variants
Arnitel comes in various variants. It's hardness varies from 40 to 70 Shore D. The names of Arnitel variants (or rebrandings like InnoFlex) reflect that. E.g. "60" has a higher elongation than "40".
Specifications for printing
Rumours on the Internet vary widely with respect to printing. In sum, it's about the same picture as with ABS printing.
- Nozzle temperature is from 210 to 260. It seems that more elastic Arnitel should printed cooler than lesser elastic one (makes sense). Melting temperature is between 180 and 200 (probably). I'd say, for starters, go as high as possible and then go down. I settled at 225 degrees for Arnitel Eco 45-D.
- Bed temperature from 55 to 110. The hotter, the better probably since it will stick better. However, too hot temperatures make it expand more and therefore could increase warping. In addition, if your printer parts are made with PLA they will bend if you heat a lot. (I happened to my Felix Printer after heating the bed to 110 degrees and I had to bend the extruder back with heat gun.... not really optimal)
- Print speed: from 40 to 80 mm/s. Faster is OK since flow isn't a problem with Arnitel, but fast probably produces less nice results.
- Arnitel warps. You need to use some strong adhesive tape or glue (e.g. a Pritt Power Stick) if you plan to print more than a few layers with an object that is larger than 2cm. Remove the glue before you start printing with PLA again.
- Keep the roll stored in plastic (same is true for most filaments ....)
- In addition
- Your printer should have a hot-end that stays cool at the top (ventilator, heat diffusing tube). Otherwise the plastic will get too weak after some printing and can not be pushed down anymore and will flow out into the extruder. E.g. I can see this happen with the Felix 1.0 but not with the better designed 2.0
- If an object detaches through warping you can fix it with adhesive gum in order to finish a print (stop the printer and take your time).
- In order to have nicer looking results, augment retraction a bit.
Printing tips using a Felix 2.0 printer
Since Arnitel Eco doesn't stick well to the platform (it gets loose once it cools down), you will have to apply the whole bag of tricks:
- Add some sticky tape or some PVA glue stick (e.g. Pritt Power stick) or hairspray with a "plastic base". Alternatively, you could try replacing the Kapton tape of the platform with PET tape. PET tape also seems to work better with ABS.
- Heat the bed as much as you can. In principle you can heat at 95 degrees, but do not since the heat then may cause the PLA extruder to bend downwards.... If you use glue, then the temperature can be lower.
- Make sure that the print head is very close to the platform (1-2 sheets of paper max.).
- Make the first layer compact (e.g. 75% of the usual height). This is to "press" it down.
- Add a raft (squeezed, underneath and extended at least 1 cm on each side so you can tape it down if gets loose. This will allow for some warping, i.e. the object will warp and pull up parts but not all of the raft and that means no print abort.
- Print slower than for PLA printing, e.g. at 50 - 75% (but not too slow, or the extruder may clog)
- For high and delicate objects, add cooling loops (print circling without printing) or print two objects instead of one.
- Fan should be on for better results. However, since the object will probably warp a bit, turning off the fan will reduce the risk of the nozzle ripping away the part from the print bed. In addition, keeping it on, might cause warping to occur later, since the plastic will keep longer a warm temperature. Therefore: maybe have the fan off for the first 50 layers, after that it's up to you. Definitively use a fan for wide objects with little filling or the whole filling will melt down. I always have the fan on, except if I hear scratching noises ...
- Temperature: 225 (?) ... though some folks seem to print with 205 degrees, other with 250...
- 0.2mm layers, 0.35 width
- 10% fill (or you cannot squeeze your toys ...)
Summary of anti-warping strategies
The bottom line is that you will have to find a method to make it stick and avoid geometries that want to warp.
It's probably best to use a combination of a hot printbed, some kind of glue and (if possible) a modified geometry.
- If you don't mind an ugly bottom, you also can try printing without glue, but then tape down the draft after it starts detaching....
- consider that you cannot print (I can't at least) all the sorts of objects you could print with PLA. E.g. objects that have a wide bottom plus some height will have a strong urge to warp. Something that is thin (less than 10 layers) and wide could be done before the print starts warping. If you must print objects that are larger than 2cm and have high walls, consider structural changes. E.g. put holes in the walls that "pull" the object towards its center. To the right is a picture of a modified Lego brick that should reduce warping.
Filling
Since Arnitel is very tough and it sticks well together, you can use very little filling. I'd recommend using the fan.
- Printing with Arnitel - 5% fill !
BTW, using a raft for large objects is not necessary, but if you use glue, it's easier to get of the platform that way.
Alternatives
- NinjaFlex and SemiFlex (made by Fenner Drives)
- Flex filament (?)
Links
- Tips
- How To Print With InnoFlex ? (RepRap forums)
- Printing with Arnitel AKA Flexible Polyester (RepRap forums)
- Arnitel (Felix Printer Forum thread)
- Product pages and data sheets at DSM
- Arnitel Eco product page at DSM (producer)
- Arnitel Eco page at DSM
- Arnitel Eco - the next generation of bio-performance materials (2.79 MB)
- Product data sheets (for all variants)
- Print bed materials
- How To Succeed When Printing With ABS and ABS Bed Adhesion Tips & Tricks (talks about PET tape and other tricks to have ABS stick. Since ABS problems are similar to Arnitel problems with respect to sticking, it's a good read.)


