Orange Textable: Difference between revisions

The educational technology and digital learning wiki
Jump to navigation Jump to search
 
(4 intermediate revisions by the same user not shown)
Line 204: Line 204:
==Example with one url==


[[File:SchemaNew.png|800x600px|center|frame|Figure 1: complete schema]]
[[File:SchemaNew.png|800x600px|center|frame|Figure 1: Complete scheme]]


In this example we will examine the technologies and the frequency that these technologies have been used, according to one of the students during the course Sciences et Technologies de l’Information et de la Communication I (STIC I), Master of Science in Learning and Teaching Technologies, University of Geneva at 2003. <br />
Line 218: Line 218:
Firstly we have to import the url into Orange Textable. To do so, we will select the URLs widget and copy paste the above url into the URL field. Then we will specify the encoding as shown in the following picture.


[[File:One.png|center|frame|Figure 2: interface of the URLs widget]]
[[File:One.png|center|frame|Figure 2: Interface of the URLs widget]]


By using the display widget we can visualize the XML tags as well as the text enclosed in these tags. The tags that we are interested in are : “course” and “exercise”.  
Line 226: Line 226:
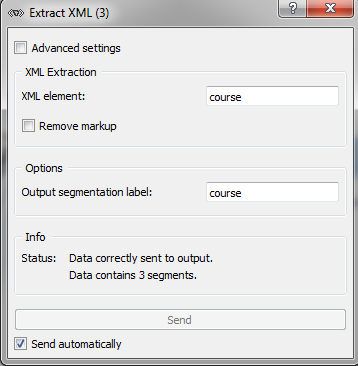
Now we have to isolate the exercises that are part of the course Stic I. In order to do that firstly we have to extract the content of the “course” tag. We will use the Extract XML widget and we will type “course” in the XML element field as shown in the following picture.


[[File:Three.png|center|frame|Figure 3: interface of the Extract XML widget]]
[[File:Three.png|center|frame|Figure 3: Interface of the Extract XML widget]]


“Course” is the XML tag of our page that encloses all the associated information to a given course. As we can notice in the above picture we have created three segments. Each segment corresponds to the content of each course.  
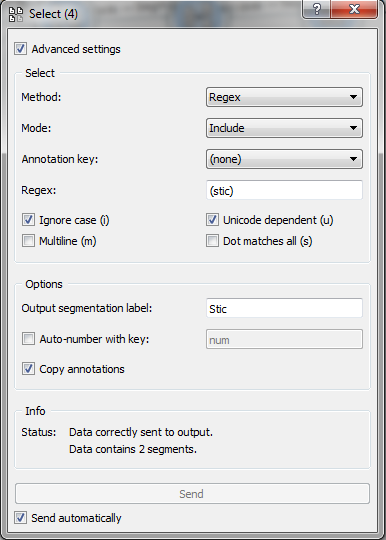
In order to isolate the content of the course Stic, we link the Select widget to the Extract XML widget and type the regular expression shown in the following picture.


[[File:Four.png|center|frame|Figure 4: interface of the Select widget]]  
[[File:Four.png|center|frame|Figure 4: Interface of the Select widget]]  


By doing this, we note that we’ve selected the whole segment that contains the string Stic and not just the specified string “Stic”.   
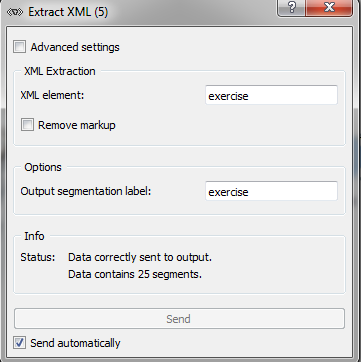
So far we have created two segments that correspond to the content related to the courses Stic I and Stic II. Finally we have to isolate each exercise of the course Stic I. To do so, we will segment the above segmentation by using the Extract XML widget and the tag “exercise”.  


[[File:Five.png|center|frame|Figure 5: interface of the Extract XML widget]]   
[[File:Five.png|center|frame|Figure 5: Interface of the Extract XML widget]]   


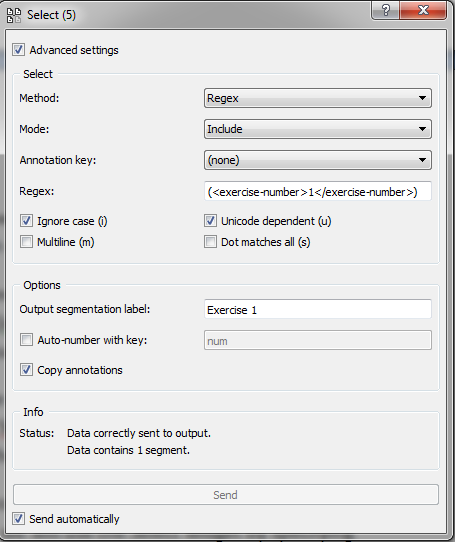
Now we have 25 segments and each segment corresponds to an exercise of either the course Stic I or the course Stic II. To isolate the desired exercises we will use the Select widget six times and we will be specifying each time the string that refers to the desired segment, that is <exercise-number>1</exercise-number>, <exercise-number>2</exercise-number>, exercise-number>3</exercise-number> etc.  


[[File:Six.png|center|frame|Figure 6: interface of the Select widget]]
[[File:Six.png|center|frame|Figure 6: Interface of the Select widget]]


We note that at this point it is important to specify the label of our segment as it will allow us to distinguish them during the merging process that follows.  
Line 248: Line 248:
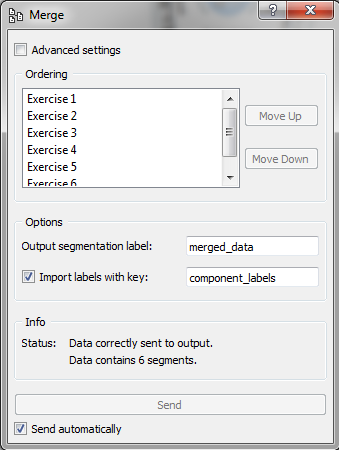
Our next goal is to identify the technologies associated to theses exercises. So, firstly we need one segmentation consisting of the six segments that we’ve created in the previous step (2). To do so, we will merge these segments using the Merge widget. In the Merge widget window we leave the default options and check the box import labels with key. Now we will have one segment with one label that consists of all the segments of step 2 (all exercises for Stic I)


[[File:Seven.png|center|frame|Figure 7: interface of the Merge widget]]  
[[File:Seven.png|center|frame|Figure 7: Interface of the Merge widget]]  


'''Step 4'''
'''Step 4'''
Line 254: Line 254:
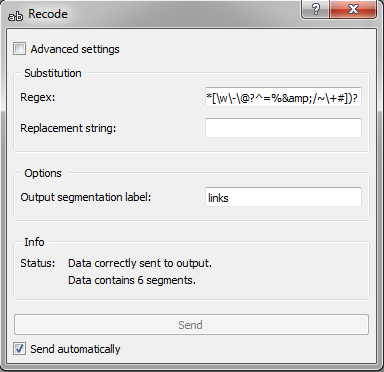
At this point we need to get rid of the urls included in the text, to avoid having double results in the case that the technology cited is also associated to a link including the name of the technology. To do so we will use the Record widget and the regular expression shown below.


[[File:PictureUrl.png|center|frame|Figure 7: interface of the Record widget]]
[[File:PictureUrl.png|center|frame|Figure 7: Interface of the Record widget]]


'''Step 5'''  
'''Step 5'''  
Line 260: Line 260:
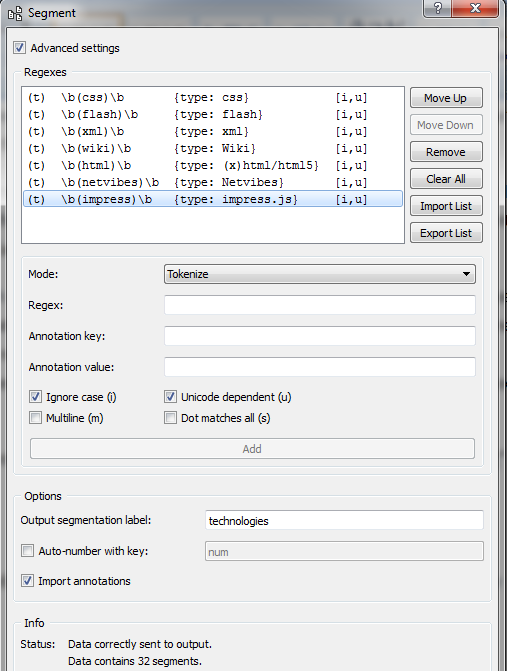
Now we are ready to identify the technologies cited in our segmentation, which are the six merged segments. For accomplishing that, we will use the Segment widget and we will specify the strings that we are searching for (technologies names) as well as the annotation value of each outcome segment.


[[File:Eight.png|center|frame|Figure 9: interface of the Segment widget]]  
[[File:Eight.png|center|frame|Figure 9: Interface of the Segment widget]]  
    
    
In order to specify the Regular Expressions (Regexes), we take the example of the css string.  We select Tokenize Mode (t) and type  \b(css)\b in the Regex field. Then, we type “type” in the Annotation key field and css in the Annotation value field. Finally we check the boxes Ignore case (i) and Unicode dependent (u).  We note that the annotation key is important as we will use it in order to “call” these segments during the construction of the table.   
Line 268: Line 268:
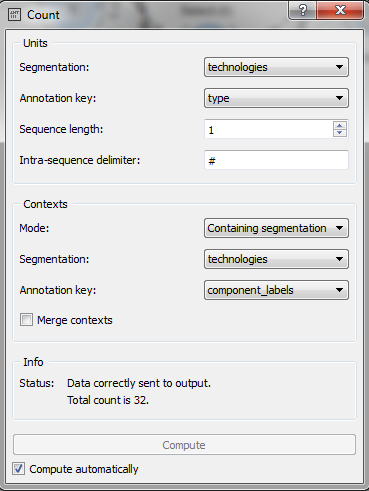
In order to count the technologies associated to the given exercises as well as the number of the times that each technology has been cited for a given exercise, we will use the Count widget. In the Units field we select annotation key: “type” (labels of the technologies). In the Contexts field we select Mode: Containing segmentation and Annotation key: component_labels (labels of the exercises) and click the “Compute” button as show in the following picture.


[[File:Nine.png|center|frame|Figure 10: interface of the Count widget]]  
[[File:Nine.png|center|frame|Figure 10: Interface of the Count widget]]  


'''Step 7'''  
'''Step 7'''  
Line 280: Line 280:
==Example with more urls==


In this mini-research we study if the students of the course VIP focus more on the player of a game or on the game itself in their analyses of various games and how this focus changes over time.
In this mini-research we study if the students of the course Jeux vidéos pédagogiques (VIP) focus more on the player of a game or on the game itself in their analysis of various games and how this focus changes over time.


For the purposes of our research we focus on the game analyses made by the students for the course VIP during the years 2012-2014. More specifically, we examine how many times in total the words “player” and “game” appear in the analyses of each year. Theses analyses can be found in edutechwiki in the following urls:
For the purposes of our research we focus on the game analyses made by the students for the course VIP during the years 2012-2014. More specifically, we examine how many times in total the words “player” and “game” appear in the analysis of each year. Theses analysis can be found in edutechwiki in the following urls:
 
Analyses 2012: http://edutechwiki.unige.ch/fr/Cat%C3%A9gorie:Maltt_VIP_Stella<br />
 
Analyses 2013: http://edutechwiki.unige.ch/fr/Cat%C3%A9gorie:Maltt_VIP_Tetris<br />


Analyses 2012: http://edutechwiki.unige.ch/fr/Cat%C3%A9gorie:Maltt_VIP_Stella
Analyses 2013: http://edutechwiki.unige.ch/fr/Cat%C3%A9gorie:Maltt_VIP_Tetris
Analyses 2014: http://edutechwiki.unige.ch/fr/Cat%C3%A9gorie:Maltt_VIP_Utopia   


'''Step 1'''  
'''Step 1'''  


Firstly, we import the urls into orange Textable defying for each url the encoding, the annotation key and the annotation value. Note that the annotation value must correspond to the year that each analysis was written in order to later present our results by year. As soon as we import all the desired urls we define the output segmentation label.
Firstly, we import the urls into Orange Textable defying for each url the encoding, the annotation key and the annotation value. Note that the annotation value must correspond to the year that each analysis was written in order to later present our results by year. As soon as we import all the desired urls we define the output segmentation label.


'''Step 2'''
'''Step 2'''


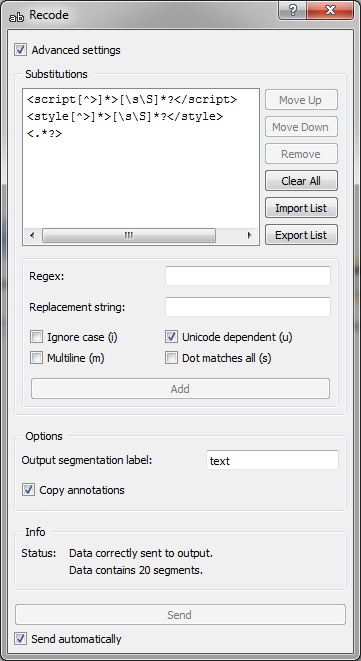
Furthermore, we clear our html pages from all the unwanted style and script tags along with their contents and all the remaining html tags in order to be left with the analyses in pure text so that we can study them easier. We do that by using the Record widget and the regular expressions shown in the picture below.  
Furthermore, we clear our html pages from all the unwanted style and script tags along with their contents and all the remaining html tags in order to be left with the analysis in pure text so that we can study them easier. We do that using the ''Record widget'' and the regular expressions shown in the picture below.The regular expression ''<script [^>]*> [\s\S]*?</script>'' removes the script tags along with their contents whereas the regular expression ''<style [^>] *> [\s\S]*?</style>'' removes the style tags with their contents and finally the regular expression ''<.*?>'' removes the html tags.
(picture 1)
 
[[File:Picture1Textable.png|center|frame|Figure 1: Interface of the Record widget]]


'''Step 3'''
'''Step 3'''


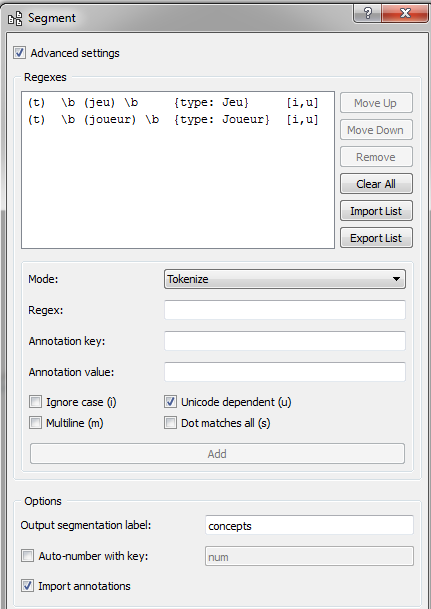
Once the texts are free of the unwanted elements, we search them for the two words that are of our interest. To do so, we use the Segment widget and the regular expressions shown below. (picture 2)
Once the texts are free of the unwanted elements, we search them for the two words that are of our interest. To do so, we use the ''Segment widget'' and the regular expressions shown below.  
 
[[File:Picture2Textable.png|center|frame|Figure 2: Interface of the Segment widget]]


'''Step 4'''
'''Step 4'''
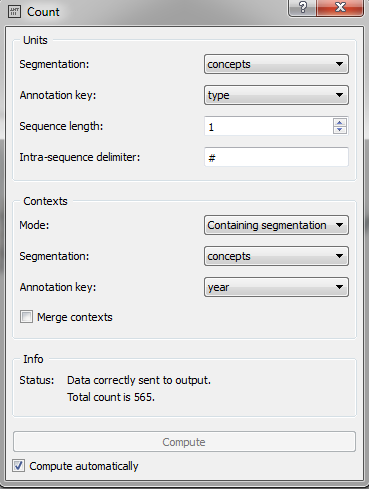
We then continue by counting how many times the words “player” and “play” are cited in the analyses of each year. We use the Count widget for doing so. In the Units field we select annotation key: “type” (labels of the words “player” and “play”). In the Contexts field we select Mode: Containing segmentation and Annotation key: years (labels of the urls) and we continue by clicking the “Compute” button as show in the following picture. (picture 3)
We then continue by counting how many times the words “player” and “play” are cited in the analysis of each year. We use the ''Count widget'' for doing so. In the Units field we select annotation key: “type” (labels of the words “player” and “play”). In the Contexts field we select Mode: Containing segmentation and Annotation key: years (labels of the urls) and we continue by clicking the “Compute” button as show in the following picture.  
 
[[File:Picture3Textable.png|center|frame|Figure 3: Interface of the Count widget]]


'''Step 5'''
'''Step 5'''


Finally and in order to visualize the result, that is the table that we have created, we use the Convert widget and Data Table widget (from the Data window) leaving their default options. (picture 4)
Finally and in order to visualize the result, that is the table that we have created, we use the ''Convert widget'' and ''Data Table widget'' (from the Data window) leaving their default options.  


Our final schema is shown in the following picture
Our final scheme is shown in the following picture
(picture schema) 
 
[[File:PictureSchemaTextable.png|center|frame|Figure 6: Complete scheme]]


'''Results'''
'''Results'''


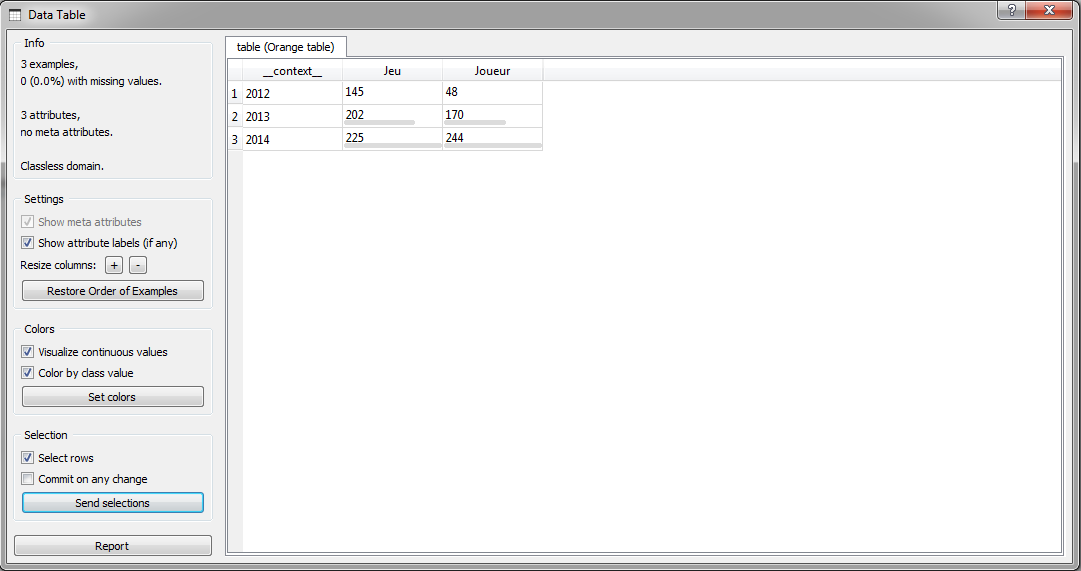
As we can see from the data table blab la bla. (picture table)
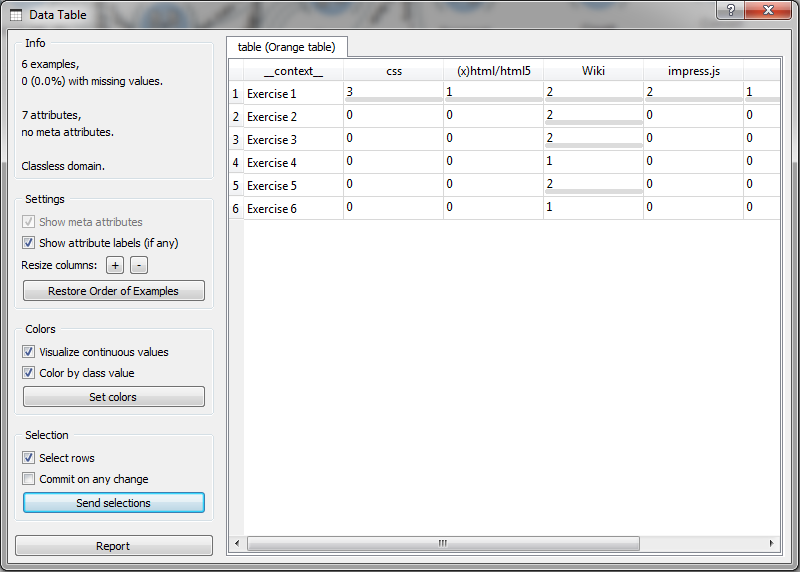
As we can see from the data table, the students of the first year we examine (2012) refer more to the word "game" than "player". At the second year (2013), the use of the word "game" is also more frequent than "player" but we can notice that the reference to the latter starts earning ground. As for the third year (2014), the use of the word "player" is greater than the use of the word "game". From this mini-research derives that over the years the tendency of students to refer more to the game than the player is changing in benefit of the latter. 
 
[[File:PictureResultsTextable.png|center|frame|Figure 4: Results]]
 
You can dowload the example by clicking [http://tecfaetu.unige.ch/etu-maltt/tetris/karanis0/SticIII/ here]


==Conclusion==
==Conclusion==

Latest revision as of 20:36, 29 January 2015


Orange Textable

No image.png

Developed by: LangTech Sàrl
License: Free&Open source
Web page : Tool homepage
Tool type : Application software

Tool.png

The last edition of this page was on: 2014/10/02

The Completion level of this page is : Low


SHORT DESCRIPTION

[[has description::Quote from the Textable (oct. 2, 2014)

Orange Textable is an open-source software tool for building data tables on the basis of raw text sources. Look at the following example to see it in typical action. Orange Textable offers the following features:

  • text data import from keyboard, files, or urls
  • systematic recoding
  • segmentation and annotation of various text units
  • extract and exploit XML-encoded annotations
  • automatic, random, and arbitrary selection of unit subsets
  • unit context examination using concordance and collocation tables
  • frequency and complexity measures
  • recoded text data and table export]]


TOOL CHARACTERISTICS

Usability

Authors of this page consider that this tool is '.

Tool orientation

This tool is designed for general purpose analysis.

Data mining type

This tool is made for Text mining.

Manipulation type

This tool is designed for Data extraction, Data transformation, Data analysis, Data visualisation, Data conversion, Data cleaning.

IMPORT FORMAT :

EXPORT FORMAT :


Tool objective(s) in the field of Learning Sciences

Analysis & Visualisation of data
Predicting student performance
Student modelling
Social Network Analysis (SNA)
Constructing courseware

Providing feedback for supporting instructors:
Recommendations for students
Grouping students:
Developing concept maps:
Planning/scheduling/monitoring
Experimentation/observation

Tool can perform:

  • Data extraction of type:
  • Transformation of type:
  • Data analysis of type:
  • Data visualisation of type: (These visualisations can be interactive and updated in "real time")


ABOUT USERS

Tool is suitable for:

Students/Learners/Consumers
Teachers/Tutors/Managers
Researchers
Developers/Designers
Organisations/Institutions/Firms
Others

Required skills:

STATISTICS: None

PROGRAMMING: None

SYSTEM ADMINISTRATION: None

DATA MINING MODELS: Medium


FREE TEXT


Tool version : Orange Textable
(blank line)

Developed by : LangTech Sàrl
(blank line)
Tool Web page : http://langtech.ch/textable
(blank line)
Tool type : Application software
(blank line)
Free&Open source

No image.png

SHORT DESCRIPTION


Quote from the Textable (oct. 2, 2014)

Orange Textable is an open-source software tool for building data tables on the basis of raw text sources. Look at the following example to see it in typical action. Orange Textable offers the following features:

  • text data import from keyboard, files, or urls
  • systematic recoding
  • segmentation and annotation of various text units
  • extract and exploit XML-encoded annotations
  • automatic, random, and arbitrary selection of unit subsets
  • unit context examination using concordance and collocation tables
  • frequency and complexity measures
  • recoded text data and table export

TOOL CHARACTERISTICS


Tool orientation Data mining type Usability
This tool is designed for general purpose analysis. This tool is designed for Text mining. Authors of this page consider that this tool is .
Data import format Data export format
. .
Tool objective(s) in the field of Learning Sciences

☑ Analysis & Visualisation of data
☑ Predicting student performance
☑ Student modelling
☑ Social Network Analysis (SNA)
☑ Constructing courseware

☑ Providing feedback for supporting instructors:
☑ Recommendations for students
☑ Grouping students:
☑ Developing concept maps:
☑ Planning/scheduling/monitoring
Experimentation/observation

Can perform data extraction of type:

Can perform data transformation of type:

Can perform data analysis of type:

Can perform data visualisation of type:
(These visualisations can be interactive and updated in "real time")


ABOUT USER


Tool is suitable for:
Students/Learners/Consumers:☑ Teachers/Tutors/Managers:☑ Researchers:☑ Organisations/Institutions/Firms:☑ Others:☑
Required skills:
Statistics: NONE Programming: NONE System administration: NONE Data mining models: MEDIUM

OTHER TOOL INFORMATION


No screenshot.jpg
Orange Textable
Free&Open source
LangTech Sàrl
http://langtech.ch/textable
[[has description::Quote from the Textable (oct. 2, 2014)

Orange Textable is an open-source software tool for building data tables on the basis of raw text sources. Look at the following example to see it in typical action. Orange Textable offers the following features:

  • text data import from keyboard, files, or urls
  • systematic recoding
  • segmentation and annotation of various text units
  • extract and exploit XML-encoded annotations
  • automatic, random, and arbitrary selection of unit subsets
  • unit context examination using concordance and collocation tables
  • frequency and complexity measures
  • recoded text data and table export]]
General analysis
Developers/Designers, Researchers
None
None
None
Medium
Application software
Text mining
Data extraction, Data transformation, Data analysis, Data visualisation, Data conversion, Data cleaning
Low

Compatibility:

Windows, MacOS X and most likely Linux (compatibility with Linux has not been tested)

Installation:

Before Textable you have to install Python v2.7 and Orange Canvas v2.7 or most recent versions. There exist also packages intended to beginners that include all the required libraries (Python, PythonWin, NumPy…). Textable v1.4 appears in the form of an additional tab in Orange Canvas. In order to activate it, start Orange Canvas, then select from the menu Options > Add-ons and check the Orange-Textable checkbox. Finally, click the OK button (twice) to activate it. Download Page

Getting started:

“The main purpose of Orange Textable is to build tables based on text strings”. [1]

Explaining some terms:

Segmentation and segments:

We could define segmentation as the possible ways to refer to specific segments of our string. Segments can be set of characters and/ or words. In order to understand better segmentation and segments, let’s see the example of Orange Textable documentation: Consider the following string of 16 characters (note that whitespace counts as a character too), and let us suppose that its string index (position of the first character in the string) is 1:

Characters a s i m p l e e x a m p l e
Position 1 2 3 4 5 6 7 8 9 10 11 12 13 14 15 16

In this context, a segment is basically a substring of characters. Every segment has an address consisting of three elements:

  1. string index
  2. initial position within the string
  3. final position

In the case of a simple example, address (1, 3, 8) refers to substring simple, (1, 12, 12) to character a, and (1, 1, 16) to the entire string. The substring corresponding to a given address is called the segment’s content. A segmentation is an ordered list of segments. For instance, segmentation ((1, 1, 1 ), (1, 3, 8), (1, 10, 16)) contains 3 word segments, ((1, 1, 1), (1, 2, 2 ), ..., (1, 16, 16)) contains 16 character segments, and ((1, 1, 16)) contains a single segment covering the whole string.

As shown by the word segmentation example, every character in the string doesn’t have to be included in a segment. Moreover, a single character may belong to several segments simultaneously, as in ((1, 1, 1), (1, 1, 8), (1, 3, 8), (1, 3, 16), (1, 10, 16), (1, 3, 8)). This also shows that the order of segments in a segmentation can diverge from the order of the corresponding substrings in the string. [2]

Annotation:

Annotation in Orange Textable documentation is defined as “a piece of information attached to a segment” and consists of two parts: key and value. This section plays a particularly important role in data processing and analysis as it makes “it possible to go beyond the basic level of forms that are physically present in a text and tap into the more abstract – and often more interesting – level of the interpretation of these forms”. For instance, the texts composing a given corpus could be annotated with respect to their genre (novel, short story, and so on), and the parts of these texts may be annotated regarding their discourse type (narrative, description, dialogue, and so on). Such data could be exploited to study the distribution of discourse types as a function of genre, which would have been extremely difficult, if ever possible, without having encoded the relevant information by means of annotations.” [3]

Python regular expressions:

Python regular expressions are special sequences of characters recognized from the Orange Textable system that serve to identify portions of text. For more information on regular expressions see Python documentation.

Manage widgets:

Select widgets:

In order to make a widget appear on the scene you have three options

  1. Left click on the widget
  2. Right click on the scene and then left click on the widget that you want to use from the list that appears
  3. Drag and drop the widget into the scene.

Connect widgets:

In order to connect two widgets hold down the left button of your mouse on one’s dotted line and draw a line towards the other’s dotted line. If you want to connect a widget with a widget that you are about to create then hold down the left button of your mouse on the dotted line of the widget and draw a line towards an empty spot of the scene; then select the widget that you want to create from the list that appears.

Action

Every widget contains a pop-up dialogue that appears by double clicking on it that allows you to import text from various sources as well as treating those texts according to a set of parameters.

Pop-up dialogue structure

The pop-up dialogue window varies according to the widget functionality. However, we can distinguish three general categories of widgets, for which the pop-up dialogue window shares a similar interface. These categories are: Text import widgets, Segmentation processing widgets, Table construction widgets and Table conversion/export widget.

Text import widgets

Widgets of this category take no input and emit Segmentation data. Their purpose is to import text data in Orange Canvas, either from the keyboard (Text Field), or from files (Text Files), or even from Internet (URLs).

Basic interface:

  • Source section: This section allows you to import one single text either from the keyboard, or from files, or even from the internet according to the relevant widget functionality.
    • Text Field: Allows you to write directly or copy paste you text and configure it.
    • Text Files: Import a file from your computer.
  • URLs: Type or copy-paste a URL.
  • Options section: All widgets include the output segmentation label field that allows you to define the label of the output segmentation. Giving to your segmentation a label that makes sense allows you to easily access and manage your corpus.
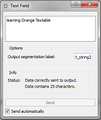
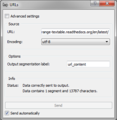
  • Info section: The info field informs you for the status of your data. This could be that the data were successfully sent to the output and the number of the characters or what was the error if something went wrong. In the above examples system informs us that our data were sent to output end that they contain 25 characters (TextField), 1 segment and 58 characters (TextFiles), 1 segment and 13787 characters (URLs). Note that in these characters blank spaces are included.
  • Sent button: The Send button sends data to output connection(s).
  • Send automatically checkbox: When the Send automatically checkbox is selected data are sent automatically to the output connection(s).
  • Advanced settings checkbox: When selected, you can have access to advanced settings. These settings vary according to the widgets functionality. Note that the Text Field widget doesn’t have advanced interface.

Advanced interface

  • Source section: Allows you to create or import a list of texts, to annotate, reorder or delete it and specify the encoding of the imported texts. Finally you can also export the list that you’ve created.
    • Text Files: Create and configure a list of imported files or a list of files from your computer as well as export the list.
    • URLs: Create and configure a list of URLs as well as export that list.
    • You can annotate your text by using the Annotation key and Annotation value fields.
    • You have to select the encoding of the imported content.
  • Option section: Allows to specify the label of the output segmentation as well as to import annotations associated with a specific key. Moreover the button Auto-number with key enables the program to automatically number the imported files and to associate the number to the annotation key specified in the text field on the right.
  • Info section: The info field informs you for the status of your data.
  • Send automatically checkbox: When the Send automatically checkbox is selected data are sent automatically to the output connection(s).

Segmentation processing widgets

Widgets of this category take Segmentation data as input and emit data of the same type. Some of them (Preprocess and Recode) generate modified text data. Others (Merge, Segment, Select, Intersect and Extract XML) do not generate new text data but only new Segmentation data. Display, finally, is mainly used to visualize the details of a given Segmentation object (content and address of segments, as well as their possible annotations).

Basic interface:

  • In general the first section is different accord to the widget that you are using.
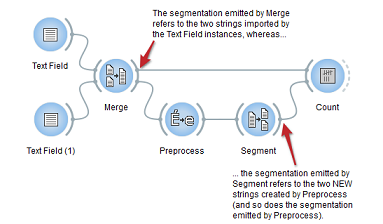
    • Preprocessing (Preprocess widget): This widget inputs a segmentation and outputs a segmentation covering the modified text. The possible modifications are to replace the accented characters by their non-accented equivalents as well as lower case by upper case characters and vice versa. Note that Preprocess creates a copy of each modified segment and increases the program’s memory footprint. Finally as it creates new strings and not only new segmentations it won’t work if combined with segmentations that refer to different strings. In the sequence depicted in the image bellow the frequency table will remain empty.
      Image taken from Orange Textable documentation
    • Substitutions (Record widget): This widget inputs segmentation which covers the text that should be recoded and outputs segmentation that covers the recoded text. It “captures” and substitutes the inputted text by using regular expressions. The text to be “captured” is encoded in the “Regex” field and the text that substitutes it in the “Replacement string” field. If the “Replacement string” field is empty the “captured” text will be deleted. Note that it creates new strings and not only new segmentations so it is subject of the same limitations as the Preprocess widget.
    • Ordering (Merge widget): This widget inputs two or more segmentations and outputs a merged segmentation. You can reorder the inputted segmentations by selecting them and then clicking the move up/move down buttons.
    • Regexes (Segment widget): Imputes a segmentation that you wish to further segment and outputs the newly created segments. You can specify the segments to be created by using regular expressions. Note that the basic interface allows you to use only one regular expression for segmenting.
    • Select (Select widget): Imputes a segmentation that you wish to select or discard some segments. In order to specify the segments to be included, select the include mode and insert one regular expression that points to those segments. In order to discard the desired segments, select the exclude mode and insert the adequate regular expression. You can also select the Annotation key of the input segmentation from the drop-down menu in order to select (or not) the segments whose annotation values for this key are matched by the regular expression. Note that if the value (none) is selected, the content of the segments will be matched against the regular expression.
    • Intersect (Intersect widget): Imputes several segmentations and allows excluding or including segments of one of the sources imputed. The Source Segmentation field allows you to select the source segmentation. The content of the source segmentation which matches the content of the segmentation selected in the Filter segmentation field will be included or excluded according to the Mode that you have selected. “The Source annotation key drop-down menu allows the user to select an annotation key from the source segmentation; thus the segments whose annotation value for this key corresponds to a type present in the filter segmentation will be in-/excluded. If the value (none) is selected, the segment content will be decisive”.[4]
    • XML extraction (Extract XML widget): This widget inputs a segmentation, searches in its content portions corresponding to the XML element type specified by the user, and creates a segment for each occurrence of this element. You can also remove the markup. Note that it is impossible to import empty XML elements.
    • Navigation (Display widget): This widget allows you to visualize the details of a given segmentation object. Such as segment number, string index-start-end, annotation value, annotation key and content.
  • Options section: All widgets include the output segmentation label field that allows you to define the label of the output segmentation. Giving to your segmentation a label that makes sense, allows you to easily access and manage your corpus. Note that the Merge widget even in the basic interface includes the Import labels with key checkbox. This field allows you to associate a key to the inputted segments labels.
  • Info section: The info field informs you for the status of your data.
  • Sent button: The Send button sends data to output connection(s).
  • Send automatically checkbox: When the Send automatically checkbox is selected data are sent automatically to the output connection(s).
  • Advanced settings checkbox: When selected you can have access to advanced settings. This setting varies according to widgets functionality.

Advanced interface

  • The first section of some widgets allows more configuration of your segmentation.
    • According to the widget that you are using you can create or import a list of substitutions (Record widget) or regular expressions (Segment widget) that you can reorder and hence define the order of their application on the input segmentation, as well as delete parts (or all) of these substitutions or regular expressions. Finally you can also export the list that you’ve created. These widgets allows you also to to control the application of the regular expressions by using the Ignore case (i), Unicode dependent (u), Multiline (m) and Dot matches all (s) checkboxes. For more information on regular expressions see Python documentation.
    • The Segment widget additionally, allows you to specify an Annotation Key and Annotation Value as well as “to specify if a given regular expression describes the form of the targeted segments (Tokenize mode) or rather the form of the separators in-between these segments (Split mode). In Split mode, empty segments that might occur between two consecutive occurrences of separators are automatically removed” [5].
    • The Select widget has three values that can be selected in the Method field.
      • Method Regex: Is the same as the basic interface. The difference is that you can control the application of the regular expressions by using the Ignore case (i), Unicode dependent (u), Multiline (m) and Dot matches all (s) checkboxes.
      • Method Sample: This method allows you to randomly select the segments send to output. You can either select to express the size of the sample in the number of segments (Count) either in percentage of input segments (Proportion).
      • Method Threshold: “This method consists of retaining from the input segmentation only the segments whose content (or annotation value for a given key) has a frequency in the segmentation that is comprised between given bounds”. The limits will be expressed in absolute frequencies (Min./Max. count) or in percentages (Min./Max. proportion (%)).
    • The Intersect widget allows selecting the Filter annotation key. That means that the segmentation will be filtered according to the content of the segments that the annotation key is referring.
  • Option section: Allows disabling the Copy Annotations checkbox which is checked by default. The Copy annotations checkbox copies every annotation of the input segmentation to the output segmentation. Select, Merge and Intersect widgets allow additionally enabling the Auto number with key field. Moreover Merge widget allows enabling the Sort segments and Merging duplicate segments fields.
  • Info section: info field informs you for the status of your data.
  • Send automatically checkbox: When the Send automatically checkbox is selected data are sent automatically to the output connection(s).

Table construction widgets

Theses widgets allow you to convert text into tables. In order to do that you have at your disposal five widgets:

  • count widget : counts items inputs segmentations and produces frequency tables
  • length widget : measures the length of items
  • Variety widget : quantifies the diversity of items
  • annotation widget : exploits the annotations associated with items
  • Context widget: allows building concordances and collocation lists.

Once the table is configured Convert widget takes the data table and emits Example tables that can be visualized using the Orange Data table widget or other widget of Orange canvas.

Example with one url

Figure 1: Complete scheme

In this example we will examine the technologies and the frequency that these technologies have been used, according to one of the students during the course Sciences et Technologies de l’Information et de la Communication I (STIC I), Master of Science in Learning and Teaching Technologies, University of Geneva at 2003.

During this course the students created a web page using the XML language that gathers all the exercises submitted for this course along with the associated technologies as well as exercises submitted for other courses of their master. We’ve selected to focus on one student for two primary reasons. Firstly we have the student’s agreement and secondly our purpose is to provide an example of the functionalities of Orange Textable tool and not an in-depth analysis of the problem in question.

We will create a concordance data table based on the student’s web page that associates the exercises submitted along with the technologies used for these exercises and we will measure the frequency of each technology for a given exercise.

By viewing the student page http://tecfaetu.unige.ch/etu-maltt/tetris/karanis0/ we can see that this page comports information about the student as well as the exercises that the student submitted for three courses. We are interested for the exercises that are part of the course Stic I.

Step 1

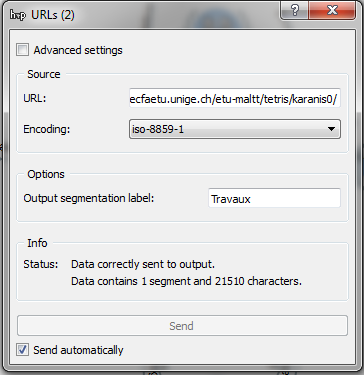
Firstly we have to import the url into Orange Textable. To do so, we will select the URLs widget and copy paste the above url into the URL field. Then we will specify the encoding as shown in the following picture.

Figure 2: Interface of the URLs widget

By using the display widget we can visualize the XML tags as well as the text enclosed in these tags. The tags that we are interested in are : “course” and “exercise”.

Step 2

Now we have to isolate the exercises that are part of the course Stic I. In order to do that firstly we have to extract the content of the “course” tag. We will use the Extract XML widget and we will type “course” in the XML element field as shown in the following picture.

Figure 3: Interface of the Extract XML widget

“Course” is the XML tag of our page that encloses all the associated information to a given course. As we can notice in the above picture we have created three segments. Each segment corresponds to the content of each course. In order to isolate the content of the course Stic, we link the Select widget to the Extract XML widget and type the regular expression shown in the following picture.

Figure 4: Interface of the Select widget

By doing this, we note that we’ve selected the whole segment that contains the string Stic and not just the specified string “Stic”. So far we have created two segments that correspond to the content related to the courses Stic I and Stic II. Finally we have to isolate each exercise of the course Stic I. To do so, we will segment the above segmentation by using the Extract XML widget and the tag “exercise”.

Figure 5: Interface of the Extract XML widget

Now we have 25 segments and each segment corresponds to an exercise of either the course Stic I or the course Stic II. To isolate the desired exercises we will use the Select widget six times and we will be specifying each time the string that refers to the desired segment, that is <exercise-number>1</exercise-number>, <exercise-number>2</exercise-number>, exercise-number>3</exercise-number> etc.

Figure 6: Interface of the Select widget

We note that at this point it is important to specify the label of our segment as it will allow us to distinguish them during the merging process that follows.

Step 3

Our next goal is to identify the technologies associated to theses exercises. So, firstly we need one segmentation consisting of the six segments that we’ve created in the previous step (2). To do so, we will merge these segments using the Merge widget. In the Merge widget window we leave the default options and check the box import labels with key. Now we will have one segment with one label that consists of all the segments of step 2 (all exercises for Stic I)

Figure 7: Interface of the Merge widget

Step 4

At this point we need to get rid of the urls included in the text, to avoid having double results in the case that the technology cited is also associated to a link including the name of the technology. To do so we will use the Record widget and the regular expression shown below.

Figure 7: Interface of the Record widget

Step 5

Now we are ready to identify the technologies cited in our segmentation, which are the six merged segments. For accomplishing that, we will use the Segment widget and we will specify the strings that we are searching for (technologies names) as well as the annotation value of each outcome segment.

Figure 9: Interface of the Segment widget

In order to specify the Regular Expressions (Regexes), we take the example of the css string. We select Tokenize Mode (t) and type \b(css)\b in the Regex field. Then, we type “type” in the Annotation key field and css in the Annotation value field. Finally we check the boxes Ignore case (i) and Unicode dependent (u). We note that the annotation key is important as we will use it in order to “call” these segments during the construction of the table.

Step 6

In order to count the technologies associated to the given exercises as well as the number of the times that each technology has been cited for a given exercise, we will use the Count widget. In the Units field we select annotation key: “type” (labels of the technologies). In the Contexts field we select Mode: Containing segmentation and Annotation key: component_labels (labels of the exercises) and click the “Compute” button as show in the following picture.

Figure 10: Interface of the Count widget

Step 7

Finally in order to visualize the result, that is the table that we have created we will use the Convert widget and the Data Table widget (from the Data window) and we will leave the default options.

Figure 11: Result

You can dowload the example by clicking here

Example with more urls

In this mini-research we study if the students of the course Jeux vidéos pédagogiques (VIP) focus more on the player of a game or on the game itself in their analysis of various games and how this focus changes over time.

For the purposes of our research we focus on the game analyses made by the students for the course VIP during the years 2012-2014. More specifically, we examine how many times in total the words “player” and “game” appear in the analysis of each year. Theses analysis can be found in edutechwiki in the following urls:

Analyses 2012: http://edutechwiki.unige.ch/fr/Cat%C3%A9gorie:Maltt_VIP_Stella

Analyses 2013: http://edutechwiki.unige.ch/fr/Cat%C3%A9gorie:Maltt_VIP_Tetris

Analyses 2014: http://edutechwiki.unige.ch/fr/Cat%C3%A9gorie:Maltt_VIP_Utopia

Step 1

Firstly, we import the urls into Orange Textable defying for each url the encoding, the annotation key and the annotation value. Note that the annotation value must correspond to the year that each analysis was written in order to later present our results by year. As soon as we import all the desired urls we define the output segmentation label.

Step 2

Furthermore, we clear our html pages from all the unwanted style and script tags along with their contents and all the remaining html tags in order to be left with the analysis in pure text so that we can study them easier. We do that using the Record widget and the regular expressions shown in the picture below.The regular expression <script [^>]*> [\s\S]*?</script> removes the script tags along with their contents whereas the regular expression <style [^>] *> [\s\S]*?</style> removes the style tags with their contents and finally the regular expression <.*?> removes the html tags.

Figure 1: Interface of the Record widget

Step 3

Once the texts are free of the unwanted elements, we search them for the two words that are of our interest. To do so, we use the Segment widget and the regular expressions shown below.

Figure 2: Interface of the Segment widget

Step 4 We then continue by counting how many times the words “player” and “play” are cited in the analysis of each year. We use the Count widget for doing so. In the Units field we select annotation key: “type” (labels of the words “player” and “play”). In the Contexts field we select Mode: Containing segmentation and Annotation key: years (labels of the urls) and we continue by clicking the “Compute” button as show in the following picture.

Figure 3: Interface of the Count widget

Step 5

Finally and in order to visualize the result, that is the table that we have created, we use the Convert widget and Data Table widget (from the Data window) leaving their default options.

Our final scheme is shown in the following picture

Figure 6: Complete scheme

Results

As we can see from the data table, the students of the first year we examine (2012) refer more to the word "game" than "player". At the second year (2013), the use of the word "game" is also more frequent than "player" but we can notice that the reference to the latter starts earning ground. As for the third year (2014), the use of the word "player" is greater than the use of the word "game". From this mini-research derives that over the years the tendency of students to refer more to the game than the player is changing in benefit of the latter.

Figure 4: Results

You can dowload the example by clicking here

Conclusion

Orange Textable allows its users to create data tables on the basis of text data through a flexible and intuitive interface. The quality of the results lies mostly on the segmentation and annotation processes effectuated by the user. The creation of the adequate segments and their annotation will ensure that the concordances and collocation lists as well as the computed quantitative indices (frequency measures, etc...) refer to the desired segments. At this point we have to stress that the segmentation process is highly dependent on regular expressions. For this reason, even if orange Textable is a tool that one can easily learn, good knowledge of regular expressions might be required.

References

Orange Textable Documentation Orange package dowload page