Flash arranging objects tutorial: Difference between revisions
m (→Snapping) |
mNo edit summary |
||
| Line 1: | Line 1: | ||
{{Incomplete}} | {{Incomplete}} | ||
{{Flash tutorial|CS3, (CS4, CS5, CS6)|beginner|}} | |||
<pageby nominor="false" comments="false"/> | <pageby nominor="false" comments="false"/> | ||
== Overview == | == Overview == | ||
| Line 10: | Line 10: | ||
:Learn to align, stack, combine, break objects in Flash CS3 | :Learn to align, stack, combine, break objects in Flash CS3 | ||
;Flash level | ;Flash level | ||
:CS3 | :CS3. However, principles are the same for CS4 to CS6 | ||
;Prerequisites: | ;Prerequisites: | ||
:[[Flash CS3 desktop tutorial]] | :[[Flash CS3 desktop tutorial]] | ||
Revision as of 16:45, 24 January 2013
<pageby nominor="false" comments="false"/>
Overview
- Learning goals
- Learn to align, stack, combine, break objects in Flash CS3
- Flash level
- CS3. However, principles are the same for CS4 to CS6
- Prerequisites
- Flash CS3 desktop tutorial
- Flash layers tutorial (first part)
- Flash drawing tutorial (at least some of it)
- Quality and level
- This text should technical people get going. It's probably not good enough for beginners, but may be used as handout in "hands-on" class. That is what Daniel K. Schneider made it for...
- It aims at beginners. More advanced features and tricks are not explained here.
Snapping
Snapping refers to a kind of assistance you may get for technical drawings. It helps to position an object with respect to the others and without using the Align Panel.
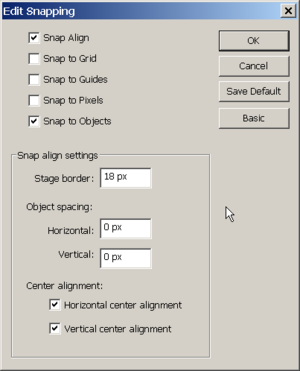
You can tune the desktop to various snapping modes
- Menu View->Snapping or right-click on the workspace
- Then turn on/off snapping modes or better click on Edit snapping
I usually just have these ones. (But more often I turn snapping off and then rather align objects with the align panel).
- Snap align
- Snap to objects
- Horizontal and Vertical Center alignment (will also allow to snap against centers of objects, otherwise you only can snap against sides)
- Snap to Objects
- Will snap an object you move against parts of an object. Move slowly...
- Snap Align (when snap objects is also on)
- Will snap to dotted lines that will appear
- Snap to Grid
- Works when you turn on the Grid with menu View->Grid
- Useful when you do technical drawings for instance.
- Snap to Guides
- Same principle as snap to grid. (View->Guides).
- Snap to Pixels
- For high precision work. Magnify the stage to at least 400%.
Object spacing does what its name says:
- Horizontal or vertical object spacing defines the snapping distance in relation to the edges of other objects
- Note: By default, an object snaps to center of a line ! E.g. if distance is 0px and your lines are 5px wide, your objects will overlap.
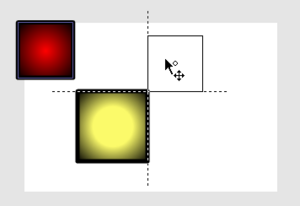
Disclaimer: I am not sure what certain combinations do. Here is for example what happens if you drag the red rectangle close to the yellow one in snap align / snap objects mode with zero object spacing:
Aligning objects
To align objects on the stage, there exist three solutions:
- Use the align panel (Open it with Window->Align or CTRL-K and dock it next to the Colors panel
- Use menu Modify->Align
- Use the shortcuts (see Flash CS3 keyboard shortcuts)
With the align panel, you can align, distribute or resize a series of selected objects.
There are two fundamental modes:
- Align/distribute referring to the stage. I.e. you may want to align a picture in the center of the stage.
- Align one or several objects with the first selected, or distribute among the first two selected objects.
The align panel (with "to stage" option unticked):
To see what each icon does, move your mouse cursor over it. The align panel icons convey the following kind of message:
- The line represents the border against which alignment or distribution will be made (left, right, middle, top, bottom, etc.)
- The dark and the white rectangle represent the selected objects
Match size will change the size (either width, height or both) of smaller objects with a larger object. Space works a bit like distribute.
Aligning objects in several frames
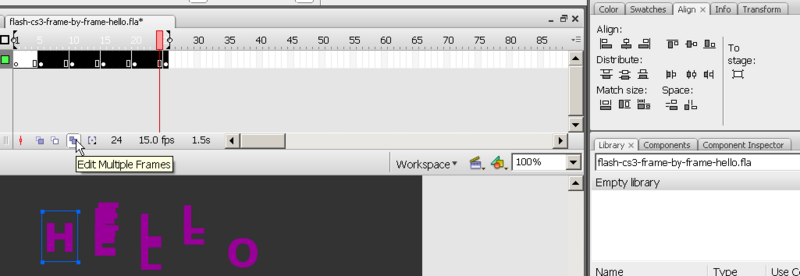
You also may align objects in several frames. For example, to align letters in all frames: Click on the Edit multiple frames button in the bar below the timeline.
- Then, you can select the frames you want to edit together by moving the "[" "]" sliders on top of the timeline
- Then select groups of objects you want to align (e.g. different letter groups in our case), then use the align pane (Window->Align), but untick To stage (!)
This tool is quite dangerous, since it is hard to control what happens in each frame. Make sure to save your file before you engage in this ! Also, when you are done, untick the Edit multiple frames button.
Stacking
When you draw a new object it is drawn on top of the others.
You can move forward or backwards any selected object(s)
- Use the right-click->Arrange menu or:
- CTRL+Up Arrow - Move Ahead
- CTRL+Down Arrow - Move Behind
Grouping
Turning shapes into objects
To combine several shapes into an object:
- Menu Modify->Combine Objects->Union
To break apart an object:
- Menu Modify->Break Apart or Right-click->Break Apart or CTRL-B
Tip: This operation is not innocent, i.e. it creates a new single editable object. If you just want to group vector graphics into a composite object use "grouping" (see below).
Creating a new object from others
Menu Modify->Combine Objects lets you combine objects in several ways:
- Union as above: It will create a new object and respect the stacking (i.e. as you see it on the stage)
- Intersect will only the take the common area
- etc ...
To break apart an object:
- Menu Modify->Break Apart or Right-click->Break Apart or CTRL-B
- The result will be shapes, not the original objects.
Grouping Objects
Use this feature, if you plan to re-edit hierarchies of grouped objects as you may have in complex drawings. To group several objects:
- Select the objects you want to group.
- Hit CTRL-g or menu Modify->Group
To ungroup an object
- Select it
- Hit CTRL-SHIFT-g or menu Modify->UnGroup
Note: Flash will allow you to animate grouped objects in a motion tween, but it will create tweening objects in the library (like it does for simple, editable objects). You can't ungroup these anymore, except by breaking them apart. I suggest alwaysusing movie clip symbols for motion animation! Tween objects are bad (at this stage).
Grouping Objects into a symbol
- Select several objects
- Right-click->Convert to Symbol or hit F8
Then you have to select the type:
- "Graphic" means a graphic (i.e. an named group of objects)
- "Button" will create a button symbol (you then can fine tune the button frames)
- "Movie Clip" will allow you to use the object for motion animation
All these symbols can later be edited (double click in the library or the stage to land in symbol editing mode).
Tips:
- Use movie clips, unless you have a reason to do otherwise. A movie clip is really not the same kind of object as button for example.
- Always give your symbols a meaningful name !
Conclusion / more
- If you draw a lot, you may want to print the list of Flash CS3 keyboard shortcuts
- At some point you also should learn about the various kinds of objects you can have in a *.fla file. They all have different purposes, e.g. various kinds of tweens only work on certain kinds of objects. See the Flash formats and objects overview.
There is more stuff in the Modify Menu, but that's its enough for now ... :)


