Felix TEC-4.1 3D printer
Introduction

The Felix TEC4.1 is a 3D printer made by FELIXprinters and that started shipping in 2018. It features semi-automatec calibration of the print bed, an optional dual head, etc. and strong, reliable steel extruders. This article shortly describes some of my experience and (if I find some time in the future) some tips. Since 3D printing is now main stream we will refrain from explaining basic use.
This model is an evolution of the Felix 1.0 3D printer we bought in 2010, the Felix 2.0 3D printer we got in 2013 and the Felix 3.0 we did not buy. Make magazine rated the older 3.1 model in fourth position in 2018. The TEC 4 is better. This makes it probably the best (non back breaking) easily portable 3D printer. Since it also is reliable (I did 15h prints on the Felix 2.0) and since it is a fairly simple (inspectable) design, I recommend this model line for teachers who will have to carry the printer from one spot to another and yet care for quality printing.
- Daniel K. Schneider 26 nov 2018
See also:
- RapMan (our first 3D printer assembled in Jan 2010, not used any more, but no modern printer will beat its look)
- Fabbster 3D printer (given away)
- Felix 1.0 3D printer (bought in 2012 and still working)
- Felix 2.0 3D printer (bought in 2013, given away, still working)
- Felix Pro 1 3D printer (bought in 2015)
Further information from the manufacturer:
- Downloads for FELIX Tec 4 (Manuals, Tips, Printables, Firmware, etc.)
Technical specifications
- Layer resolution
- Minimum layer height: 0.05 mm,
- Maximum layer height: 0.25 mm (with a standard nozzle)
- Extruder / nozzles
- Single (Dual hot ends on option)
- 0.35mm (0.25, 0.5mm, 0,7mm options) nozzles
- Max 275 C
- Print volume
- 255 x 205 x 225mm
- Print bed
- Kapton coated.
- heated, up to 90 C ?
- Detachable and flexible (quick removal of prints !)
- Semi-Automatic calibration (For leveling, a Z-Sensor will probe and then tell which of the two buttons to turn and how much. For z-probe, this is done through the control)
- Dimensions and weight
- 10kg
- 410 X 450 X 520 mm
- Print materials
- Many (PLA, TPE, ABS, PVA, Wood, Glass, PET(G)
- Software
- In principle, one could use any controller/slicer software. As of Nov 2018 there are profiles for the following controller/slicer software: Repetierhost (Cura), Simplify3D (commercial). Repetierhost is configured and distributed through Felix.
- Connectivity
- USB Cable (I prefer that, since I can more easily control the printer during printing. I also find filament changes easier to do through Repetierhost)
- SD Card (practical for students)
- Recommended spare parts (recommended if you buy the machine with institutional investment money)
- Full metal hotend (includes heater and thermistor cables)
- 0.5 nozzle (however switching the hotend or just the nozzle requires some work)
- Flexible build plate (this only buys the metal, you also need a Kapton sheet)
- Kapton sheets (stickers)
- 1 spare nozzle
- 1 spare barrel
- 1 Heater cable + 1 thermistor cable
- Cleaning drills
Notice: Removing the nozzle can kill the hot end. You must (1) do this while the barrel is still hot enough (> 60 degs for PLA) and (2) take a grip on the barrel and not the hotend (!) while you turn the nozzle. Same for the barrel. Do remove the barrel while the hotend is hot. Otherwise you risk turning the little tube that connects the hotend to the barrel. Personnally, I rather buy a new hotend than trying to remove anything.
Unpacking, assembly, configuration, calibration
Unboxing
The box arrived in good shape and unboxing is easy and fast. It was ordered on Tuesday Nov 20 and arrived in my office on Monday morning, Nov 26, 2018.
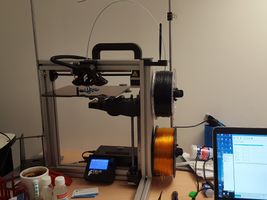
- Unboxing and readying the Felix TEC 4.1

Box
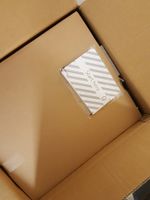
Opened Box, with instructions.
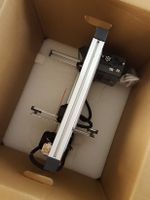
Top removed
Top that included all spares, cables, extra spares, and three rolls
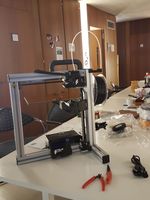
Assembled


Assembly
I takes about 15 minutes to unpack and assemble the printer.
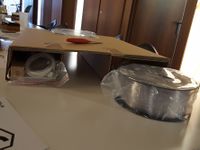
- 5 plastic strips that hold elements in position have to be cut
- the handle on top has to be fixed
- filament guide has to be clipped on the frame
- filament holders (optional) have to be clipped and positioned
- The magnetic flexible build plate has to be put in the right position on top of the platform
PC Configuration
Download Repetierhost as distributed by Felix. The installation also will propose to install a serial driver.
However, I prefer using the commercial Simplify3D program, for which you also could download profiles at FelixPrinters. The problem with the built-in Cura slicer (or at least the version that is there) that one cannot built correct Lego walls. In order to a lego (or similar) structure right, one must provide wrong dimensions. Otherwise the Repetierhost/Cura combo works great.
Calibration
The printer is shipped with a 23 pages quick start guide. It includes
- 8 pages of specifications, basics, part list, unboxing, handle fixing, etc.
- The calibration routine for a single head printer takes two pages. I carefully read these, since this a new feature for me.
Calibrating means two things: (1) All spots of the build plate have to have the same distance to the print head (i.e. it must be strictly orthogonal with respect to the X/Y movements). (2) The print bed should be a the right distance from the nozzle, i.e. the thickness of a business card or 2 sheets of paper. The first is done by semi-automatic hardware calibration, the second by software, i.e. in the printer's parameters. The printer might have just worked out of the box but I did not try that...
(1) Platform leveling
- The build platform must be leveled.
- In the display unit, select Control->Level Build PLT.
- the printer will start measuring the angle of the build platform, which will move
- Turn front or rear wheel left or right X degrees as displayed, then test again. Repeat until "OK" appears
(2) Z-Probe calibrating
Calibrating the Z-Probe, i.e. adjusting the right z height is done via software (i.e. the printer will remember). Here are my slightly modified tips, since the instructions are a little less clear.
- Put a large sheet of thick paper (120g) or two sheets of ordinary printer paper on the platform.
- Click Control->Calibrate Z-Probe
- Now if your paper is stuck on the platform, i.e you cannot remove move the paper, turn the wheel right to lower the platform
- If you wish you now can insert the Felix calibration card
- Then turn the wheel left to rise the platform until there is a good amount of friction, i.e. you can still pull the card away without damaging it (I prefer the first layer to be very close).
In addition, you can adjust Z-distance of the first layer in the script section of your slicer, e.g. I often add at the end of the code something like a 20th of a mm (0.05mm), do not insert the leading "0" !
G1 Z-.05 F3000
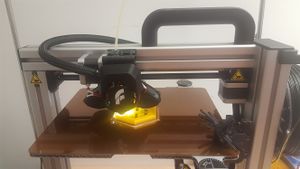
First prints
There was no failed print nor any trial with the Felix logo that ships with RepetierHost. I used Repetierhost 2.05 for FELIXprinters, freshly downloaded after uninstalling an old version.
- First print was a spinning top with special (strong) using Felix Premium PLA and default slicer values. After the print, I re-calibrated the Z-Probe as described above since the the first surface layer was not squashed enough. I used the Felix calibration card, but with a good amount of friction. I also may increase flow rate a bit and printer with a slightly higher temperature... more about this later when I find time to print more complex objects.
- Second print was a Beekee box with PETG from Felix. I raised default temperature a bit to 220 degrees and slowed down first layer speeds a bit.
- First two prints
First print, a simple spinning flower top I designed.
Second print, Beekeebox, designed by a TECFA team, led by Vincent Widmer (PhD student).
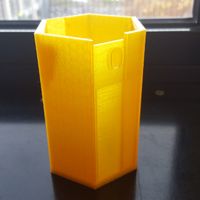
Second print, Beekeebox printed.


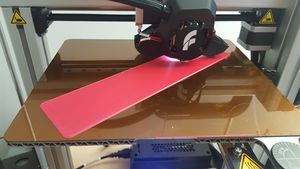
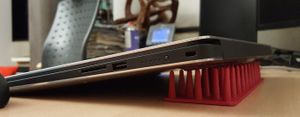
For the third print I printed a large variant of our customizable Custom laptop cooler stand, i.e. a 250 X 60mm version which I had to place diagonally on the print bed. Soft PLA is definitely not the best flexible filament, but it's cheap and the print came out fine enough.
- Third print
Print in progress
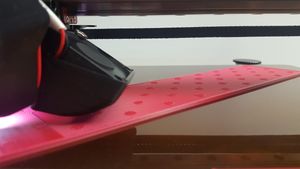
Print in progress, just before the spikes
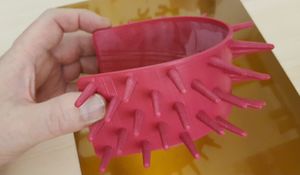
Printed & flexible
Print in progress, just before the spikes


Summary of three first prints: like the Pro 1, the FELIX TEC4.1 seems to be able to cope fine with a variety of non-warping plastics. A heated print bed with a Kapton sheet remains one of the best solutions in our opinion since Kapton bonds well with PLA, PETG and soft PLA. It also works well with ABS pieces designed for printing in the open, e.g. smaller objects and/or with holes that reduce tension. Since the print sheet can be easily removed and be bent, it also makes it easier to remove sticky prints.
Summary
Unboxing, readying, and calibrating was easy and the first prints went well. I really do like the new flexible platform. It can be removed and put back easily.
I probably will like this printer better than the Felix Pro 1 3D printer since it seems to be more robust. The Pro1 does have a sensitive Z sensor that can require hardware calibration work once it experienced stress (see next item). Since semi-automated calibration is easy I don't need fully automatic calibration, although it is a nice feature.
- Printing with a single print head is easier. My Pro2 does have a second print head. This is interesting for printing with different plastics for support, but a second print head can become a problem spot when printing large horizontal structures that may have slicer mistakes. E.g. I did managed to get the print heads ripped off with a vulcano for example. I therefore order this printer without second print head.
- On the negative side, removing the hotend is not as easy as with the Pro 1. Swapping hotends is interesting when you print with different nozzle sizes, e.g. plastic with particles inside (wood, stone, fibers, etc.) prints better with a 0.5mm nozzle.
Since I first wrote this review a did print many other objects, e.g. marble runs, terrain models, embedded rings. Compared to the Pro2, the print quality seems to be slightly less good with respect to smoothness and evenness of the walls. Print aborts still can happen, they do on any printer I have met. I suggest adding skirts or use glue for objects that have small foot prints (e.g. a set of Lego compatibles). Creating fatter and squashed first layer also helps a lot in these cases. In any case, I would recommend the Tec4 model for education, since it is cheaper and very easy to carry.
Slicer settings
The default slicer settings defined in the Felix Repetierhost distribution can be trusted for typical prints as far as we can tell. That being said, adjustments have to made for some types of objects and more importantly, for other filament types and makes. Below, we will write down some parameters used for some more difficult objects.
Felix Premium PLA
This filament is based on Ingeo 3D850 (PDF) from Natureworks and features faster crystallization rates and improved heat resistance.
Print temperature = 205 (or less). According to the manual printing with 210 degs can be risky. Quote (p.14) "The top part of the hot-end will become near the critical 60°C where the filament becomes too soft, too soon and causing a clog."
Base print speed = 60mm/s
Cheap PLA
Cheap no-name "best value" PLA, prints very well between 195 and 200 degrees.
Felix PETG
PETG is a combination of PET (polyethylene terephthalate) aka polyester and different concentrations of glycol (G). PETG is a strong filament similar to ABS in strength, but it prints more like PLA.
Print temperature = 220
First layer speed = 20
Soft PLA
Bought from Printerstore (49.50 CH / kg ~ 45 Euros ). Compared to NinjaFlex this is rather cheap.
The following settings were use for a large, 25cm x 6cm Custom laptop cooler stand.
- Temperature = 225 (220 to 230 should be OK)
- Bed temperature = 40 (0 also should work, since soft plastic usually sticks very well to Kapton)
- Flow (extrusion multiplier) = 95%
- First layer speed = 20 mm/s = 1200 / min (or less !)
- Base print speed = 40 mm/s = 2400 / min
- Perimeters speed = 30 mm/s
- Layer thickness = 0.2mm or 2.5mm (lower is maybe not recommended since this plastic does not flow that well.)
- retraction = half oz typical PLA values or (better) 0
- Z calibration. since this plastic sticks really well keep the "official" distance of the hot end. Plastic must be able to flow freely !
Tips:
- To remove a soft PLA print, spray some alcohol along the edges and wiggle the platform so that it can enter underneath.
- One might use a 0.5mm nozzle for printing soft plastics to speed up the printing, but for now I didn't want to exchange the hot end.
- If the print dries up: augment temperature (ie. 230), add 10% flow, reduce fan to 50%, reduce retraction. Also check infill parameters. "None2 show work fine. "Low" may be a problem with large structures, since the walls are thin and may "dry" up the nozzle because adherence is lacking. If so, try setting infill extrusion width to 133% and slow down speed. Use a simple grid pattern. High infill should work fine, but the object may not be flexible enough.
- No or little plastic in the first layer: You may to re-calibrate z (or make a change in the startup script). Make sure that the plastic can flow in the first layer. Distance between hotend and printbed should be a least a credit card.
Links
- Official
- FELIX Printers (Netherlands)
- FELIX Printers @ Facebook
- FELIX Printers on Twitter
- FELIX Printers on LinkedIn
- FELIX USA (I don't know if this is just a franchise)