InkStitch - lettering: Difference between revisions
| (2 intermediate revisions by one other user not shown) | |||
| Line 24: | Line 24: | ||
In addition, InkStitch allows - like a professional embroidery program - creating letters from SVG fonts. See the next two articles, i.e. [[InkStitch - design letters]] and [[InkStitch - Geneva-simple typefaces]] | In addition, InkStitch allows - like a professional embroidery program - creating letters from SVG fonts. See the next two articles, i.e. [[InkStitch - design letters]] and [[InkStitch - Geneva-simple typefaces]] | ||
See also the [[InkStitch - embroidery patch]] tutorial. It explains how to create rounded text from either simple text with fills or from digitized fonts as described here. | |||
== The lettering module == | == The lettering module == | ||
For Ink/Stitch 1.25 (Mai 2019) | For Ink/Stitch 1.25 (Mai 2019). Version 1.26 allows selecting from several fonts now and also transform the size (i.e. instructions below need some updating) | ||
=== To create letters === | === To create letters === | ||
| Line 51: | Line 53: | ||
=== Manipulate letters === | === Manipulate letters === | ||
Since the generated letters are just ordinary SVG objects with Ink/Stitch satin stitch annotations, you can do anything you like with these objects. E.g. manipulate individual letters by making them fatter or having them follow a curve. | Since the generated letters are just ordinary SVG objects with Ink/Stitch satin stitch annotations, you can do anything you like with these objects. E.g. manipulate individual letters by making them fatter or having them follow a curve. To do this, please have a look on the [[InkStitch - embroidery patch]] (section 4). | ||
Latest revision as of 21:02, 2 October 2019
Introduction
Lettering is probably the most popular stitching activity for beginning home users. As of Spring 2019, Ink/Stich does include a simple digitized font available under lettering in the Ink/Stich menu.
Most embroidery machines do include some lettering facilities and all serious embroidery packages include a lettering module. As of Spring 2019, there is only one included lettering font, but that should change in the future.
In addition, InkStitch allows - like a professional embroidery program - creating letters from SVG fonts. See the next two articles, i.e. InkStitch - design letters and InkStitch - Geneva-simple typefaces
See also the InkStitch - embroidery patch tutorial. It explains how to create rounded text from either simple text with fills or from digitized fonts as described here.
The lettering module
For Ink/Stitch 1.25 (Mai 2019). Version 1.26 allows selecting from several fonts now and also transform the size (i.e. instructions below need some updating)
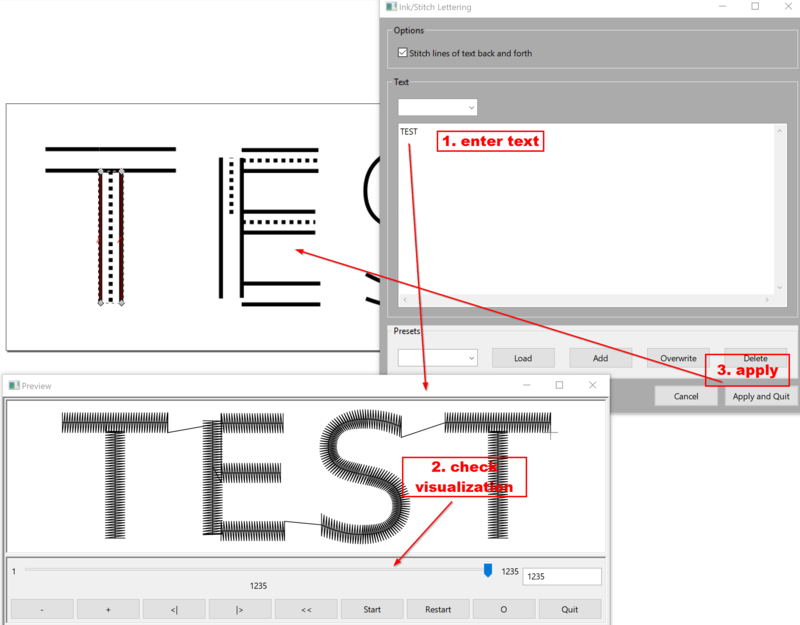
To create letters
- Menu Extensions -> Ink/Stitch -> Lettering
- Type your text in the popup menu
- Apply and Quit
You now can see a group of letters. Each letter is also a group. Open Menu Objects -> Objects to check this.
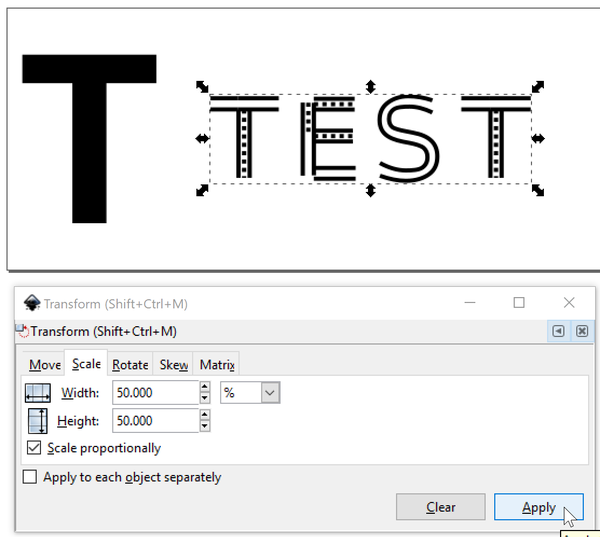
Adjusting letter size
By default, the letters produced are rather big, i.e. a capital letter is about 20mm high (font size 79pt bold). You can probably safely scale this down by 50%, e.g. use a letter size of 10mm.
- Menu Object->Transform
- Scale tab
- Tick Scale proportionally
- Scale to 50%
Manipulate letters
Since the generated letters are just ordinary SVG objects with Ink/Stitch satin stitch annotations, you can do anything you like with these objects. E.g. manipulate individual letters by making them fatter or having them follow a curve. To do this, please have a look on the InkStitch - embroidery patch (section 4).

