InkStitch - embroidery logos: Difference between revisions
m (→Result) |
|||
| (3 intermediate revisions by the same user not shown) | |||
| Line 30: | Line 30: | ||
=== Transform the SVG into a file with many paths === | === Transform the SVG into a file with many paths === | ||
The SVG file is composed of a few complex path that cannot be stitched as is. Each petal and each letter should become a path. | The SVG file is composed of a few complex path that cannot be stitched as is. Each petal and each letter should become a path. Petals are not really separated by space, but someone painted some white lines on top. We either could stitch these or (as we do here) remove them. | ||
[[File:Mediawiki-logo-1.png|thumb|600px|none|Structure of the initial SVG file]] | [[File:Mediawiki-logo-1.png|thumb|600px|none|Structure of the initial SVG file]] | ||
| Line 38: | Line 38: | ||
'''Create a single path for the flower''' | '''Create a single path for the flower''' | ||
In the original, the flower is composed of single path that defines the yellow and 25 little white stripes that separate visually the petals. Now let use separate the petals for real. We | In the original, the flower is composed of single path that defines the yellow and 25 little white stripes that separate visually the petals. Now let use separate the petals for real. We shall do that by subtracting the white traits from the yellow sunflower outline. | ||
* Open the objects panel. | * Open the objects panel. | ||
* Select all the white little stripes (inside the group Inline stripes) | * Select all the white little stripes (inside the group Inline stripes) | ||
* Make the strokes a bit fatter, e.g. 1.5mm | * Make the strokes a bit fatter, e.g. 1.5mm | ||
* Transform the strokes to | * Transform the (still selected) strokes to paths (Menu path:Stroke to path). | ||
* Merge all | * Merge all these new "stripe" paths into a single path (CTRL-K) | ||
* SHIFT-Select the yellow flower (Tournesol_1_), followed by the new combined | * SHIFT-Select the yellow flower (Tournesol_1_), followed by the new combined "stripes" path | ||
* Menu Path -> Difference. | * Menu Path -> Difference. | ||
* Fix the petals with the Node Editor (optional, I did not) | * Fix the petals with the Node Editor (optional, I did not) | ||
'''Fix the center''', i.e. keep the circle but remove the yellow behind | You now should only have a yellow flower left, the stripes should be gone. If not, repeat the above. | ||
'''Fix the center of the flower''', i.e. keep the circle but remove the yellow behind | |||
* Select the center circle | * Select the center circle | ||
* Transform it to a path (Menu Path -> Object ot Path) | * Transform it to a path (Menu Path -> Object ot Path) | ||
* Copy/paste in place | * Copy/paste in place. You now have two objects | ||
* CTRL-select Flower and the new center drawing | * CTRL-select Flower and the new center drawing | ||
* Menu Path -> Difference | * Menu Path -> Difference | ||
You now removed overlap of the circle in the center with the | You now removed the overlap of the circle in the center with the flower petal behind, i.e. you created a big hole in the yellow drawing | ||
'''Remove some junk left by Illustrator and use cleanup procedures''' | '''Remove some junk left by Illustrator and use cleanup procedures''' | ||
| Line 70: | Line 72: | ||
* Select Mediawiki text | * Select Mediawiki text | ||
* Path -> Break Apart | * Path -> Break Apart | ||
* Fix the "D" letter (SHIFT select outside, then inside. Then make a difference as above) | * Fix the "D" letter (SHIFT select outside, then the inside. Then make a difference as above) | ||
* Fix the "A" letter | * Fix the "A" letter | ||
| Line 80: | Line 82: | ||
* Select all | * Select all | ||
* Menu Extensions -> Embroidery - Params | * Menu Extensions -> Embroidery - Params | ||
* Select Autofill with an | * Select Autofill with an underlay | ||
=== Result === | === Result === | ||
(simulated) | (simulated) | ||
To stitch the following, Ink/Stitch v. 1.90 (or higher) is required in order to produce a machine embroidery file. Older versions may crash - 18:04, 18 June 2018 (CEST) | |||
{| | {| | ||
| [[file:MediaWiki_logo_reworked_5.svg|300px|thumb|none|SVG Version for download]] | | [[file:MediaWiki_logo_reworked_5.svg|300px|thumb|none|Stitchable SVG Version for download]] | ||
| [[file:MediaWiki_logo_reworked_5.jpg|300px|thumb|none|Simulation]] | | [[file:MediaWiki_logo_reworked_5.jpg|300px|thumb|none|Simulation]] | ||
|} | |} | ||
Revision as of 18:05, 18 June 2018
Introduction
Creating professional logos is probably fairly difficult. However, you can fairly easily create a logo if the original drawing or picture is not too complicated.
Mediawiki Logo
We suggest that you support your favorite open source projects by stitching their logo on your cloth and bags. A good start would be Mediawiki, i.e. the software that runs Wikipedia and this wiki.
Get the original logo or take it from here:
Before it can be stitched, this logo needs some work. In addition, overlaps must be removed.
Transform the SVG into a file with many paths
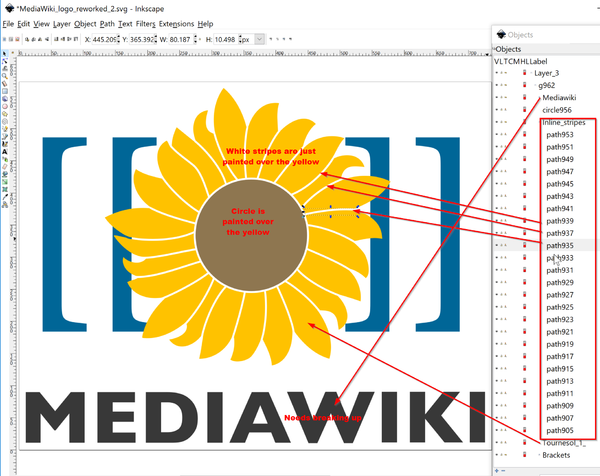
The SVG file is composed of a few complex path that cannot be stitched as is. Each petal and each letter should become a path. Petals are not really separated by space, but someone painted some white lines on top. We either could stitch these or (as we do here) remove them.
- Select all and ungroup once
Create a single path for the flower
In the original, the flower is composed of single path that defines the yellow and 25 little white stripes that separate visually the petals. Now let use separate the petals for real. We shall do that by subtracting the white traits from the yellow sunflower outline.
- Open the objects panel.
- Select all the white little stripes (inside the group Inline stripes)
- Make the strokes a bit fatter, e.g. 1.5mm
- Transform the (still selected) strokes to paths (Menu path:Stroke to path).
- Merge all these new "stripe" paths into a single path (CTRL-K)
- SHIFT-Select the yellow flower (Tournesol_1_), followed by the new combined "stripes" path
- Menu Path -> Difference.
- Fix the petals with the Node Editor (optional, I did not)
You now should only have a yellow flower left, the stripes should be gone. If not, repeat the above.
Fix the center of the flower, i.e. keep the circle but remove the yellow behind
- Select the center circle
- Transform it to a path (Menu Path -> Object ot Path)
- Copy/paste in place. You now have two objects
- CTRL-select Flower and the new center drawing
- Menu Path -> Difference
You now removed the overlap of the circle in the center with the flower petal behind, i.e. you created a big hole in the yellow drawing
Remove some junk left by Illustrator and use cleanup procedures
- Open the XML editor
- Kill the metadata section (use the little "remove node" icon on top)
- Now Select All and Ungroup
- File -> Cleanup
- File -> Save as optimized SVG
Break apart the tournesol
The current drawing cannot be stitched yet because both the flower and the lettering are very complicated paths that should be broken up into simpler ones.
- Select tournesol
- Path -> Break Apart
- Select Mediawiki text
- Path -> Break Apart
- Fix the "D" letter (SHIFT select outside, then the inside. Then make a difference as above)
- Fix the "A" letter
Put everything into a layer
- Create a new layer
- Select all and move to new layer
Parametrize
- Select all
- Menu Extensions -> Embroidery - Params
- Select Autofill with an underlay
Result
(simulated)
To stitch the following, Ink/Stitch v. 1.90 (or higher) is required in order to produce a machine embroidery file. Older versions may crash - 18:04, 18 June 2018 (CEST)


